

Backyard Pizza Oven DIY: Build It Right from the Ground Up
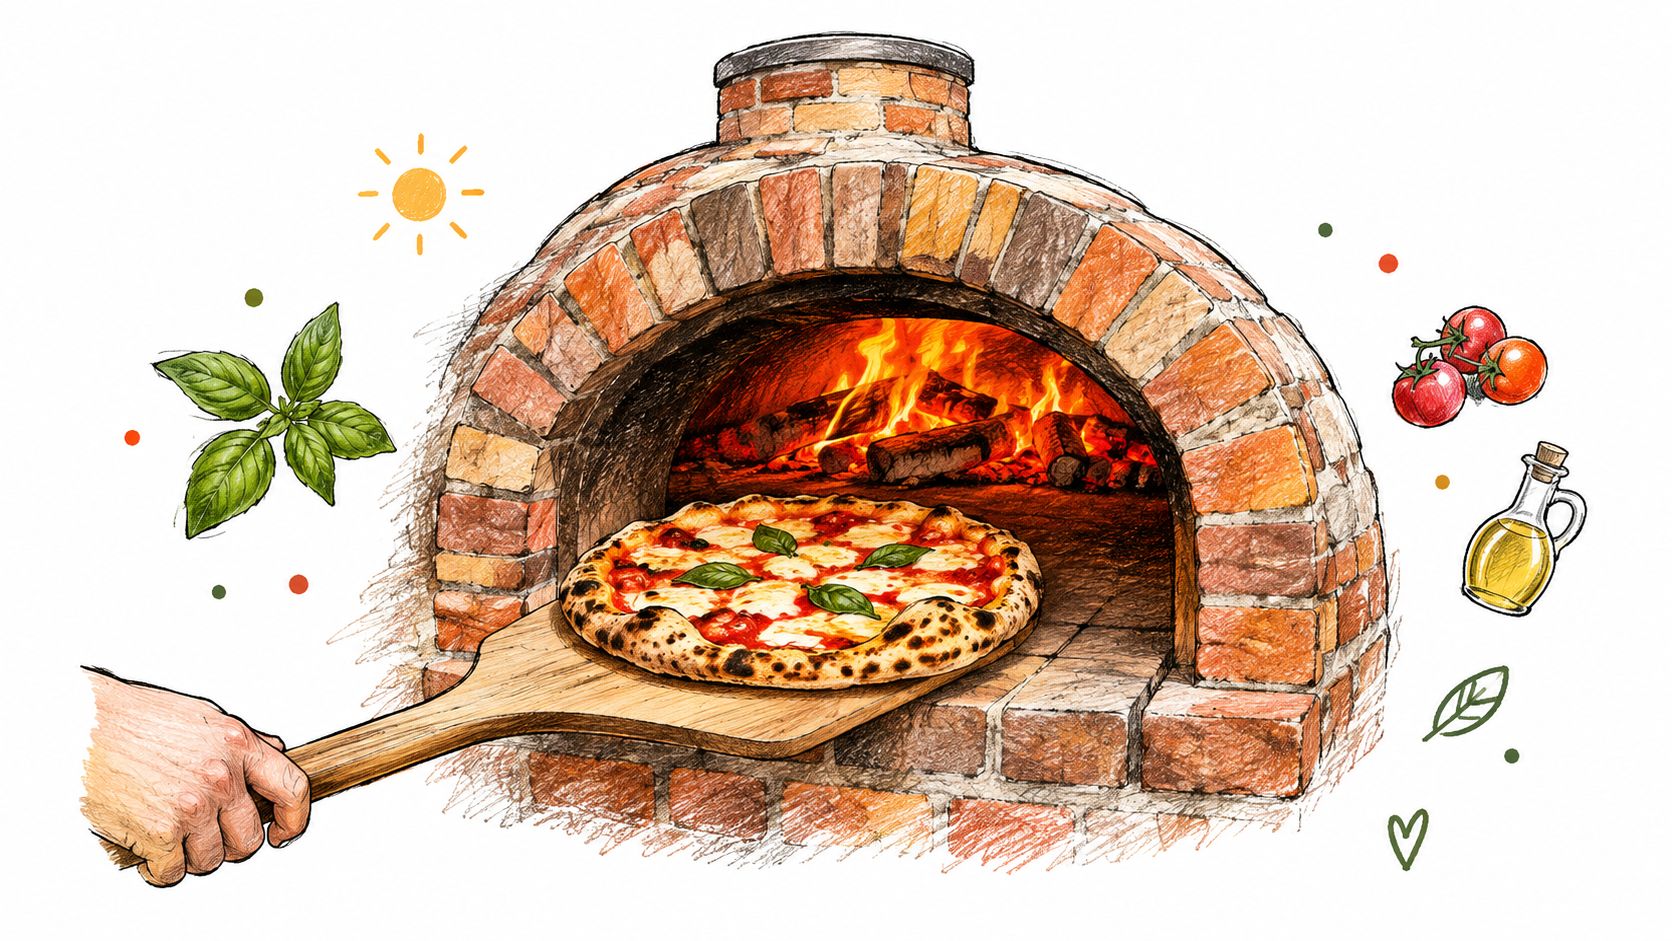
The fire has settled into a bed of glowing embers. You slide a Margherita across the pale firebrick, turn it once with the peel, and watch the cornicione swell and blister. For a moment, the project feels exactly as promised.
Then you remember the work behind that first bake: excavation, concrete, refractory mortar, insulation, drying time, curing fires, weather delays, and the very real possibility of cracking the dome by rushing it. Backyard pizza oven DIY is rewarding, but a permanent masonry oven is a small construction project, not a Saturday craft.
The category itself has moved well beyond hobbyist experimentation. One market estimate places outdoor pizza ovens at about USD 535.71 million in 2024, with a projected 5.01% compound annual growth rate from 2024 to 2033 (market estimate and forecast). That demand reflects a simple shift: people are willing to invest in outdoor cooking infrastructure, not just buy a novelty appliance for one summer.
Table of Contents
- Why a Backyard Pizza Oven DIY Project Is More Than a Weekend
- Site Prep, Permits, and the Foundation That Holds Everything
- Building the Hearth, Dome, and Arch That Actually Cook Pizza
- Insulation, Vent, and the Finishing Layer That Locks In Heat
- Curing, First Firing, and the Mistakes First-Time Builders Make
- Real Costs, Build Time, and the Smarter Shortcuts Worth Knowing
- Your Decision Checklist Before You Pour a Single Bag of Concrete
Why a Backyard Pizza Oven DIY Project Is More Than a Weekend
The first serious decision isn't which brick to buy. It's whether you want the calendar that comes with a permanent oven.
A fixed dome usually moves through a sequence of site preparation, foundation work, hearth construction, dome building, insulation, weatherproofing, and curing. Concrete and refractory materials need time to dry and stabilize. A newly built oven also needs progressive curing before it sees full heat. Independent guidance describes a functional wood-fired oven as requiring 5 to 7 days of progressive curing, so the project is better treated as a multi-week commitment than a quick weekend build (DIY oven cost, time, and curing guidance).
The first fire is where rushed builds reveal themselves. A cold, damp dome pushed immediately toward pizza temperature can develop cracks as trapped moisture expands and the masonry heats unevenly. The oven may still cook, but damage around the arch, floor, or dome can become difficult to repair once the finish layer is in place.
Choose the oven you can actually finish
| Build type | Skill level | Material cost | Heat retention | Appearance and lifespan |
|---|---|---|---|---|
| Pompeii-style firebrick dome | Advanced masonry | Highest of the three | Excellent when insulated correctly | Traditional appearance and durable service life |
| Cob or earthen oven | Beginner to intermediate | Lowest material burden | Strong thermal performance when thick and dry | Sculptural, but needs weather protection and periodic resealing |
| Barrel or metal-drum retrofit | Beginner to intermediate, with fabrication needs | Moderate | Faster response, lower retention | Practical and quick, but less refined and more fuel-hungry |
A firebrick dome is the choice for someone who wants repeatable high-heat pizza, long heat retention, and a structure that can become part of the yard. It demands accurate layout, good refractory materials, a stable base, and patience with curing.
A cob oven is more forgiving during construction. You can shape the form by hand and avoid much of the precision brick cutting, but the outer shell needs protection from rain and freeze-thaw cycles. Cob makes sense for occasional cooking, a sheltered climate, or a builder who values the process and atmosphere as much as fast recovery between pizzas.
A barrel oven or metal retrofit gets you cooking sooner. It can be a sensible experiment when you're unsure whether live-fire cooking will become a regular habit. The trade-off is thinner thermal mass, more active fire management, and weaker heat retention after the initial bake.
Modern backyard pizza ovens now combine both traditions. Traditional designs remain rooted in brick, stone, and refractory construction, while the portable format expanded after Ooni launched what it describes as the first portable pellet pizza oven in 2012 (historical coverage of pizza ovens and Ooni's launch).
Builder's rule: If you only want pizza occasionally, don't build the most permanent oven available. If you want to cook every week and use retained heat for bread or roasting, don't underbuild the thermal system.
Before buying materials, answer three questions. How often will you cook? Does your climate expose the oven to heavy rain or freezing conditions? Do you care more about high-performance pizza or the satisfaction of shaping an outdoor hearth by hand?
Most first-time builders overestimate their commitment and choose cob because it looks accessible. That can be a good choice, but only when the weather protection and maintenance fit your site. If you want the cleanest path to repeated high-temperature baking, build the insulated firebrick dome. If you want to test the habit, start with a barrel retrofit or a stone or steel setup on a grill.
Site Prep, Permits, and the Foundation That Holds Everything
A dome can't compensate for a poor site. Before mixing mortar, inspect the ground, the drainage, the overhead clearance, and the way smoke will move through the yard.
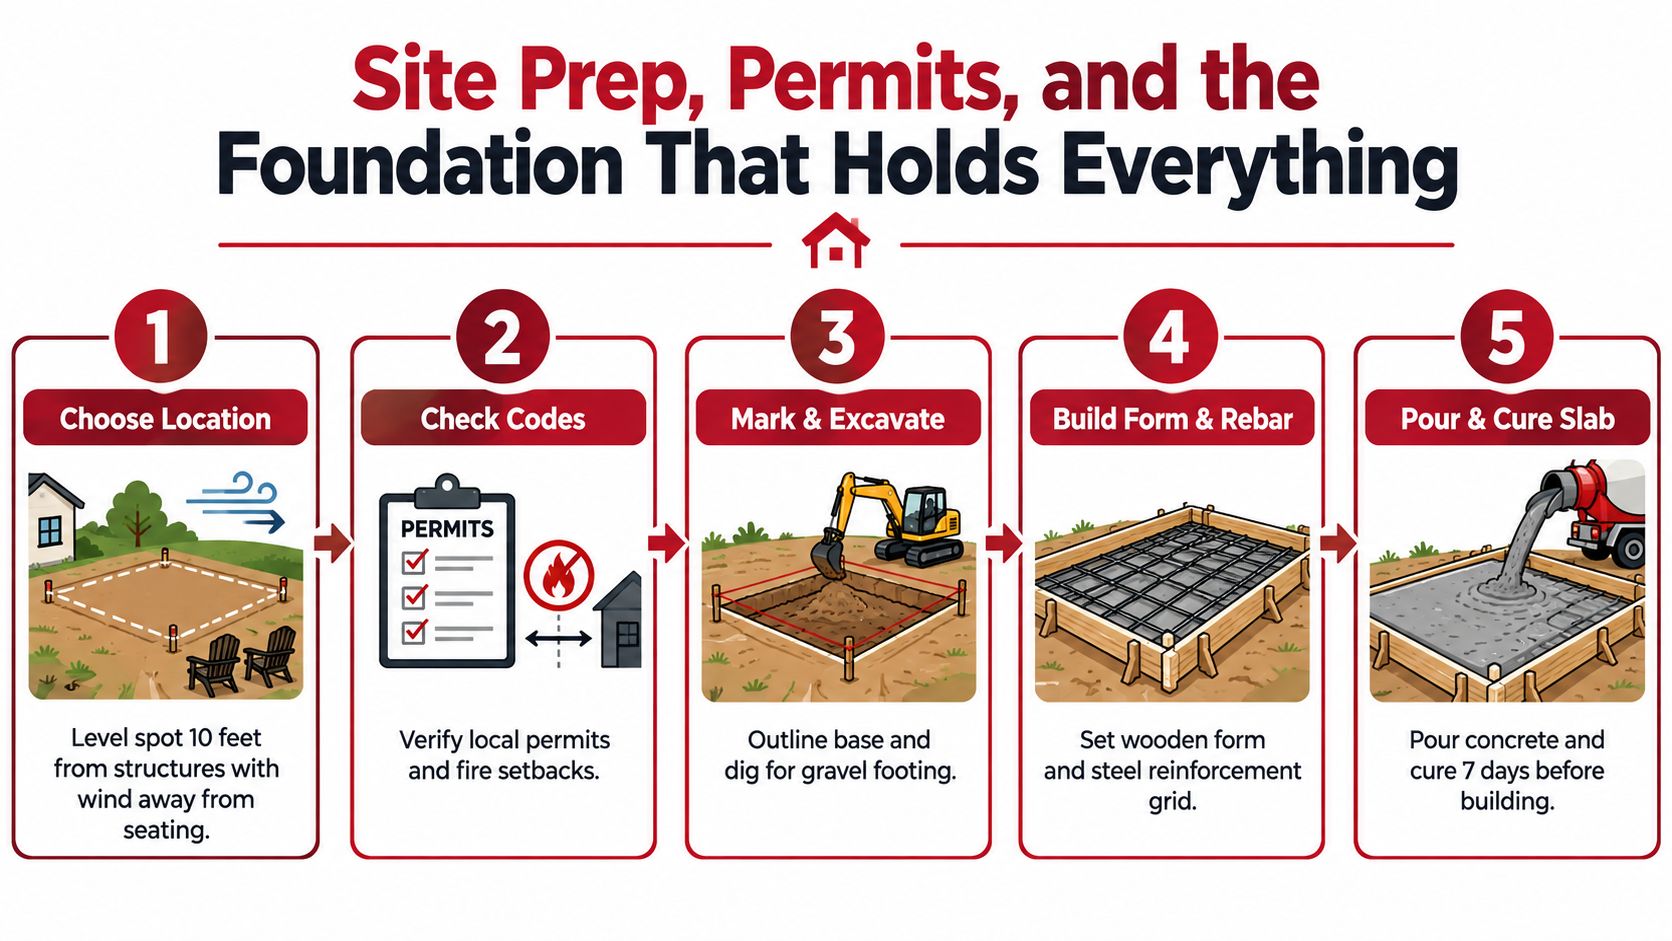
Choose a level location away from combustible construction and low branches, with enough room to work behind and beside the oven. Check local building and fire requirements before pouring a permanent slab. Homeowners' associations may apply additional restrictions, and local rules can vary depending on the structure, fuel, chimney, and property layout.
Build the base in the right order
Mark the oven footprint, then leave working room around it for construction, ash removal, and maintenance. Excavate to stable ground, install a compacted gravel base, form the slab, and add reinforcement before the concrete arrives.
Recent DIY guidance commonly places standard backyard slabs in the 4 to 6 inch range, with larger installations sometimes requiring 6 to 8 inches depending on the load and design (foundation, drainage, and structural planning guidance). The exact base should match the oven's weight, soil conditions, local practice, and any engineering requirements that apply to your property.
Drainage matters as much as thickness. Grade surrounding ground away from the footprint, prevent standing water from collecting beneath the slab, and don't trap moisture against the finished oven stand. A foundation that settles or shifts can transfer stress into the hearth and dome.
Plan the stand and working height before placing reinforcement. If you're building a masonry stand, leave room for firewood storage and ash cleanup. A purpose-built outdoor pizza oven stand guide can help you think through support, working height, and the relationship between the base and cooking floor.
Let the slab gain strength before loading it with masonry. The critical point isn't just waiting for the surface to look dry. The concrete must stabilize under the weight of the stand, hearth, dome, and finish.
Building the Hearth, Dome, and Arch That Actually Cook Pizza
The hearth controls the bake from below, while the dome controls the fire, airflow, and radiant heat from above. Build the floor as though every joint will affect a pizza, because ash, uneven brick edges, and open gaps eventually will.
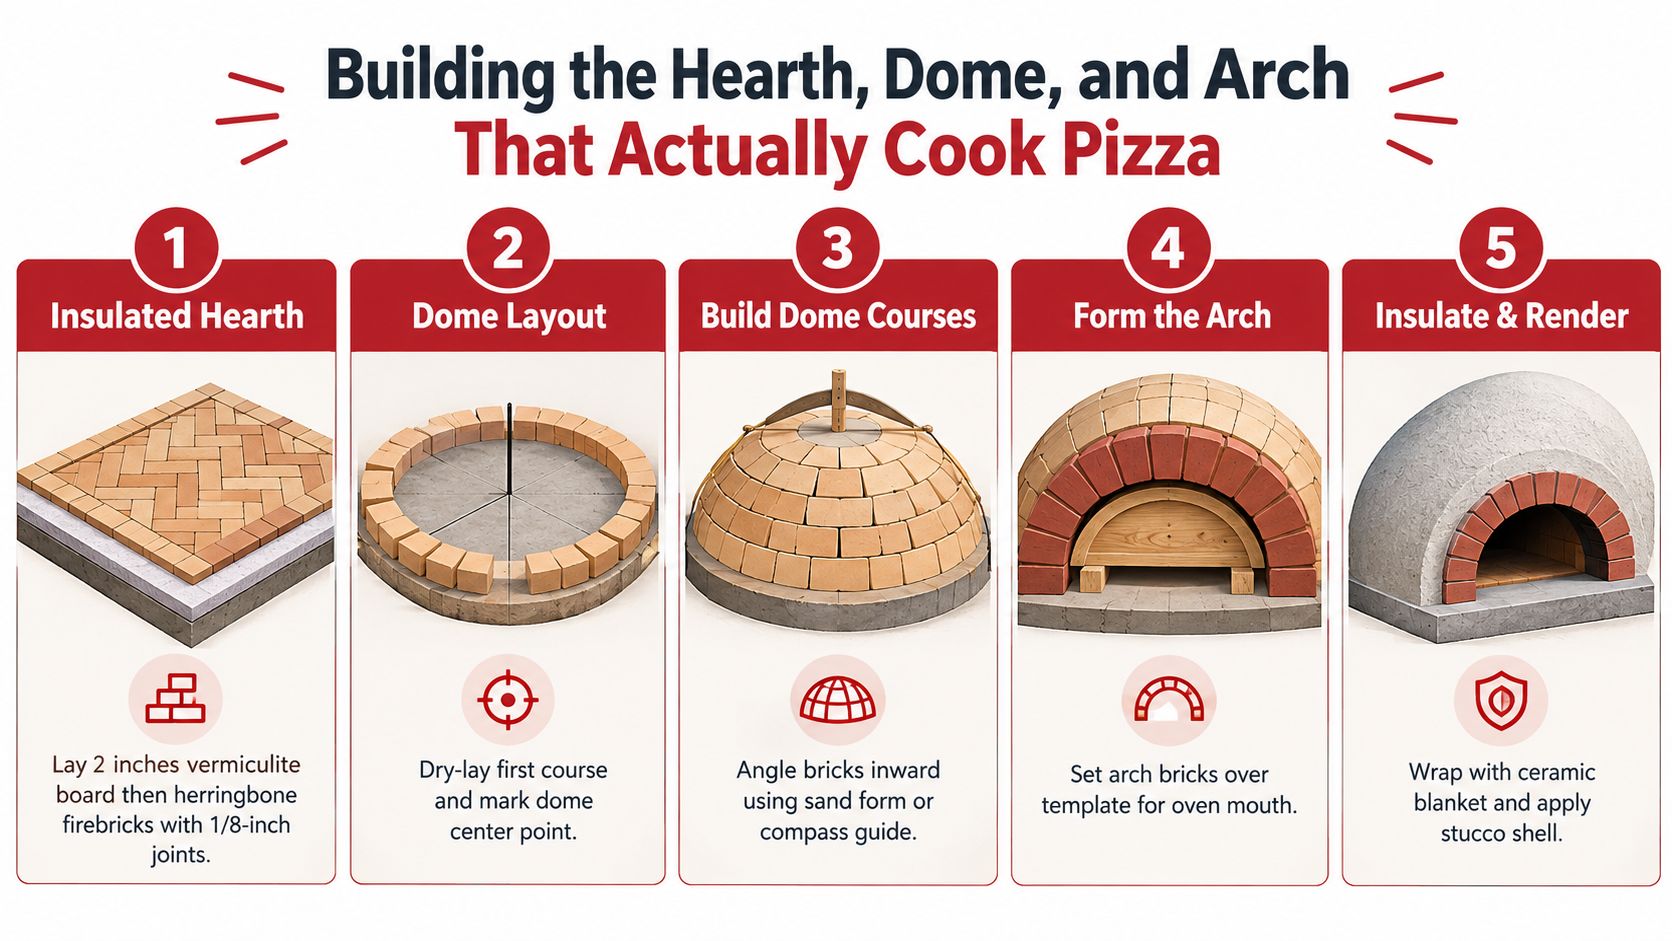
Start with a continuous insulation layer above the structural slab. Technical guidance commonly recommends 2 to 4 inches of refractory insulation board beneath the firebrick deck, because reducing downward heat loss shortens heat-up time more effectively than adding floor mass (pizza oven insulation guidance).
Set firebricks into a tight, even cooking surface. A herringbone layout keeps long joints from running directly along the pizza's path, while a soldier-style arrangement can work when the bricks are accurately fitted. Avoid ordinary concrete or decorative pavers in the cooking zone. Materials that aren't designed for repeated high heat can crack, shed fragments, or fail under thermal cycling.
Raise the dome with control
For a Pompeii-style dome, begin with a level soldier course and use a center guide, template, or adjustable compass to keep each ring aligned. Cut firebrick with a wet saw where possible, dry-fit each course, and keep the inner face smooth. A small irregularity on the outside is less important than a protruding edge inside the oven, where flame and peel movement will meet it.
Cob construction uses a different rhythm. Shape a sand form to the finished interior, cover it with cob in manageable lifts, and allow each lift to firm before adding more. A barrel retrofit depends on a sound metal shell, a refractory cooking surface, and insulation packed around the hot zone.
The arch deserves special attention because it carries load while shaping the entrance and draft. Build it over a temporary plywood or masonry form, angle the voussoirs toward a central keystone, and don't remove the support until the refractory mortar has cured sufficiently. The opening height is commonly designed at about 63% of the interior dome height, a proportion associated with draft and flame clearance in traditional oven designs (earth oven construction reference).
The oven mouth must also meet the dome cleanly. Gaps between the arch and dome create weak points, while a low or poorly shaped opening can restrict access and disturb airflow.
A useful construction video can show the hand positions and brick angles more clearly than a written description:
Insulation, Vent, and the Finishing Layer That Locks In Heat
A heavy oven without insulation is a slow, fuel-hungry oven. The dense firebrick should store heat inside the cooking chamber, while a low-conductivity layer outside the dome keeps that energy from bleeding into the stand and weather.
Install insulation beneath the hearth before laying the cooking floor. For the dome, use a continuous ceramic-fiber blanket or a mineral insulation mix appropriate to the design. Guidance for wood-fired ovens commonly places dome insulation in the 2 to 4 inch range, with ceramic blanket or vermiculite and perlite mixes used for different construction approaches (technical insulation guidance). Don't leave thin spots around the arch, shoulders, or chimney transition.
The vent needs a clean route from the oven mouth to the flue. Keep bends gentle, avoid narrowing the passage, and support the chimney so its weight doesn't pull on the arch. Smoke should travel across the ceiling and exit through the vent rather than spilling into the cooking area.
Match the finish to the structure
The outer finish protects insulation from rain and physical damage. Lime stucco, tile, stone veneer, or a suitable plaster can all work when applied over a stable substrate and detailed to shed water. Cob ovens need especially careful roof or shelter planning, because repeated wetting and drying can weaken earthen finishes.
| Build type | Insulation layer | Thickness | Outer finish |
|---|---|---|---|
| Firebrick dome | Ceramic-fiber blanket or vermiculite/perlite insulation | 2 to 4 inches | Stucco, tile, or stone veneer |
| Cob oven | Clay, sand, straw, or other earthen insulation render | Built as a substantial outer shell | Earthen plaster under a roof or weather shelter |
| Barrel retrofit | Mineral or ceramic insulation rated for the operating environment | Sized to the shell and heat path | Metal enclosure, masonry skin, or weatherproof cladding |
The exact recipe matters less than continuity and compatibility. A thin decorative coat won't replace insulation, and a sealed finish applied before the structure dries can trap moisture.
Benchmark references place authentic high-heat pizza around 700 to 900°F, while Neapolitan-style baking commonly targets 750 to 950°F for 60 to 90 seconds (refractory and pizza-oven temperature guidance). Use an infrared thermometer to check both the deck and dome. A glowing ceiling doesn't prove that the cooking floor is ready.
Curing, First Firing, and the Mistakes First-Time Builders Make
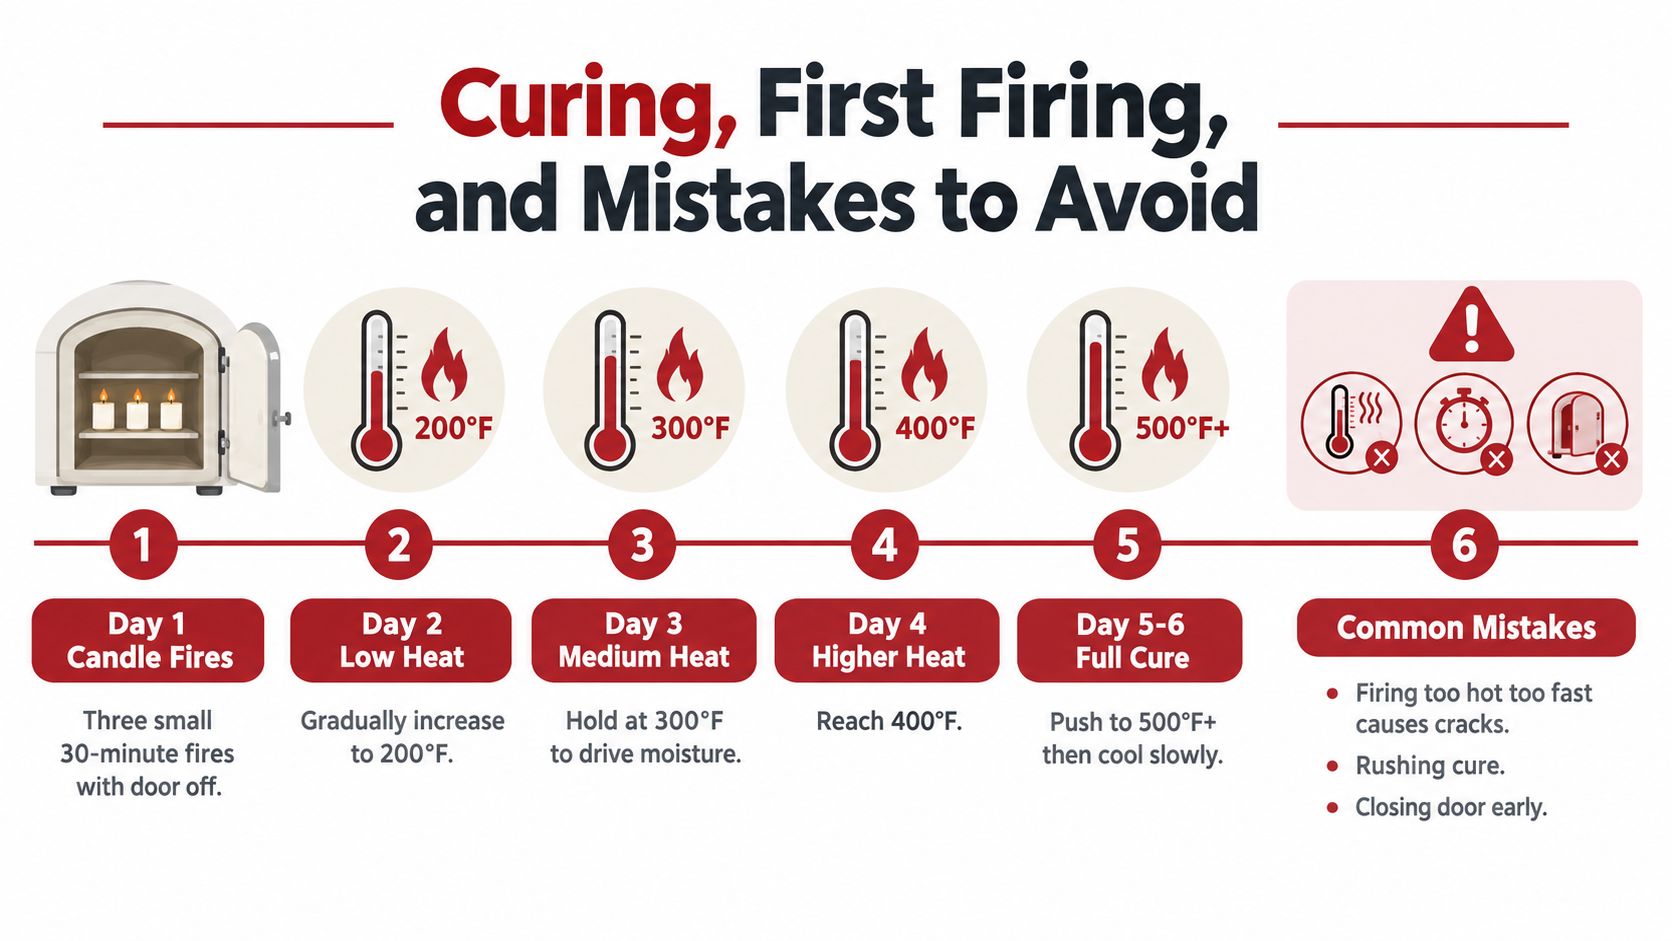
The first fire should be boring. Small flames, open access, gradual heat, and close observation are more valuable than an impressive blaze.
A new oven contains construction moisture in the mortar, insulation, render, and surrounding masonry. Heat it too quickly and that moisture expands faster than the structure can release it. Fine surface cracks may be repairable, but rushed firing can also damage joints and create movement around the arch.
Use a patient curing sequence
Follow the materials supplier's instructions when they differ, but the practical progression looks like this:
- Begin with small candle fires. Keep the door open and use gentle heat so moisture can escape.
- Increase gradually. Let the oven cool between early fires instead of stacking one hot session on another.
- Watch the interior. Damp patches, white residue, or persistent steam indicate that the oven is still releasing moisture.
- Delay the first real bake. A new structure should complete progressive curing before it receives a full pizza fire.
The commonly cited 5 to 7 days of progressive curing is a useful minimum planning reference, not permission to force the schedule when the oven remains visibly damp (DIY oven construction and curing guidance).
A first pizza should be simple rather than heavily loaded. Once the oven reaches the intended cooking range and the floor has been checked with an infrared thermometer, launch a small Margherita and watch the underside closely. A top that browns before the base usually means the deck hasn't charged fully, the floor is too cool, or the pizza carries too much wet topping.
First-bake lesson: Don't judge the oven by the flame. Judge it by the floor temperature, the underside of the crust, and how steadily the oven recovers after the launch.
Keep the peel dry and the dough lightly floured. A wet base can adhere to hot firebrick, where it tears instead of sliding cleanly. Use dry hardwood suitable for cooking, not resinous softwood that can spit sap and leave deposits on the dome.
For a concise first-cook routine, use this first bake guide as a preparation reference. The most expensive mistake remains the same: closing the door early, trapping moisture, and assuming a sealed oven will cure faster.
Real Costs, Build Time, and the Smarter Shortcuts Worth Knowing
DIY only wins financially when your labor, mistakes, storage, and waiting time are treated fairly. The material range is wide. Independent guidance puts a DIY outdoor oven anywhere from a few hundred dollars to more than USD 1,000, depending on the size and materials (DIY oven cost and timeline guidance).
A firebrick dome typically draws money into the firebrick, refractory mortar, insulation board, dome blanket, concrete, reinforcement, stand, chimney parts, and weatherproof finish. Cob can reduce the material burden, but it doesn't eliminate the need for a stable foundation, insulation, shelter, and finishing work.
| Option | DIY Cost (USD) | Build Time | Skill Level | Best For |
|---|---|---|---|---|
| Firebrick dome | A few hundred to more than USD 1,000, depending on materials and size | Several weekends plus curing | Advanced | Frequent cooks who want thermal retention |
| Cob oven | Lower material cost, with site and shelter costs still required | Several sessions plus drying and curing | Beginner to intermediate | Hands-on builders in a suitable climate |
| Barrel retrofit | Variable, based on shell, refractory floor, and insulation | Faster than masonry | Intermediate | Experimenters who want a quicker live-fire setup |
| Prefab modular kit | Product-dependent | Shorter installation period | Intermediate | Buyers who want a defined system without laying every course |
| Stone or steel on an existing grill | Product-dependent | Same-day setup | Beginner | Cooks who want high-heat pizza without construction |
Add contingency to any masonry estimate. Extra bricks, damaged insulation, replacement cutting blades, mortar waste, weather protection, and a second attempt at the arch are ordinary project costs, not unusual failures.
The smarter shortcut may be to skip the dome entirely. A thick cordierite stone on a covered kettle or gas grill gives a crisp baking surface with little site work. A pizza steel responds more aggressively to the dough and can recover quickly between bakes, but it also demands careful preheating and heat management.
A steel plate is particularly useful when the goal is a fast, intensely heated bake on an existing grill. A stone is often more forgiving for general baking and provides a familiar refractory surface. Neither creates the full retained-heat behavior of a masonry dome, but both remove foundation work, curing fires, chimney design, and weatherproofing from the project.
For readers comparing metal and stone construction options, this pizza steel DIY guide provides a practical reference for the steel route. Hans Grill also sells cordierite pizza stones and pizza steels designed for ovens, grills, and wood-fired setups, so those tools can serve as a legitimate escape hatch when building a dome no longer sounds like the point.
Choose the firebrick oven when the building itself is part of the pleasure. Choose cob when low material burden and hand-built character matter more than maximum durability. Choose a barrel, stone, or steel setup when you want to cook soon and preserve your weekends.
Your Decision Checklist Before You Pour a Single Bag of Concrete
The right backyard pizza oven DIY path becomes clearer when you stop asking which design looks impressive and start asking which commitment fits your life.
Time budget
- Weekend-only schedule: Choose a cordierite stone, pizza steel, or a ready-made grill setup.
- Several free weekends: Consider a barrel retrofit or cob oven.
- Longer project window: A firebrick dome becomes realistic, provided you can protect it from weather and allow full curing.
Physical site
- Limited patio or rental space: Avoid permanent masonry and use an existing grill.
- Open yard with drainage and clearance: Cob or barrel construction may fit.
- Permanent foundation area with safe access: A brick dome can justify the site work.
Honest skill assessment
Can you set a level mortar bed, cut firebrick accurately, shape a stable arch, mix cob to the right consistency, or fabricate a safe metal retrofit? If not, choose the design that removes the skill you don't have rather than hoping the finish will hide it.
- Comfortable with masonry: Build the insulated firebrick dome.
- Comfortable with hand-shaped natural materials: Build cob, with a roof or serious weather protection.
- Comfortable with fabrication: Consider a barrel retrofit.
- Not interested in construction: Use a stone or steel on an existing grill.
Use case
A pizza once a month doesn't require the same thermal system as every-Friday service. Occasional cooks usually benefit from a fast, low-maintenance setup. Frequent cooks can make the foundation, insulation, curing, and storage work worthwhile.
Choose one path before ordering materials: full brick build, cob build, barrel retrofit, or stone and steel shortcut. Commit to the option that matches your actual time, site, skills, and cooking habit, not the version that looks best in a video.
Hans Grill offers cordierite pizza stones, high-thermal-mass pizza steels, and pizza preparation tools for ovens, grills, and wood-fired setups. If you want crisp, high-heat pizza without committing to a multi-week dome build, visit Hans Grill and choose the setup that fits your existing grill or oven.


