

How to Use a BBQ Baking Stone for Perfect Pizza
You bought the dough. You gave the grill plenty of fuel. You slid the pizza on with big expectations, then pulled out a pie with a pale middle, scorched rim, and cheese that looked done long before the base was ready. That's the moment the dough, the toppings, or the stone often take the blame.
Usually, the main problem is heat management.
A BBQ baking stone can turn a regular grill into a serious pizza setup, but only if you treat the grill differently than an indoor oven. Fire sits below the food. Hot spots drift. Wind matters. The lid becomes part of the cooking system. Once you learn how to control direct heat, indirect heat, and airflow together, the stone starts doing what it's supposed to do: giving you a crisp underside without burning the life out of the top.
Table of Contents
- From Soggy Bottoms to Crispy Crusts
- Choosing the Right Stone for the Grill
- Grill Setup and Perfect Preheating
- Mastering the Launch and the Cook
- Essential Care and Cleaning Secrets
- Troubleshooting Common BBQ Stone Problems
- Your Go-To Grilling Guide and FAQs
From Soggy Bottoms to Crispy Crusts
A BBQ baking stone gives pizza dough something a grill grate never can. A broad, heat-loaded surface that browns the bottom evenly instead of branding it in stripes while flames lick at random spots.
On a grill, that matters even more than it does in the kitchen. The actual job is not just getting the stone hot. The job is balancing the heat stored under the dough with the heat circulating over the top. I learned that the hard way after turning out pizzas with a dark rim, pale cheese, and a center that folded like warm flatbread.
That balance is what separates a crisp base from a soggy one. If the stone is taking too much direct fire, the crust sets and scorches before the toppings catch up. If the stone never stores enough heat, the dough steams from the sauce and stays soft through the middle.
The best grill pizza happens when the stone cooks the base and the closed lid finishes the top at the same pace.
Use the grill like a small pizza oven, not just a hot outdoor burner. The stone handles conductive heat from below. The lid traps and circulates heat across the top, which is why closing it promptly matters so much. Flare-ups, burner placement, and charcoal arrangement all change that equation.
If you want a closer look at how stone material affects heat retention and thermal shock on a grill, this guide to the best pizza stone material is worth reading.
Start with one principle and a lot of the usual pizza problems get easier to fix. Manage where the heat goes first. The crust usually follows.
Choosing the Right Stone for the Grill
A grill exposes every weak point in a pizza stone. Hot spots hit harder, lid-up checks dump heat fast, and one flare-up can punish the underside of the stone more than any kitchen oven will. Cheap stones often fail here because BBQ cooking asks them to handle uneven fire, not just high temperature.
Why material matters more on a BBQ

If the stone is mainly for grill use, cordierite is usually the safer bet. It handles higher heat and sharper temperature swings better than basic ceramic, which matters on a BBQ where the fire is rarely perfectly even. I have seen bargain ceramic stones survive in an oven for months, then crack on the grill after one hard preheat and a quick lid-open temperature drop.
That matters for more than durability. Material affects how confidently you can manage heat. A stone that tolerates aggressive preheating gives you more control over indirect setups, higher lid temperatures, and back-to-back cooks without worrying that one mistake will end the session. If you want a closer look at the trade-offs, this guide to the best pizza stone material breaks them down well.
Practical rule: On a BBQ, buy the stone that handles heat swings first. Worry about looks second.
Shape and thickness change how the grill behaves
Shape is not just about fit. It changes how easy the cook feels when the grill is hot and time matters.
Round stones sit neatly inside kettles and kamados, but rectangular stones give you more landing space, which is helpful if your launches aren't perfect yet. I prefer rectangular stones for BBQ use because they give you a little margin when you are working quickly over live fire, and that margin saves pizzas.
Thickness has its own trade-off. A thick stone stores more heat and recovers better between pizzas, but it takes longer to fully heat through. A thinner stone gets ready faster, but it loses steam during a longer cookout and can scorch if the fire below spikes. For one or two pizzas, a thinner stone can work well. For a group cook with repeated launches, extra mass usually makes the grill easier to control.
The best choice depends on how you cook. If your grill runs hot in one area, a thicker cordierite stone helps smooth that out. If your grill is smaller and you need faster heat-up times, a slightly thinner stone may be the better compromise. The goal is not just buying a stone that survives. The goal is buying one that helps you manage bottom heat while the closed lid finishes the top like a small outdoor oven.
Grill Setup and Perfect Preheating
Grill pizza usually fails before the dough ever hits the stone. The fundamental problem is heat control. A BBQ baking stone needs the grill set up like a small outdoor oven, with bottom heat kept in check and the closed lid doing serious work on the top of the pie.
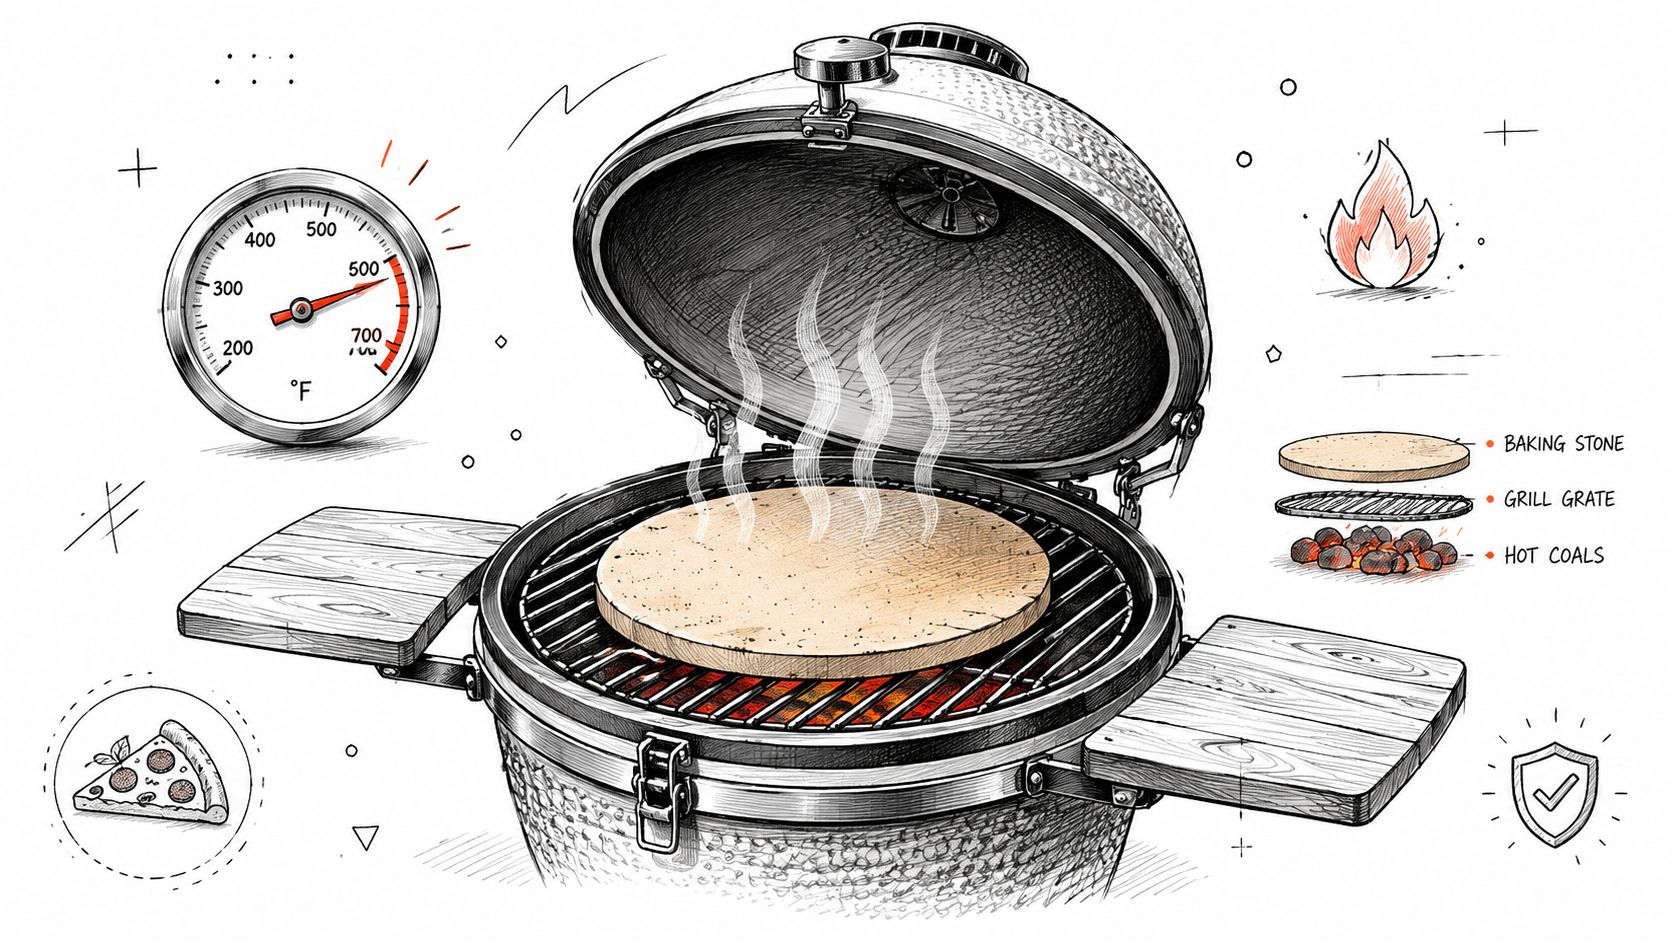
Build an indirect zone first
If the flame or coals are concentrated right under the stone, the crust burns before the cheese and toppings have time to catch up. I learned that one fast. Good grill pizza comes from strong ambient heat around the stone, not punishment from directly below.
On a gas grill, turn on the outer burners and leave the center burner off if your grill allows it. Place the stone where it gets strong ambient heat rather than direct punishment. Place the stone over the less aggressive area so the base cooks steadily instead of taking the full blast of the flame path.
On a charcoal grill, bank the coals to the sides or around the edge of the kettle. Do not pile them under the middle of the stone. That setup heats the chamber, lets the lid reflect heat back down, and cuts the risk of a scorched bottom.
The lid matters more than many grillers expect. With the lid closed, hot air rolls over the top of the pizza and helps brown the cheese, set the rim, and finish toppings that would stay pale over open grates. Open the grill only to launch, rotate, or pull the pie. Every extra peek dumps the heat you worked to build.
A few setup checks make a big difference:
- Keep the strongest heat off the center underside of the stone
- Center the stone so the lid can circulate heat around it
- Watch for wind pushing one side of the grill hotter than the other
- Use a raised rack or spacers if your grill runs too fierce from below
Preheat the stone with the grill
Start with the stone in a cold grill and bring both up to temperature together. That gives the stone time to heat through instead of just getting hot on the surface, and it reduces the stress that comes from sudden temperature swings.
If you want the full reasoning, this guide on whether you should preheat a pizza stone explains the process in more detail.
The common mistake is trusting the lid thermometer too early. Grill air heats up faster than the stone. A grill can look ready while the stone still lacks the stored heat needed to set the bottom crust. Then the dough lands, the surface temperature drops, and the center stays pale and soft.
A hot lid thermometer does not mean a fully heated stone. The crust responds to the surface it touches.
Give the stone enough time to saturate with heat, especially if it is thick. For repeated pizzas, that stored heat is what keeps the second and third pie from turning gummy underneath.
If your grill cooks hard from below, raise the stone slightly or place a heat deflector under it if your cooker supports that setup. Even a small gap helps smooth out bottom heat. That is the real trick on a BBQ. Control the fire underneath, then let the lid act like a convection chamber above. That balance is what gets you crisp bottoms, browned tops, and a pizza that tastes like it belonged on the grill all along.
Mastering the Launch and the Cook
The hardest moment comes right after you stretch a good dough, top it well, and walk it to a grill running hot. One sticky launch can turn all that setup into a folded mess. Get the launch right, though, and the cook becomes a heat-management job instead of a rescue mission.
A visual walkthrough helps if you're still learning the motions.
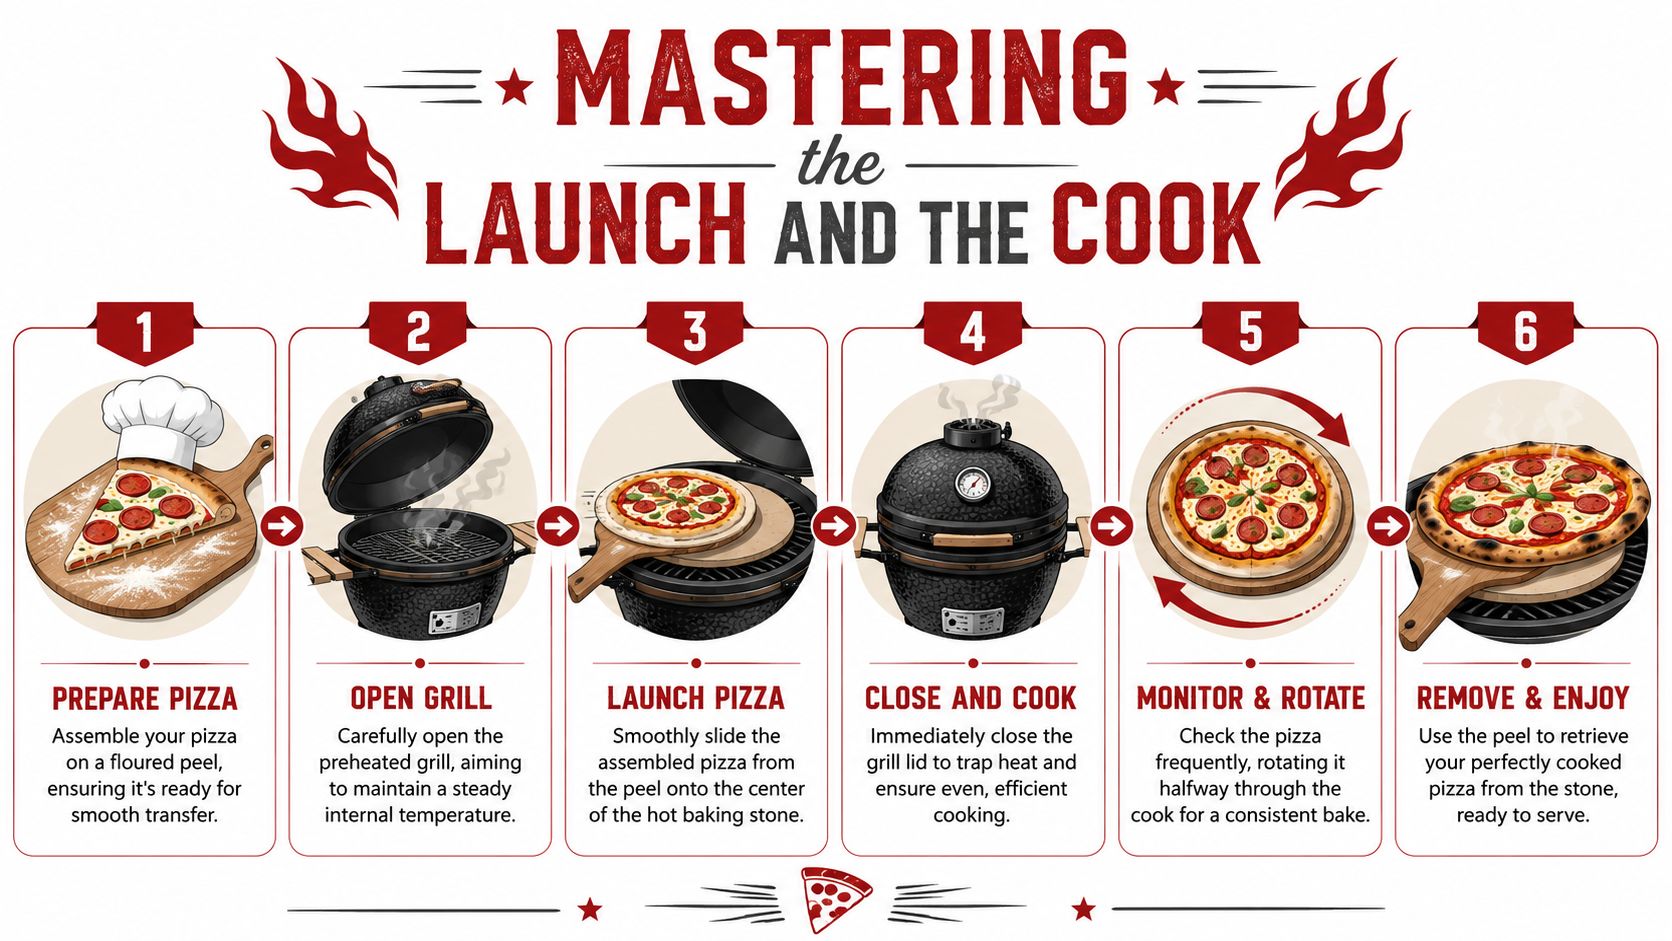
Launch clean or fight the whole cook
Build the pizza on a peel and keep checking that it still slides before you commit. I give the peel a quick shake after topping, then again right before the launch. If the dough drags even a little, fix it there. Do not hope it will free itself once you reach over the stone.
A light dusting of flour or semolina helps, but there is a trade-off. Too little and the dough sticks. Too much and the excess burns on the stone, which leaves bitter spots on the next pizza and makes flare-ups more likely if loose flour reaches the fire.
A few habits prevent the usual disasters:
- Top and launch without a long pause: Sauce and moisture soak through fast, especially with thin dough.
- Use a short, controlled jerk: Set the front edge where you want it, then pull the peel back cleanly.
- Land near the center: Off-center pizzas catch hotter zones and are harder to turn.
- Keep the topping load realistic: A grill stone cooks fast, but overloaded dough still sags and sticks.
If you're deciding between peel types, this comparison of wooden and metal pizza peels can help you choose the right feel for your style.
Humid weather changes the launch. Dough picks up moisture from the air and gets tacky much faster. In grilling communities, parchment paper under the pizza for the first few minutes is a common workaround for sticky launches on damp days. Remove it once the base sets so the crust can finish directly on the stone.
Use the lid like a convection chamber
Once the pizza hits the stone, close the lid fast. The stone handles the bottom. The trapped hot air under the lid finishes the rim, melts the cheese, and cooks the top before the base goes too far. That balance matters more on a BBQ than in a kitchen oven because grill heat is less even and usually stronger from below.
Here's a good video reference for the overall motion and timing:
Watch the pizza closely during the first minute. If one side of the crust balloons early or the underside colors too fast, your grill is telling you where the hot side lives. Rotate only when the base has firmed up enough to move cleanly. On a two-burner gas grill, that often means a half-turn once the rim starts to set. On charcoal, I turn more by feel because the heat pattern shifts as the fire settles.
Opening the lid every minute slows the top and throws off the whole cook. Leave it shut long enough for the lid to do its job, then check with purpose. Look for three signs: the rim has structure, the cheese is actively bubbling, and the base releases cleanly when the peel slides underneath.
Flare-ups need quick handling. If cheese or oil drops near direct flame and the back edge of the pizza starts scorching, move the pizza to a cooler spot on the stone or turn down the burner under that side. The goal is steady stored heat, not a blast furnace under one quadrant. That is the secret to pizza on a BBQ stone. Manage the fire below, use the lid to finish the top, and let the stone even out the swings your grill naturally creates.
Essential Care and Cleaning Secrets
A fresh stone looks clean for about one cook. After that, it starts telling the truth. Dark spots, baked-on marks, and uneven color aren't signs you ruined it. They usually mean you're using it.
A stained stone is usually a good stone
People often treat pizza stones like serving platters and expect them to stay spotless. That mindset leads to over-cleaning, aggressive scraping, and sometimes soap, which the stone doesn't need. A baking stone is porous. It takes on character as oils and flour bake into the surface.
That doesn't mean you should try to “season” it like cast iron on purpose. I don't oil stones, and I don't recommend it. The better path is simple use. Repeated bakes naturally make the surface more forgiving over time.
The goal isn't a pretty stone. The goal is a reliable one.
Clean it gently and leave it alone
The easiest maintenance routine is also the safest:
- Let it cool fully: Moving or washing a hot stone invites damage.
- Scrape off residue: Use a bench scraper, spatula edge, or stiff brush.
- Skip soap: The stone can absorb it, and there's no upside.
- Use minimal water: If something stubborn remains, wipe lightly and let the stone dry thoroughly before its next cook.
If a mark won't come off, I leave it. A stone doesn't need to look new to bake well. In fact, the obsession with restoring the original color causes more problems than the stains ever do.
Troubleshooting Common BBQ Stone Problems
When pizza goes wrong, the failure usually points straight back to one part of the process. Read the result, fix the cause, and the next pie gets better fast.
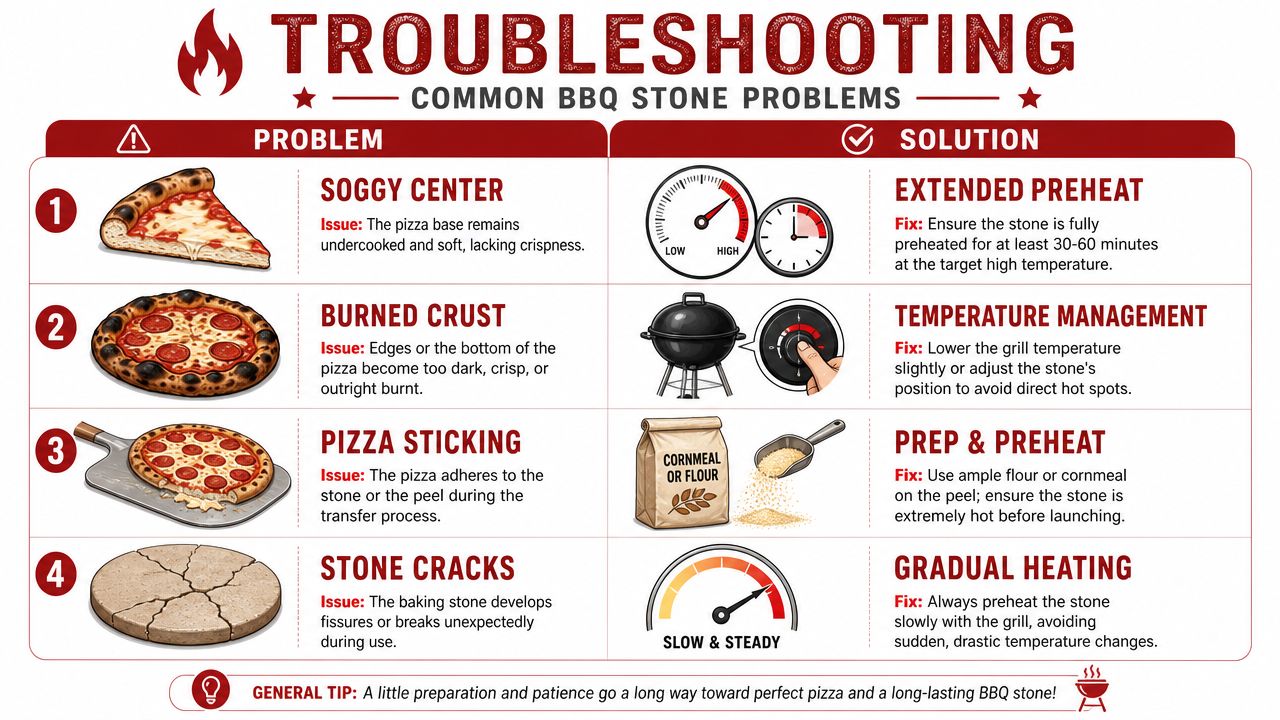
What the pizza is telling you
Use this as a quick diagnostic guide:
- Soggy center: The stone probably wasn't fully heat-loaded, or the pizza was too wet in the middle. Give the stone more time and go lighter with sauce.
- Burned bottom, pale top: Your stone is taking too much direct heat from below. Rework the grill into a stronger indirect setup.
- Pizza sticks during launch: The peel prep failed, the dough sat too long, or the day is humid enough that parchment would've helped.
- One side cooks faster: Your grill has a hot zone. Rotate once instead of spinning constantly.
A lot of people treat these as random mishaps. They usually aren't. A grill is very honest. It shows you exactly where your heat balance is off.
What breaks stones and what saves them
The most dreaded problem is the crack. In BBQ use, the usual culprit is thermal shock. That happens when the stone experiences a sudden temperature jump or uneven stress that the material can't absorb.
The big mistakes are familiar:
- Dropping a cold stone into a hot grill
- Moving a hot stone onto a cool surface
- Adding liquid to a hot stone
- Exposing one section to far harsher heat than the rest
The fix is boring but effective. Heat it gradually, cool it naturally, and don't rush cleanup. Most stone failures come from impatience, not mystery.
Your Go-To Grilling Guide and FAQs
A good grill pizza cook does not come from memorizing one bake time. It comes from reading heat. On a BBQ baking stone, the job is balancing bottom heat from the stone with top heat trapped under the lid, while keeping the fire from licking one side of the crust harder than the other.
That is why a quick reference helps. Use it as a starting point, then adjust for your grill's hot spots, the moisture in your toppings, and how aggressively your burners or charcoal are pushing heat into the stone.
BBQ baking stone cooking reference
| Item | Grill Air Temp | Approx. Cook Time |
|---|---|---|
| Thin-crust pizza | Hot, steady, lid closed | Cook until the crust is crisp and the cheese bubbles |
| Margherita-style pizza | Hot with balanced top heat | Cook until the rim blisters lightly and the center sets |
| Heavier topping pizza | Moderate-hot indirect heat | Cook a bit longer so the base and toppings finish together |
| Flatbread | Hot stone, gentler top load | Remove once the bottom colors and the bread puffs |
| Garlic bread or naan-style bread | Hot but not scorching | Pull when browned in spots and cooked through |
Common questions from backyard pizza cooks
Can you use a BBQ baking stone in a regular oven?
Yes, in many cases you can. Many stones are made for both grill and oven use, as long as you heat and cool them gradually. The main difference is control. An oven gives you steadier top-to-bottom balance, while a grill demands more attention to burner placement, lid position, and radiant heat from below.
Stone or steel on the grill?
They cook differently, and the trade-off matters. Steel hits hard and recovers heat fast, which is great for fast bakes, but it can scorch the bottom quickly on a grill that already runs hot underneath. Stone is usually easier to manage outdoors because it gives you a little more forgiveness. I reach for stone when I want a crisp base without fighting burned bottoms all night.
Do you need to rotate every pizza?
Only if your grill tells you to. If the back corner runs hotter, rotate once partway through and close the lid again. If your stone is centered over a strong indirect setup and the lid is holding heat evenly, leave the pizza alone. Too much fiddling costs heat and can spoil oven spring.
Why does grill pizza feel harder than oven pizza at first?
Because a grill is less forgiving. The stone stores heat, the fire keeps changing, and the lid acts like your top element and convection fan at the same time. Get those three working together, and grill pizza starts making sense fast.
What is the fastest way to improve results?
Stop focusing only on maximum heat. Better pizza usually comes from managed heat. Set the stone where it gets steady heat instead of direct punishment, keep the lid closed as much as possible, and give the top of the pizza time to catch up with the bottom.
If you're ready to upgrade your setup, Hans Grill makes pro-level pizza tools built for home ovens and backyard BBQs, including cordierite stones, pizza steels, peels, and dough gear that make repeatable crisp-crust pizza much easier.


