

How to Make BBQ Pizza on a Backyard Grill
You've shaped the dough, brushed on barbecue sauce, and loaded the pie with chicken or pulled pork. The grill is roaring, but the first pizza still comes off with a black bottom, pale cheese, and a center that folds like wet cardboard. That failure usually isn't caused by the toppings. The stone is the oven, and your launch temperature, heat zones, and recovery routine decide whether BBQ pizza succeeds.
Grill-baked pizza rewards restraint. Use less sauce than you think you need, pre-cook anything dense, measure the cooking surface instead of trusting the lid thermometer, and treat every pie as a separate bake. Once the grill behaves like a small oven instead of an oversized barbecue, crisp BBQ pizza becomes repeatable.
Table of Contents
- What Makes a Grill a Surprising Pizza Oven
- Picking Your Grill and Setting It Up for Pizza
- Stone or Steel, Direct or Indirect Heat
- Dough, Sauce, and Toppings That Survive the Grill
- The Launch, Bake, and Slice Sequence
- Troubleshooting the Most Common BBQ Pizza Problems
- Pro Tips and a Repeatable Pizza Night Checklist
What Makes a Grill a Surprising Pizza Oven
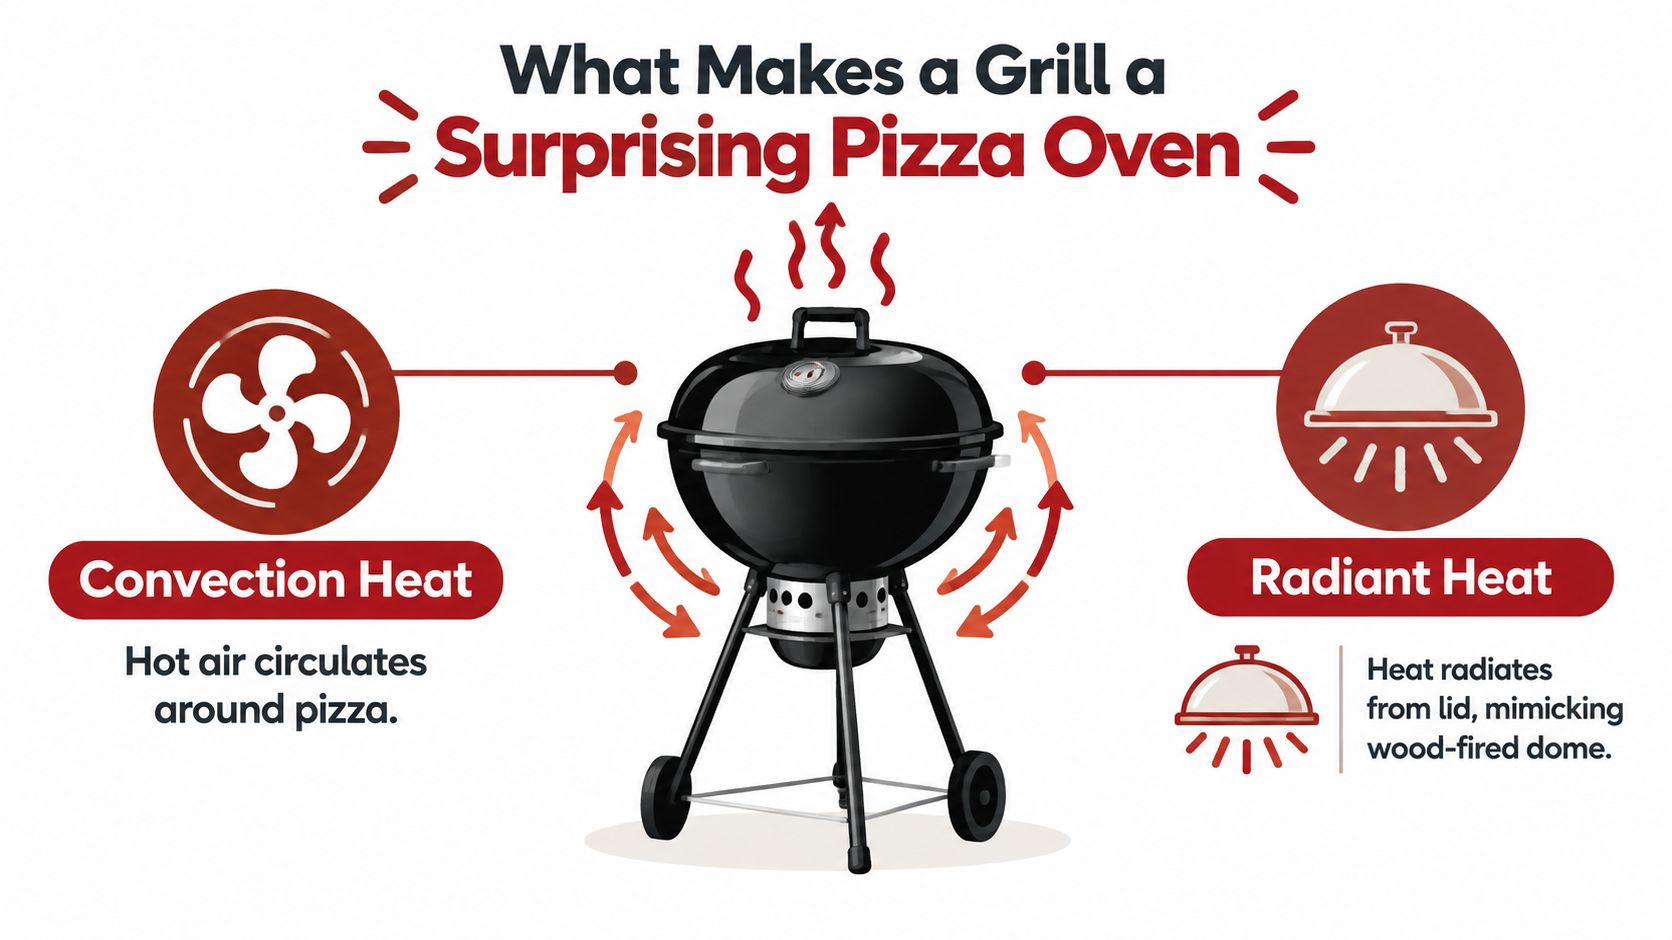
A closed grill can produce the two kinds of heat pizza needs. Heat rises from the burners or coals, hot air circulates beneath the lid, and the closed metal hood reflects radiant heat back toward the cheese and crust. That combination resembles the action of a compact pizza oven, where the floor cooks the base while the upper chamber browns the toppings.
The pizza stone or steel becomes the oven floor. It stores heat during preheating, then transfers that energy into the dough as soon as you launch. A kitchen sheet pan mostly passes heat into the underside. A properly heated stone gives the crust a much stronger, steadier push, which is why the base can crisp before the toppings dry out.
Build a small hot chamber
Set up indirect heat, place the stone on the grates while everything is cold, close the lid, and let the grill and stone preheat together for 45 to 60 minutes, a method supported by tested grill-pizza guidance. Starting cold matters because sudden temperature changes can crack the stone. The same guidance emphasizes measuring the stone surface, not relying only on the air temperature inside the grill.
A grill also gives you options a kitchen oven can't. Charcoal can add a light wood-smoke note, while gas gives cleaner flavor and faster control. The trade-off is thermal mass. A backyard grill has less stored heat than a dedicated masonry oven, so the stone needs time to recover after each launch.
Practical rule: Think of the grill as a small, hot chamber that bakes one pizza at a time. Don't assemble pies faster than the stone can recover.
Picking Your Grill and Setting It Up for Pizza
A grill that can hold heat steadily can bake good pizza, but each fuel type demands a different approach. Gas is the easiest to repeat, since burner output changes immediately and two-zone heat is simple to maintain. Charcoal reaches a higher live-fire ceiling and adds smoke, though wind, coal placement, and fuel changes make timing less predictable. Kamado grills retain heat well. Pellet grills automate temperature control, but may send less direct heat into the stone.
Clear loose ash and scrub the grates before setting up. Put the stone on the grates while the grill is cold, then arrange the fire so one side supplies the main heat and the other leaves room for recovery. A stone should not go onto a fully heated grill. This guide to pizza on a gas grill follows the same principle: gradual heating protects the cooking surface and improves consistency.
Set targets at the cooking surface
Aim an infrared thermometer directly at the stone, not at the lid or open air. A practical benchmark for many backyard grills is roughly 500 to 550°F at the stone surface, although some grill setups run hotter. The science of grilled pizza explains why those readings can differ substantially. The lid gauge alone cannot tell you whether the oven floor is ready.
Use a cold start with the burners open to dry the stone and drive off absorbed moisture. Keep the lid closed during preheating, and wait for the stone to reach its target before launching. If the air reading looks high while the surface remains cool, trust the surface. It controls how quickly the bottom crust sets.
| Grill Type | Peak Stone Temp | Best For |
|---|---|---|
| Gas | Setup-dependent, measure the stone | Predictable heat and easy recovery |
| Charcoal | Setup-dependent, often the strongest live-fire heat | Smoke flavor and high-temperature baking |
| Kamado | Setup-dependent, strong heat retention | Long, steady cooks and charcoal control |
| Pellet | Usually gentler stone heating | Automated temperature management |
Expect the peak temperature to vary with fuel, weather, stone thickness, lid design, and placement. After each launch, close the lid and let the stone recover before loading another pie. A setup that lets you shift the pizza away from the hottest area gives you more control when the bottom races ahead of the top.
Stone or Steel, Direct or Indirect Heat
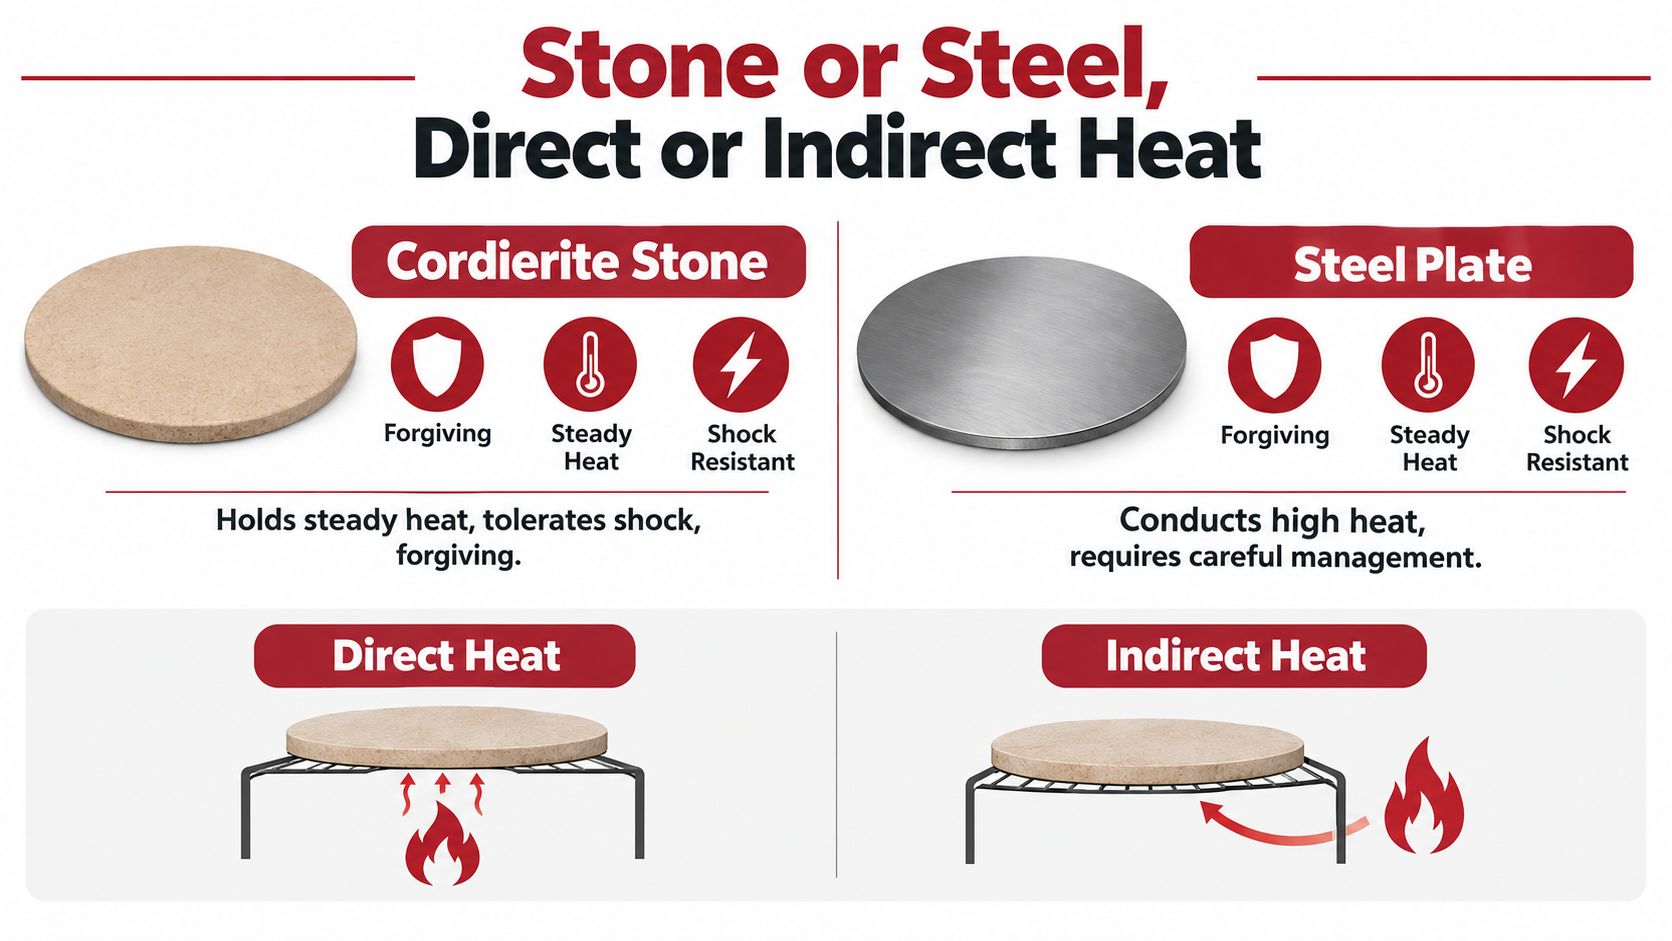
The cooking surface determines how quickly the bottom sets. Cordierite stone is forgiving, holds heat steadily, and works well for beginners, gas grills, and pellet grills. A steel plate conducts heat more aggressively, browns the underside faster, and recovers quickly between launches. That speed is useful, but steel punishes a slow rotation or an overloaded pie.
The choice should match the heat your grill can comfortably deliver. Stone gives you more time to manage the top of the pizza. Steel needs stronger ambient heat so the cheese and toppings don't lag behind the rapidly browning base. If your grill struggles to heat the chamber, stone is usually the less frustrating option.
Match the surface to the fire
Direct heat places the main flame or coal bed beneath the stone. It gives the fastest floor bake, but the underside can burn before the cheese melts. Indirect heat offsets the fire so the stone sits over a cooler gap. The bake takes longer, yet the top and bottom have more time to finish together.
A hybrid setup is often the easiest answer. Preheat the stone over the hotter zone, then shift it toward the cooler side just before launching. You keep the stored floor heat but soften the direct blast beneath the crust. That arrangement also gives you somewhere to move a pie if dripping sauce or fat causes a flare-up.
| Setup | What Works | What Can Go Wrong |
|---|---|---|
| Stone over direct heat | Fast base coloring | Burnt bottom and undercooked toppings |
| Stone over indirect heat | More forgiving loaded pies | Longer bake and slower recovery |
| Steel over strong direct heat | Crisp, deeply browned base | Requires quick handling |
| Stone preheated direct, baked indirect | Balanced floor and top heat | Requires enough grill space to move the surface |
If you want a steel surface designed for use in both ovens and BBQs, Hans Grill's Pizza Steel PRO is one option to compare with a cordierite stone. Whichever surface you choose, place it on a stable grate and let it heat gradually. Thermal shock is a bigger threat than a modestly imperfect temperature.
Dough, Sauce, and Toppings That Survive the Grill
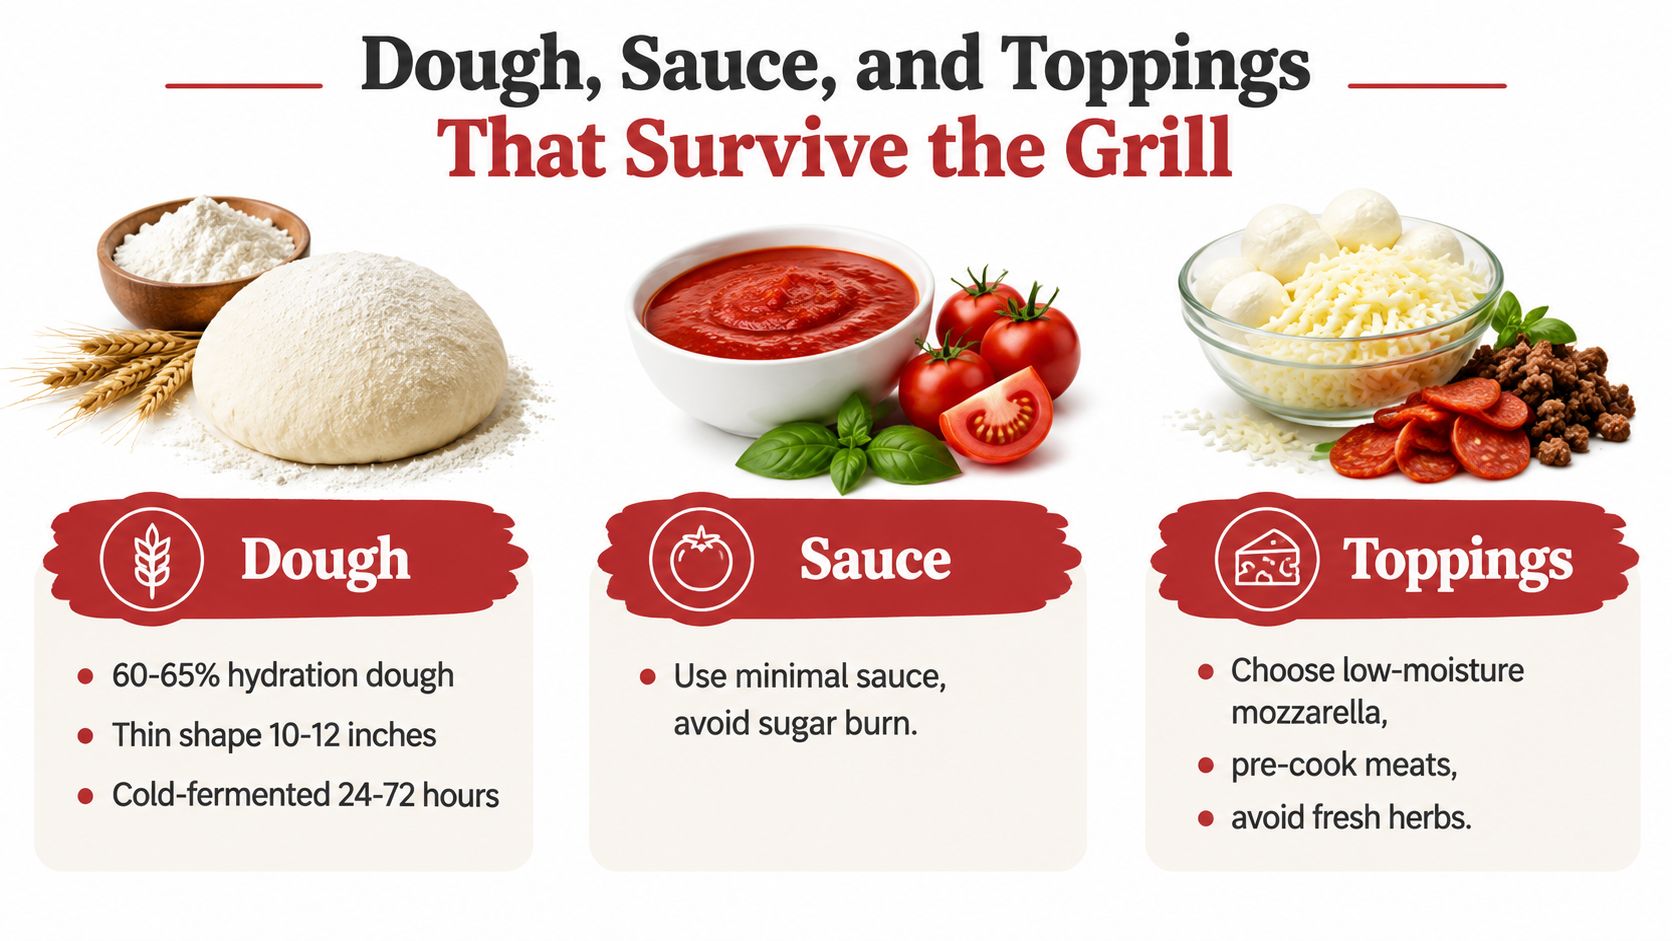
A grill exposes wet dough and heavy toppings quickly. Use a dough in the 60 to 65% hydration range, shape it thin, and keep the round around 10 to 12 inches so the base cooks before the rim turns too dark. A cold fermentation of 24 to 72 hours can make the dough easier to stretch and give the crust more developed flavor, as long as you bring it out with enough time to relax.
Dust the peel with flour or semolina, but don't bury the dough in loose flour. Excess flour burns on a hot stone and leaves a bitter taste. A light coating of olive oil on the shaped base can help create a moisture barrier, especially when your BBQ sauce is thin or sweet.
Keep moisture under control
BBQ sauce should replace tomato sauce without flooding the dough. Choose a thick sauce, or reduce a thinner sauce before using it. A small amount of tomato paste can tighten a sauce that spreads too easily. The BBQ pizza sauce recipe guide is useful for thinking about sauce texture, but the working rule is simple, spread a thin film and leave the rim bare.
Pre-cook ingredients that release water or need substantial heat. Sausage, bacon, mushrooms, onions, chicken, brisket, and pulled pork should be cooked or warmed before they reach the pizza. They only need to heat through on the grill, not cook from raw while the crust races toward doneness.
Build in this order:
- Sauce first: Spread a thin layer and avoid the outer rim.
- Cheese second: Low-moisture shredded mozzarella melts without releasing the water found in very wet fresh mozzarella.
- Heavy toppings third: Add cooked meat and softened vegetables in a sparse, even layer.
- Finishes last: Keep basil, arugula, lemon zest, and hot honey off the grill until serving.
A BBQ pizza can carry bold flavor without carrying a heavy load. Too many toppings turn a hot bake into a steaming problem.
The Launch, Bake, and Slice Sequence
A pizza can be perfectly topped and still fail before baking starts. Assemble it on a floured peel, never on the stone, and keep the dough moving so it does not absorb the dust and stick. Shake the peel firmly before approaching the grill. The dough should slide as one piece. If an edge catches, lift it and add a little semolina beneath the sticky spot.
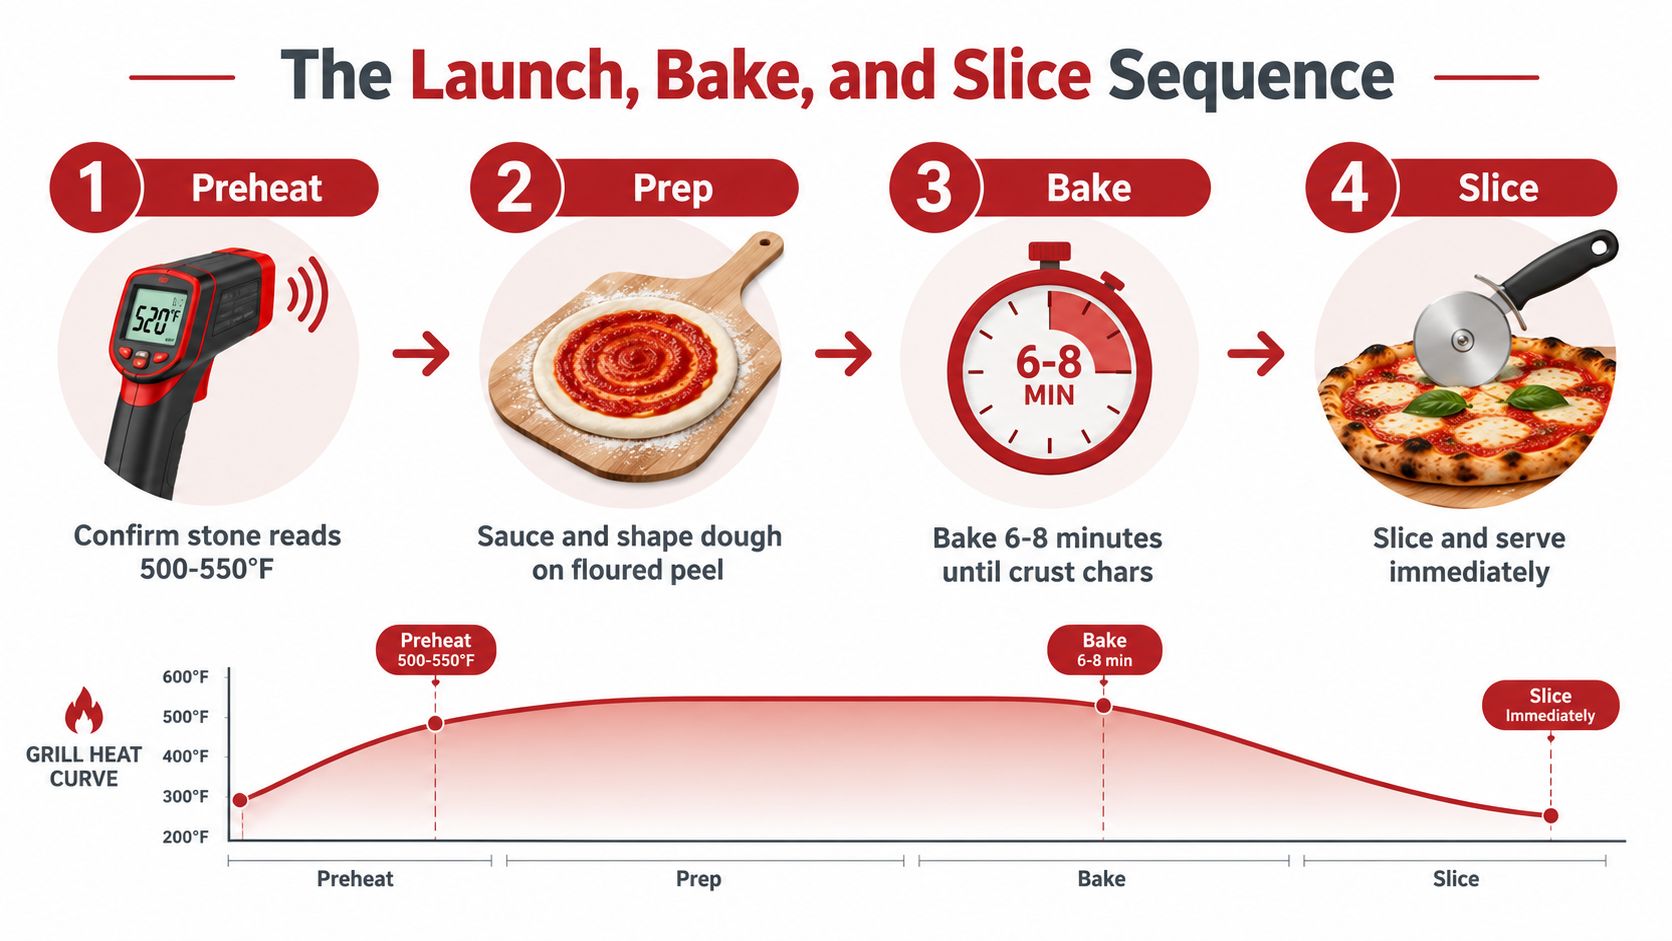
Aim for a stone surface of 500 to 550°F, a practical benchmark supported by grilled-pizza testing. The stone is the oven floor, so its temperature matters more than the air reading on the grill lid. Set the peel at the back of the stone, then pull it out with one short, confident motion. A hesitant launch folds the rim, drags the sauce, and can weld the pizza to the peel.
Use the lid and rotate with purpose
Close the lid immediately. In a hot setup, bake for roughly 4 to 6 minutes, watching the rim rather than trusting the timer alone. Rotate the pizza 90 to 180 degrees every 60 to 90 seconds because many grills run hotter at the rear. Use a turning peel and make small adjustments instead of dragging the pizza across the stone.
Gas grills usually recover quickly after the lid opens, while charcoal can lose heat more slowly and develop a hotter side near the fuel. Give the grill time to recover after each turn, especially if the lid temperature drops sharply.
Pull the pizza when the rim has dark blistered spots, the cheese is melted, and the bottom releases with a gentle peel nudge. If the center remains wet, shift the pizza toward indirect heat, close the lid, and let the chamber finish the top. Lower-temperature stone baking can take 10 to 12 minutes at 350 to 425°F grill temperature, so a slower setup needs more time than a high-heat launch. See the full sequence in action before your first attempt:
Transfer the finished pizza to a wire rack for about a minute so steam does not soften the base. Slice on a board with a rocker knife, then add basil, olive oil, or hot honey once the crust stops steaming.
Troubleshooting the Most Common BBQ Pizza Problems
The common assumption is that a bad grilled pizza needs a different recipe. Usually, it needs a different heat decision. Diagnose the symptom before changing the dough or buying another topping.
| Problem | Likely Cause | Fix |
|---|---|---|
| Burnt bottom, pale top | Stone is too hot or sits too close to the fire | Move to indirect heat, raise the grate, or lower the stone temperature |
| Crust tears during launch | Dough stuck to the peel or was assembled too early | Use a flour and semolina dusting, shake before launching, and assemble quickly |
| Flare-ups lick the toppings | Fat or sauce drips onto an open flame | Reduce burner output, use two zones, and move the pizza away from the fire |
| Pale, gummy center | Dough is too thick or the bake is too short | Stretch thinner, complete the preheat, and check the underside before pulling |
A black underside with unmelted cheese doesn't mean the grill is too cool. It usually means the floor is delivering heat faster than the lid is cooking the top. Shift the pizza to indirect heat, close the lid, and let the chamber finish the job.
Fix the launch before blaming the peel
A stuck crust often starts before the grill is opened. Wet sauce, an overworked dough round, or a peel left sitting under the assembled pizza can all create adhesion. Keep the topping load light, shake the peel before walking to the grill, and never assemble directly on a hot stone.
A gummy middle also reveals a mismatch between thickness and heat. Thin dough gives the interior less distance to cook, while pre-cooked toppings stop you from holding the pizza on the grill until dense ingredients finish. Next time, reduce the dough thickness before changing the sauce or cheese.
Pro Tips and a Repeatable Pizza Night Checklist
The difference between a decent grilled pie and a reliable one comes from repeatable heat management. Cold-fermented dough develops better handling and flavor, while a light olive-oil brush around the rim encourages deeper color. Finish with fresh basil, lemon zest, or hot honey after baking, because delicate ingredients lose their character under the lid.
Cook in a rhythm that gives the grill time to recover. After removing a pizza, close the lid and let the stone regain heat before launching the next one. A busy topping station doesn't compensate for a cold cooking surface.
Tape this checklist inside the cabinet
- Clean the grates: Remove ash, grease, and loose debris.
- Set the zones: Keep a hot side for preheating and a cooler side for recovery.
- Preheat the surface: Heat the stone or steel gradually with the lid closed.
- Check the stone: Use an infrared thermometer instead of trusting air temperature alone.
- Prepare the peel: Dust it lightly with semolina or flour.
- Load with discipline: Use restrained sauce, low-moisture cheese, and pre-cooked toppings.
- Shake before launch: Confirm the pizza slides freely.
- Close the lid: Rotate around the first minute and continue watching hot spots.
- Check the underside: Pull only when the base is browned and the rim is blistered.
- Vent the crust: Rest briefly on a wire rack before slicing.
BBQ pizza has a long American story, commonly traced to Coletta's Italian Restaurant in Memphis in the 1950s, with California Pizza Kitchen helping spread a related barbecue chicken style in 1985, as described in this account of BBQ pizza's origins. The flavor combination works because barbecue sauce, smoke, cheese, and cooked meat fit naturally on a crisp crust. The grill still decides whether those ingredients arrive together in good shape.
The grill is the oven. Consistency comes from managing the stone, the launch, the zones, and the recovery, not from piling on more toppings.
Build your next BBQ pizza around the right cooking surface, a controllable heat setup, and tools that make launching easier. Visit Hans Grill to compare pizza stones, pizza steel, proofing boxes, and peels designed for home ovens and backyard BBQs, then put the heat-management routine above to work on your next pizza night.


