

BBQ Pizza Stone Guide for Crispy Backyard Crusts
You've got the grill hot, the dough stretched, and a peel loaded with toppings. Then the first pizza lands, the crust stays pale underneath, the cheese races ahead of the dough, and the stone seems to be doing nothing. That frustrating result usually isn't a dough problem. It means the stone was treated like a slab placed over heat, rather than a thermal battery that needs time to charge.
A reliable bbq pizza stone setup depends on three controls, preheat time, surface temperature, and recovery between pies. Get those right and a backyard grill can produce a crisp base with a properly baked top, without requiring a dedicated pizza oven.
Table of Contents
- What a BBQ Pizza Stone Actually Does
- Cordierite and the Materials Behind the Heat
- Setting Up Your Grill the Right Way
- Stone vs Steel vs Ceramic on a Grill
- Common Mistakes That Crack a Stone
- Cleaning and Caring for a Grilled Stone
- Your Backyard Pizza Routine
What a BBQ Pizza Stone Actually Does
The charcoal is glowing, the lid is closed, and the stone is sitting on the grate. It doesn't look dramatic, but the stone is taking on energy from the grill and storing it throughout its body. When the dough touches the surface, that stored heat moves directly into the base, setting the crust before moisture has time to leave it soggy.
That makes a bbq pizza stone a thermal battery, not a nonstick pan. It doesn't merely create a convenient place to put a pizza. It absorbs heat, holds it, and releases it through direct contact with the dough. The practical explanation of this role is also covered in Hans Grill's guide to using a pizza stone.
The three jobs beneath the pie
First, the stone delivers a high contact temperature to the dough. Grill air can be hot, but air transfers heat less efficiently than a solid surface pressed against the crust. The result is a faster set on the bottom and a better chance of crispness instead of a soft, steamed base.
Second, the stone smooths out hot spots. Gas burners and charcoal beds rarely heat a grate with perfect uniformity. A solid baking surface spreads some of that unevenness across its footprint, so one part of the pie isn't exposed to the full force of a burner while another part barely cooks.
Third, the stone buffers the launch. Opening the lid lets heat escape, and moving a pizza onto the surface introduces a cooler mass of dough. A charged stone keeps transferring heat while the grill air recovers. That buffer is especially useful when you're handling a sticky launch and can't close the lid immediately.
Practical rule: If the stone hasn't absorbed enough heat through its core, a hot grill thermometer can give you false confidence.
Why the first pie often fails
A stone can feel hot on top while remaining cooler inside. The surface warms first, but the deeper material needs more time to reach a stable working temperature. Grill testing reported a 3/4-inch cordierite stone taking 38 minutes to stabilize at 700°F, then holding its surface within ±8°F for 14 minutes after the flame was reduced, as described in this grill-focused analysis of cordierite stone performance.
That is the thermal-battery effect in practical terms. The stone first charges, then supplies consistent heat when the grill environment changes. A baking steel conducts heat faster and can brown a base aggressively, but a stone offers a different balance of stored heat, moisture management, and forgiving contact. The right choice depends on whether you want maximum speed or a steadier cooking surface.
Cordierite and the Materials Behind the Heat
Cordierite is the workhorse material in grill-rated pizza stones because it combines moderate heat transfer with strong resistance to repeated high-heat cycling. A technical guide to pizza-baking surfaces identifies cordierite as the most common pizza-stone material and describes it as a refractory ceramic used for both oven and grill baking.
The same guide reports cordierite thermal conductivity of about 2.5 to 3.0 W/mK, density of 2.0 to 2.3 g/cc, heat capacity of 0.9 J/(g⋅°C), and heat-storage capacity of 1.8 to 2.1. Those figures aren't just laboratory decoration. Together, they explain why the material can absorb grill heat, release it steadily into dough, and tolerate the repeated changes that happen when a lid opens, a pizza launches, and the burners or coals settle.
Translating the material into grill behavior
A cordierite stone won't behave like a thin metal plate. It needs a deliberate warm-up because its useful performance comes from heat stored through its mass, not just a hot upper skin. That slower charge is the trade-off for a more stable baking surface.
Thickness matters too. A thicker slab stores more usable heat and is less easily knocked off balance when you launch a cold or heavily topped pie. It also weighs more and takes longer to heat, so the grill needs enough room, grate strength, and fuel control to support it.
A porous stone can also help manage the dough's surface moisture. That doesn't mean it absorbs every problem caused by wet toppings or undercooked dough, but it gives the base a dry, hot contact surface. The result is a different texture from a pan, particularly when the dough is stretched thin and the toppings are kept restrained.
Material comparison
| Property | Cordierite Stone | Ceramic Stone | Pizza Steel or Plate |
|---|---|---|---|
| Heat behavior | Steady transfer with useful stored heat | Gentle, steady baking when warmed carefully | Rapid, forceful heat transfer |
| Thermal shock tolerance | Strong when heated and cooled gradually | More vulnerable to sudden changes | Won't crack like stone, but can deform or damage nearby surfaces if mishandled |
| Moisture behavior | Porous and suited to dry baking | Often porous, so it needs dry care | Nonporous metal surface |
| Main advantage | Balanced performance for oven and grill use | Light baking feel and accessible entry point | Fast browning and strong bottom char |
| Main trade-off | Requires patience and careful handling | Less forgiving of abrupt temperature changes | Can scorch thin dough and adds substantial heat to the base |
A cordierite stone is the default choice because it sits between fragile ceramic and aggressive steel. It can handle the demands of a BBQ without making every launch a race against scorching, provided you charge it gradually and protect it from thermal shock. For a fuller material overview, see what pizza stones are made of.
Setting Up Your Grill the Right Way
Your first grill pizza may look finished on top while the bottom stays pale and soft. The usual cause is a stone that reached a high surface temperature before its interior had stored enough heat. A BBQ pizza stone works like a thermal battery. It absorbs energy gradually, holds that energy through the bake, and releases it into the dough. Set it on a cold grate, then heat the grill and stone together. Placing a cold stone on a hot grill can cause thermal shock and stress cracks. Plan on 45 to 60 minutes of preheating, following the guidance in this pizza-stone care and use guidance.
Build the heat zone
On a gas grill, place the stone over the central area and adjust the burners for an even chamber of heat. Keep a concentrated flame from heating only one part of the slab. Close the lid during warm-up. The stone then gains heat from below, the surrounding air, and the surfaces reflecting heat inside the grill.
Charcoal requires a different arrangement. Bank the coals to one side and set the stone over the indirect side. The stone stays away from the most severe direct radiant heat while the closed grill develops a hot baking chamber. A steady fire gives more repeatable results than the largest possible coal pile.
Charge the stone, then measure it
For standard pies, manufacturer guidance targets a stone surface around 550 to 650°F. Neapolitan-style results may call for temperatures as high as 750°F. Use an infrared thermometer on the baking surface instead of trusting the grill's lid gauge alone. The lid gauge measures air near the top of the grill. The surface reading shows the heat reaching the dough.
Preheat time is part of the cooking process. Early in the warm-up, the surface can become hot while the slab's interior remains cooler. Dough placed on it draws energy away immediately, so an undercharged stone loses temperature and produces a weaker base. Wait until the stone has become stable across its thickness, not merely hot at the top.
Launch with control
Prepare the peel before stretching the dough. A light dusting of semolina or rice flour helps the pizza slide, while excess flour burns and leaves bitter debris on the stone. Build the pie quickly, check that it moves freely, and place it in the center with one confident motion.
For a full walk-through of the launch itself, see cooking pizza on a grill with a pizza stone.
Close the lid as soon as the pizza is on the stone. The slab cooks the base, and the enclosed grill retains the reflected heat that cooks the toppings and finishes the upper crust. If one area browns first, rotate the pizza instead of repeatedly releasing heat by opening the lid.
The stone should be hot before the dough arrives, not merely hot by the time the pizza is nearly finished.
Keep the lid closed between pies while the chamber recovers. Use heat-rated gloves when handling the stone, never pour water onto a hot slab, and let it cool completely inside the closed grill before moving it. A gradual cooldown protects the same stored thermal system that a gradual warm-up helps build.
Stone vs Steel vs Ceramic on a Grill
A kamado and a small gas grill punish the same baking surface in different ways, so choose the material around the cooker, not in isolation. The surface acts as a thermal battery: its stored heat must match the grill's airflow, hot spots, and ability to recover between pizzas.
The material data in the cordierite section explains the underlying differences. Use the table here to make the practical choice for your grill and the crust you want.
Match the surface to the cooker
| Cooker and use case | Cordierite Stone | Ceramic Tile | Pizza Steel |
|---|---|---|---|
| Small gas grill | Good balance if the stone fits without blocking airflow | Usable with gentle heating | Powerful, but easy to overheat |
| Kamado | Good stored heat and indirect-baking control | Suitable when protected from shock | Effective, though difficult to moderate |
| Kettle charcoal grill | Works well over indirect coals | Needs careful placement away from sharp hot spots | Delivers strong browning over a controlled fire |
| Large offset grill | Benefits from the broad chamber and indirect zone | Better with stable heat and careful placement | Useful when the cook wants a heavily browned base |
A small gas grill usually gives the most predictable results with cordierite, provided the stone leaves room for airflow. Its thermal battery smooths out the burner's direct heat, giving the base time to brown without making the surface response too aggressive. Steel can work, but the grill's burner pattern and the dough thickness need closer attention.
Kamado cookers hold heat efficiently, which makes them well suited to a stone and indirect baking. Ceramic also fits this setting when the product is designed for grill use and protected from abrupt changes. Steel produces strong results in a kamado, but the enclosed cooker can make its fast response harder to moderate.
A kettle charcoal grill gives each surface a different job. Cordierite suits repeatable baking over indirect coals. Ceramic needs careful placement away from sharp hot spots. Steel is useful when the fire is controlled and a darker underside is the goal.
Large offset grills offer a broad chamber and a useful indirect zone. A stone can take advantage of that space, while ceramic benefits from stable placement. Steel makes sense when the cook deliberately wants a heavily browned base and can manage the fire rather than letting the plate dictate the result.
Choose steel for speed and strong bottom color when you already understand how your grill transfers heat. Thin dough, wet toppings, or uneven burners leave little room for correction. Ceramic suits lighter-duty baking and careful handling. Cordierite remains the practical choice for a broad range of grills, but its fit, support, and placement determine whether that stored heat produces repeatable pizza.
Common Mistakes That Crack a Stone
Most cracked stones fail because of a sudden change, not because the grill is too hot to begin with. Cordierite is designed for high-heat baking, but the material still expands and contracts as its temperature changes. Uneven expansion creates stress, especially when moisture or a cold surface is involved.
The cold-stone mistake
Putting a cold stone onto a blazing grate is the most common error. The underside can heat sharply while the top remains much cooler, creating a mismatch across the slab. The replacement habit is simple: place the stone on the cold grill, then heat both together.
The same caution applies after baking. Don't carry a hot stone onto a cold concrete patio, set it on a wet counter, or rinse it under a tap. Let it cool where it is, with the grill closed.
Water and detergent create separate problems
Soaking is not a deep-cleaning shortcut. A porous stone can hold water inside its structure, and that trapped moisture becomes a risk when the stone is exposed to high heat. Use a scraper and a dry wipe instead of trying to make the stone look new.
Dishwashers and detergents are equally unsuitable. Heat cycles add stress, while detergent can enter the pores and leave odors or residue that later emerges during baking. Independent care guidance recommends starting with a cold stone on a cold grill, avoiding soaking and detergents, and accepting discoloration as normal. Those points are summarized in this barbecue pizza-stone care guide.
Don't borrow cast-iron habits
Oil seasoning belongs to a different kind of cooking surface. A porous stone doesn't need an oil coating, and adding one can create smoke, sticky patches, or burnt residue. Keep the stone dry and let normal baking change its appearance naturally.
Darkening, flour marks, and baked-on spots are usually cosmetic. Deep cracks, pieces that move, flaking fragments, or damage that grows during heating are different. A stone with structural damage should be retired rather than tested over a grill where a fragment could interfere with the food or grate.
Cleaning and Caring for a Grilled Stone
A grilled stone doesn't need to stay pale to stay useful. In fact, a patchy dark surface is normal after repeated baking. The job is to remove loose food debris, keep moisture out of the stone, and prevent grease from becoming a permanent heat problem.
Start after the stone has cooled enough to handle safely but is still mildly warm. Use a metal bench scraper or flat spatula to lift loose cheese, charred toppings, and baked flour. Scrape parallel to the surface instead of digging the edge into the slab.
Then wipe away the crumbs with a dry cloth. If a mark needs attention, use a barely damp paper towel and let the stone dry completely before the next heating cycle. Water should be a limited tool, never a soak.
Deal with grease at the grill level
A stone under a gas grill can collect drippings from the cooking chamber. Washing the stone won't solve the source. Clean the grill's drip area, keep fatty toppings controlled, and use the grill's intended drip tray or a suitable foil shield below the grate when the appliance allows it.
Don't place loose foil where it blocks burner airflow or interferes with the grill manufacturer's safety design. The aim is to keep grease away from the baking surface without creating a second heat-management problem.
Store it dry and supported
Let the stone cool fully before bringing it indoors. In freezing climates, indoor storage protects the slab from repeated moisture and cold exposure. Store it flat or in a position where it can't slide and strike a hard edge, and don't stack heavy cookware on top of it.
Never wrap a warm stone in an airtight cover. Heat and residual moisture need a chance to dissipate. Once the surface is completely cool and dry, a breathable storage location is preferable to a sealed container.
A used stone should look experienced, not polished. Judge it by stability and baking performance, not by whether every stain has disappeared.
Check the slab at the start of the season for hairline cracks, loose edges, or flaking. If the damage is structural, don't keep experimenting with it over live heat. Retire it safely and replace it with a stone sized for the grate and rated for BBQ use.
Your Backyard Pizza Routine
The first pizza usually fails before it reaches the grill. The stone may feel hot while its center is still cold, so the top browns before the base has enough stored heat to bake through. Treat the bbq pizza stone as a thermal battery: preheating charges the slab, and each launch draws energy from it. Repeatable results come from charging it fully, confirming the surface temperature, and keeping the lid closed.
Clear the grill, clean the grate, prepare every topping, and decide where the indirect and hotter zones will sit. Pizza moves quickly after launch, so sauce, cheese, peel, turning tool, and a heat-safe landing surface should already be within reach.
On a gas grill, place the stone in the cold grill and preheat with the lid down. On charcoal, bank the coals to one side and position the stone over the indirect area. Confirm the surface with an infrared thermometer before the first launch. The target temperatures for different doughs and stones are covered earlier, so do not rely on the lid gauge alone.
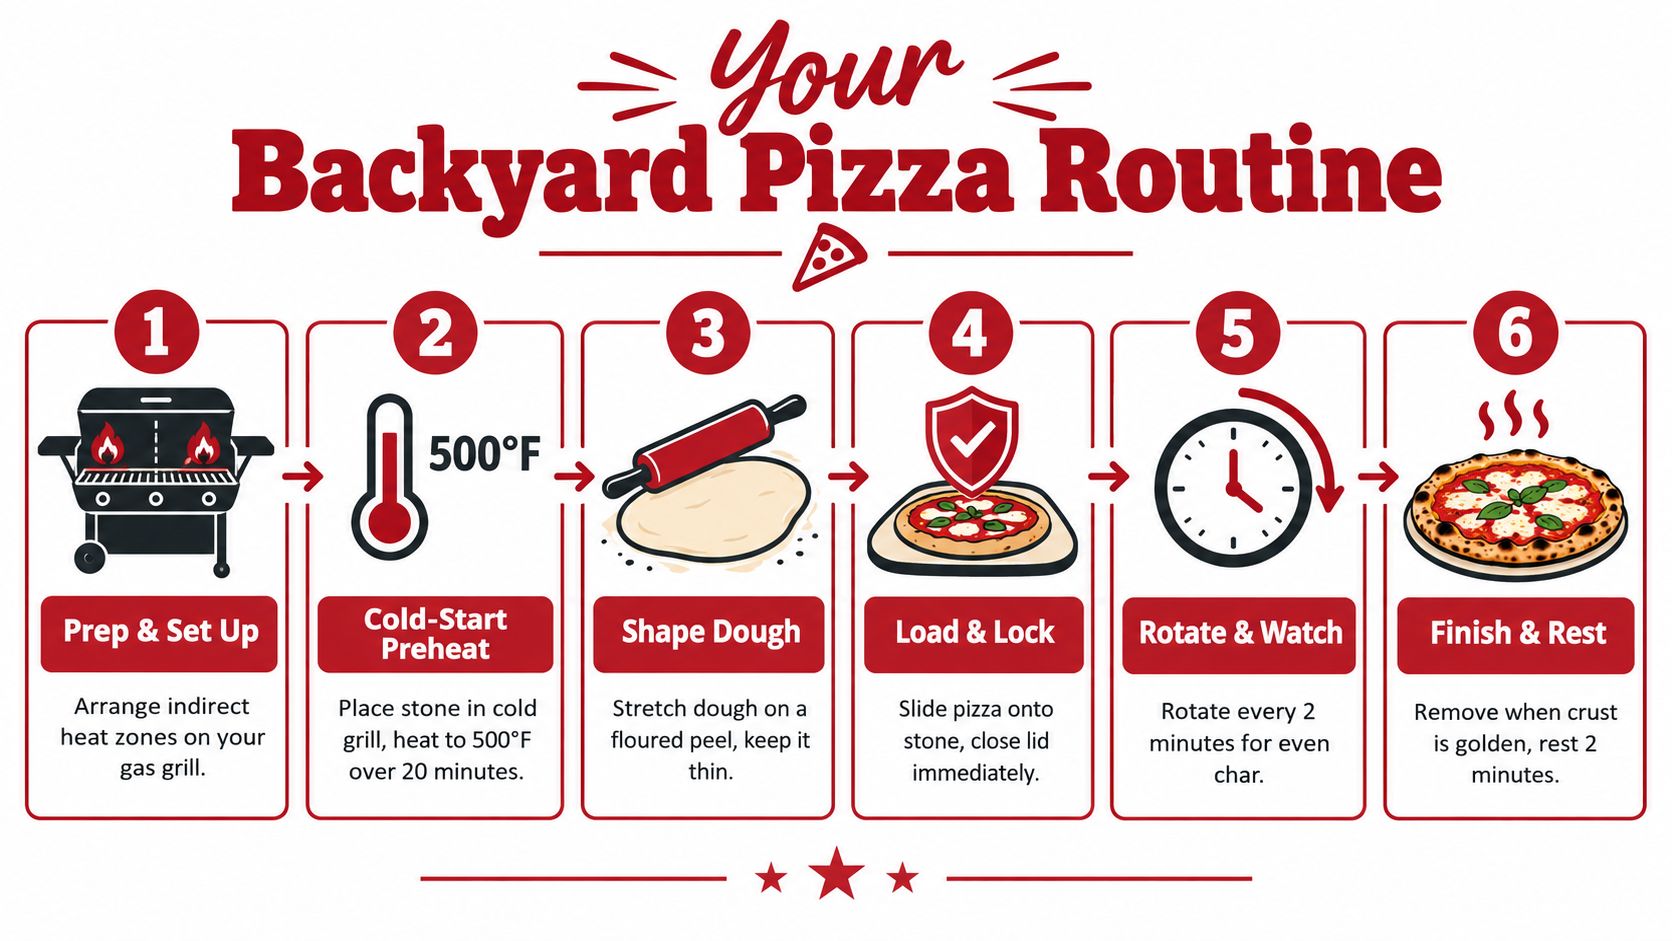
Run the bake in a fixed order
- Set up the heat zones. Keep the stone away from the fiercest direct coal bed or a concentrated burner flame. Give the grill enough time to heat the slab through, not just warm its upper face. A surface reading can look ready while the stone still lacks the stored energy needed for a second pie.
- Shape and load efficiently. Stretch the dough on a lightly dusted peel, keep the topping layer controlled, and test the dough's movement before approaching the grill. A heavy, wet pie makes a difficult launch and pulls heat from the stone during the bake.
- Close the lid immediately. The stone supplies bottom heat, while the closed grill retains heat above the pizza. Open only to rotate or inspect the base. Every unnecessary opening extends the bake and lets the top fall behind the bottom.
- Rotate based on evidence. If one side colors faster, turn the pizza or adjust its position. The first pie reveals where your grill's hot zone sits. Use that information for the next launch rather than repeating the same placement.
A fully charged stone should bake a pizza in a few minutes, although dough thickness, topping moisture, and surface temperature change the timing. Check the underside before the top appears finished. A pale base means the stone needs more preheat or the pizza needs more time. A dark underside with underdone cheese means the surface is too aggressive, or the pie is too thin for that setup.
This short demonstration shows the launch, lid control, and rotation that make grill baking easier to repeat.
After the last pie, turn off the burners or close down the charcoal airflow and leave the stone in place. Let it cool naturally. Scrape loose debris only when it is safe to handle, then move it indoors once fully cool and dry.
The routine is simple:
- Preheat by the clock: Charge the stone through its full thickness.
- Confirm with a thermometer: Measure the surface instead of trusting the lid gauge alone.
- Launch with a prepared peel: Keep dough, toppings, and tools ready before opening the lid.
- Rotate deliberately: Correct hot spots instead of accepting an uneven base.
- Cool slowly: Leave the stone in the closed grill after the fire is off.
- Never soap a porous stone: Scrape, wipe sparingly, and store it dry.
Hans Grill offers cordierite pizza stones, pizza steel, peel sets, and proofing tools for oven and BBQ use. Visit Hans Grill to compare baking surfaces and choose a tool that fits your grate, heat source, and preferred crust.


