

BBQ Pizza Stone Instructions That Actually Work
You've got the stone, the grill's hot, and the first pizza looks simple enough. Then the bottom goes black, the cheese stays shy, and the stone spits a crack across the middle before you've even figured out what happened. That's the normal disaster, not the exception, and the fix starts with one hard truth: the air inside the grill, the stone's surface, and the heat pattern under the dough are three different things.
Table of Contents
- Why Most BBQ Pizza Stone Setups Fail Before the Dough Hits the Grate
- What a Pizza Stone Is Actually Doing on Your Grill
- The Preheat and First-Launch Routine
- Managing Direct and Indirect Heat on Gas and Charcoal
- Reading the Bake So Timing Becomes a Backup, Not the Main Tool
- Thermal-Shock Prevention and Safe Cleaning After the Bake
- Putting It All Together and Answering the Questions First-Timers Still Ask
Why Most BBQ Pizza Stone Setups Fail Before the Dough Hits the Grate
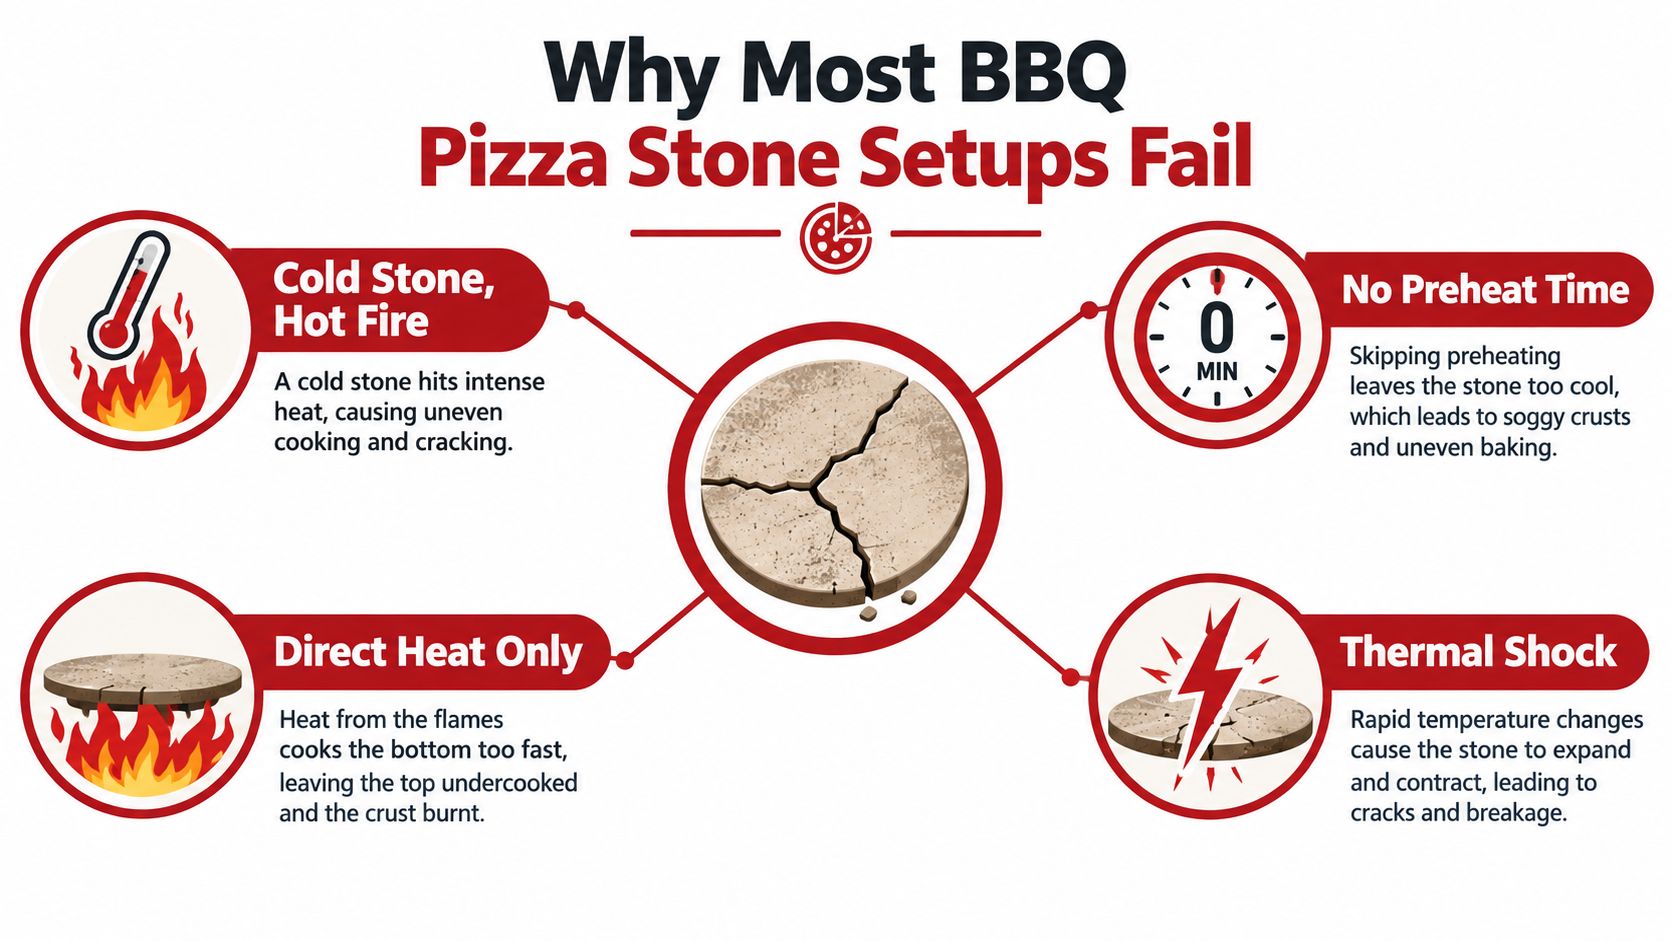
Most first attempts fail because the cook treats the grill like an oven. It isn't. A closed lid can feel hot, the grate can radiate hard, and the stone can still be nowhere near ready to bake a pizza cleanly.
The three temperatures you need to keep separate
The ambient lid temperature is what your grill thermometer shows. The stone surface temperature is what touches the dough. The heat pattern beneath the stone decides whether the bottom chars before the top melts.
That's why a flat “preheat for 30 minutes” instruction keeps failing people. Thirty minutes may warm the air, but if the stone hasn't soaked up enough heat, the crust sticks and goes pale. If the fire is blasting straight up under the pie, the bottom can race ahead while the toppings lag behind.
Practical rule: If the lid says hot but the stone hasn't had time to heat mass into itself, don't launch.
Curiosity makes it worse. Lifting the lid every two minutes dumps heat, drags the bake out, and gives you a half-set top with a scorched underside. The better move is to treat the grill like a closed cooking chamber and only open it when you need to check color, rotate, or retrieve the pizza.
A better mental model is simple. You're not trying to make the grill “as hot as possible.” You're trying to build a stable, dry, evenly heated surface under a controlled heat pattern, then leave it alone long enough for the dough and toppings to finish together.
What a Pizza Stone Is Actually Doing on Your Grill
A pizza stone is a heat battery. It stores energy, then gives it back to the dough fast enough to crisp the base without turning the whole cook into a charred mess. That's why a stone behaves differently from a grate, and why thin metal and thick ceramic don't cook the same way.
Cordierite is the material that matters most in bbq pizza stone instructions because it handles heat changes better than cheap, fragile ceramics. A 2025 report on research published in Matter explains that cordierite expands only minimally as temperature rises and even contracts slightly along one crystallographic direction, which helps explain why it stays dimensionally stable under heat. The researchers used lattice-dynamics and molecular-dynamics simulations to show that competing atomic-vibration and elastic effects largely cancel out, which is exactly the kind of boring-sounding physics that keeps your stone from turning into shrapnel. Technology Networks coverage of the cordierite research
Why material choice changes your margin for error
Cordierite gives you forgiveness, not immunity. It helps with gradual swings, but it won't save a wet stone dropped onto a screaming hot grate, and it won't shrug off trapped moisture. That's the part home cooks miss when they hear “durable” and assume “indestructible.”
The stone's job is also to smooth out uneven heat. The top may be getting radiative heat from the lid while the bottom is getting conduction from the stone, and the stone's thickness decides how much heat it can hold before it gives up. Thicker stones tend to need longer to get ready because they're doing more work as a reservoir.
| Material | Thermal Expansion | Typical Preheat | Best For |
|---|---|---|---|
| Cordierite | Low, with minimal dimensional change | Longer, because it needs to soak heat | Backyard grilling and high-heat baking |
| Thin steel | Not covered in the verified data | Faster heat response | Quick bakes when you want speed over forgiveness |
| Generic ceramic | Not covered in the verified data | Varies, often less forgiving | Light use with careful handling |
The practical takeaway is blunt. Pick a dry, heat-tolerant stone, heat it gradually, and respect thickness. Marketing doesn't cook pizza, thermal mass does.
The Preheat and First-Launch Routine
You can wreck a pizza before the dough even leaves the peel. The usual mistake is hearing “preheat for 30 minutes,” watching the lid thermometer climb, and assuming the stone is ready. It often is not. Three temperatures matter here: the air under the lid, the stone surface, and the heat pattern under the dough. If you ignore that split, you get the classic grill pizza failure, burnt bottom, pale top, raw center.
Start with a dry stone on a cold grate, then light the grill and let everything warm together. That protects the stone from a sharp temperature jump and gives it time to store heat instead of just sitting in hot air.
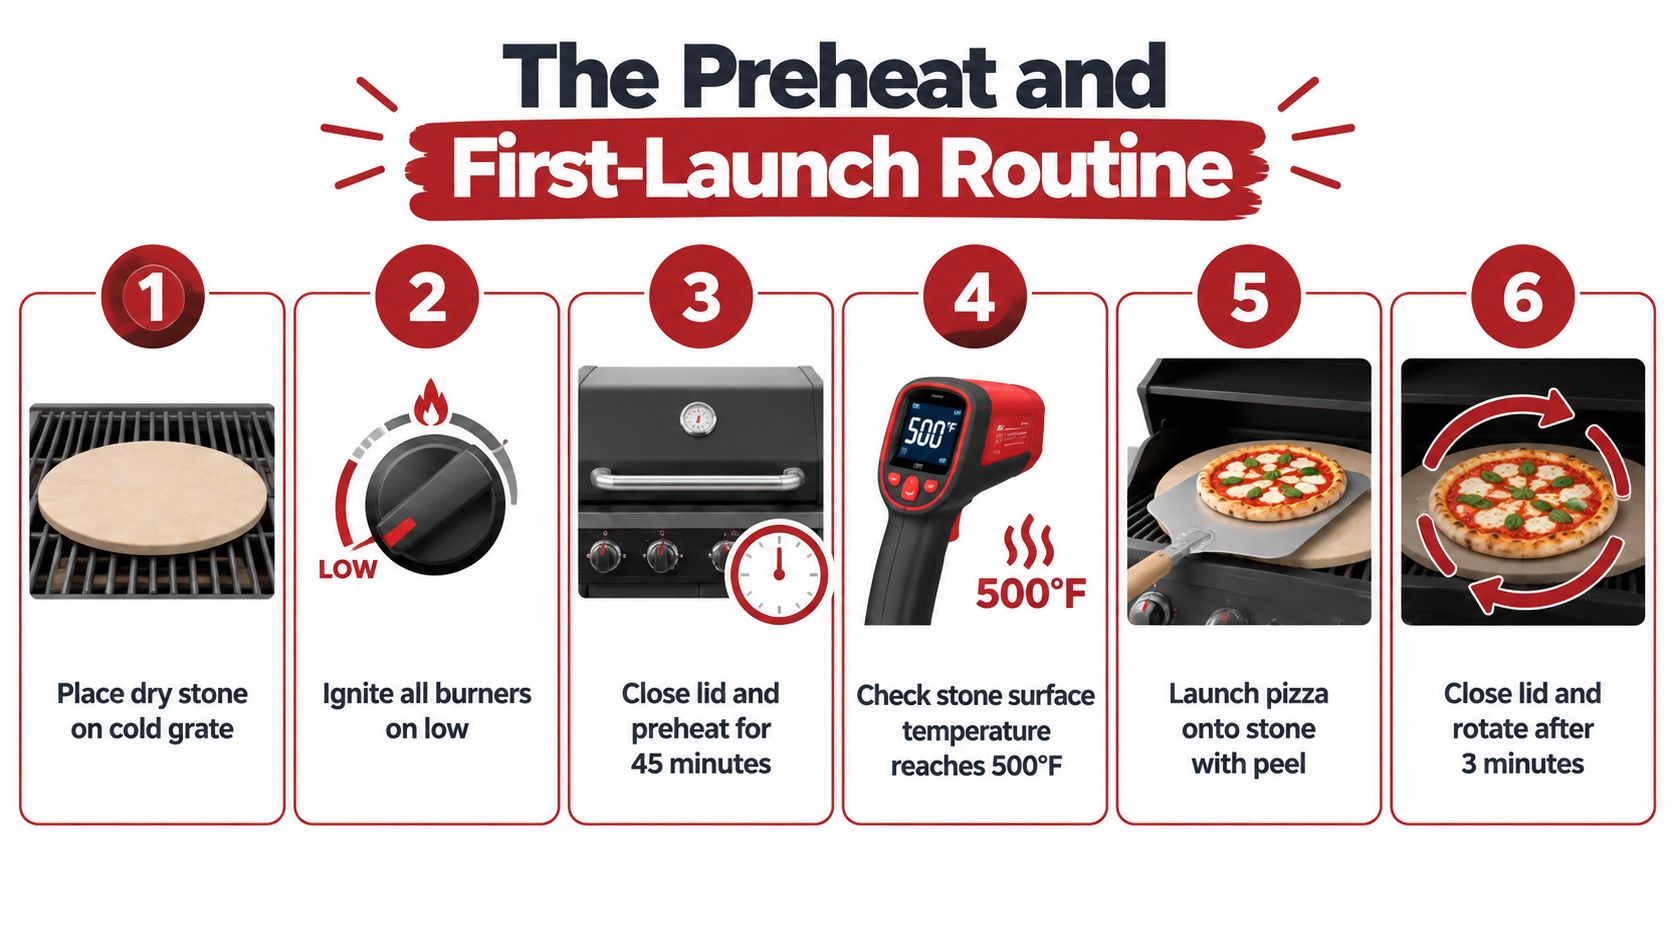
Weber's pizza grilling guidance calls for a 30-minute stone preheat and a grill range of 450–475°F, with 500°F also referenced in its stone instructions and an 8–10-minute cook. Use those numbers as a starting point, not a finish line. The lid gauge reads the chamber. Your dough lands on the deck. Check the stone surface with an infrared thermometer if you have one, because that reading tells you whether the base will bake cleanly or scorch before the toppings catch up.
Launch like you mean it
Dust the peel with flour or cornmeal and build fast. If the dough sticks on the peel, it will stick worse once it starts sagging under sauce and cheese. Keep the toppings moderate and the sauce restrained. Wet, heavy toppings slow the center and punish any hot spot under the crust.
Then commit. Slide the pizza onto the hot stone in one motion, close the lid right away, and stop fussing with it for the first part of the bake. Every nervous check dumps heat and drags the stone surface backward.
The first pizza is not where you prove your bravery. It's where you protect the heat you've already built.
For a visual walkthrough of the same preheat logic, see the guide on preheating a pizza stone.
Managing Direct and Indirect Heat on Gas and Charcoal
Once the pizza is on the stone, the grill setup decides whether the top keeps pace with the bottom. On a gas grill, the cleanest setup is usually to heat the outer burners and leave the center less aggressive under the stone. On charcoal, bank the fuel around the perimeter instead of dumping it directly beneath the pie.
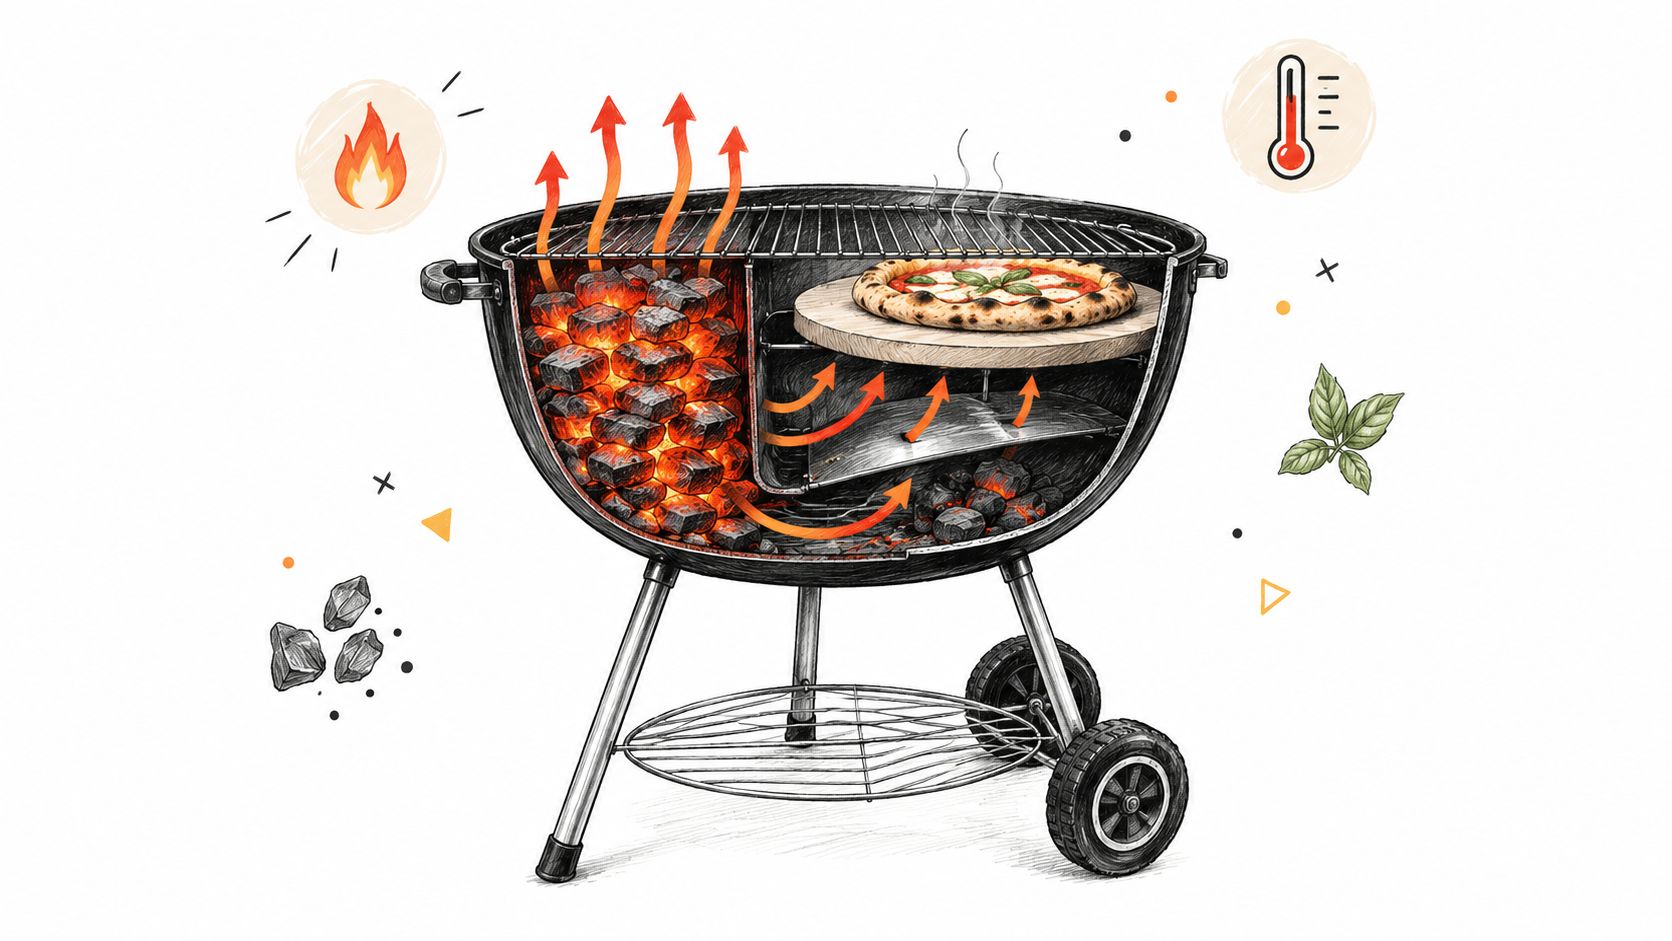
That's the whole trick. Direct heat is useful for setting the base, but too much of it burns the underside before the cheese wakes up. Indirect heat gives the top time to catch up without killing the bottom.
When to move the pizza
A useful pattern is a short stretch over stronger heat, then a finish in a cooler zone if the crust is coloring too fast. That move is what saves a pie with a strong base and slow toppings. If the bottom is racing ahead, don't keep cranking the fire and hoping for the best.
For small grills, you may not get a perfect two-zone setup. In that case, keep the lid closed, reduce the aggression of the fire, and accept a slightly longer bake instead of chasing speed. Burnt bottoms are a heat-pattern problem, not a pizza problem.
If you want a gas-grill-specific reference point, the internal guide on pizza on gas grill aligns with the same split-zone logic. It's not fancy, but it works because the heat is managed instead of guessed.
Good setup beats brute force. A pizza wants balanced heat, not a blast furnace under one spot.
One more thing matters here. The stone surface temperature and the grill's displayed temperature are not the same reading, so don't treat them like twins. If your grill runs hot on the lid thermometer but the stone hasn't fully absorbed that heat, the pizza still won't bake evenly.
Reading the Bake So Timing Becomes a Backup, Not the Main Tool
A pizza can hit the expected bake window and still be wrong. Read three signals together: the browned, bubbly rim, a base changing from pale to mottled gold, and cheese that has melted with a few browned spots. If the cheese remains cool in the middle while the underside is darkening, close the lid and let the top catch up. Adding flame beneath the stone only widens the problem.
The 8–10 minute window mentioned earlier is a useful checkpoint after the stone has absorbed heat and the dough has launched cleanly. Let the clock nudge you to look, and let your eyes make the call.
What to check before you pull it
- Rim color: The edge should blister and begin to char in spots.
- Bottom color: Lift one side with a peel. Look for a crisp, mottled underside.
- Cheese behavior: Melted cheese with browned freckles shows that the top is catching up.
- Center feel: A wet or slack center needs more covered cooking.
The stone surface, lid thermometer, and heat pattern beneath the dough can tell different stories. A hot lid does not guarantee that the stone is ready, while a hot stone can keep scorching one section of the base. Check the pizza rather than trusting a single reading.
A quarter-turn on the peel helps when one side receives more direct heat. Make that adjustment once, then close the lid. Repeated peeking dumps chamber heat and slows the toppings. If the bottom looks finished while the top stays pale, shift the heat pattern instead of making the stone hotter.
Once the pie comes off, rest it off the stone for about a minute. The base settles, and slices cleanly without turning brittle in your hands.
Thermal-Shock Prevention and Safe Cleaning After the Bake
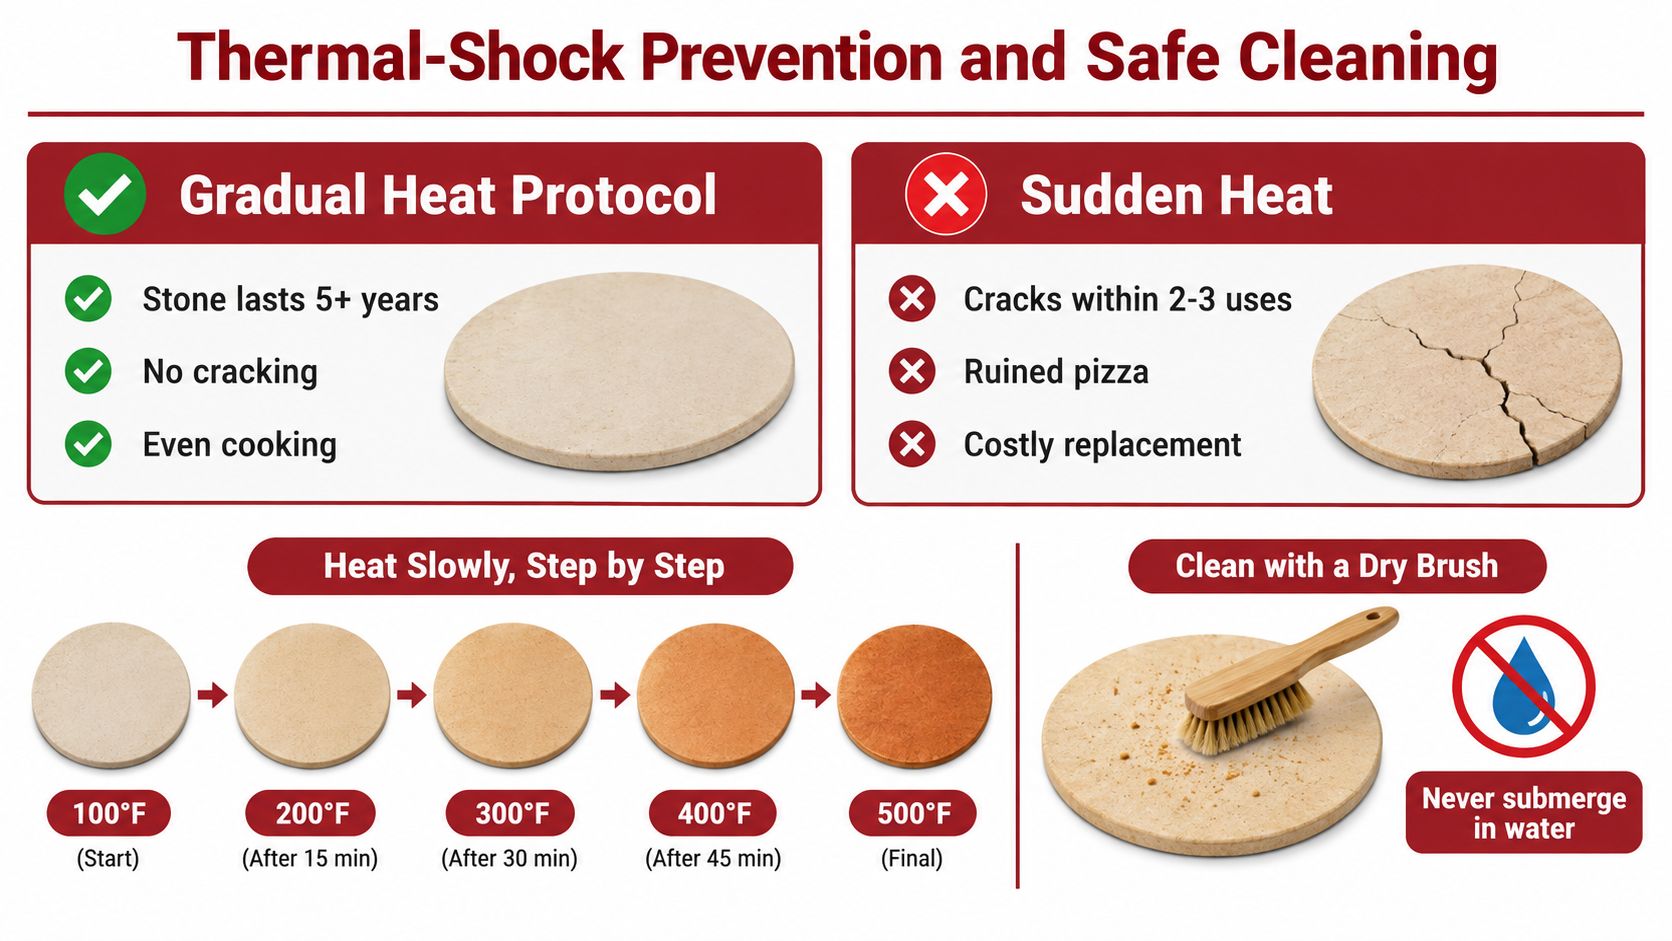
The biggest way people crack a stone is not by cooking it too hot. It's by changing its temperature too fast or putting moisture where heat is about to hit. Cordierite helps with stability, but it doesn't cancel physics, and it doesn't forgive bad handling. The pizza stone crack guide makes the same point in plain terms, dry stone in, gradual heat up, no hot-to-cold abuse.
The handling rules that prevent cracks
Put the stone on the grill while it's still cold. Keep it dry. Don't set it over glowing coals or naked flame if you can avoid it, and don't pull a hot stone onto a cold counter or splash it with water. After the bake, switch the grill off and let the stone cool all the way down inside the grill before you touch it.
That last part matters more than people think. A stone can survive plenty of cooks and still fail later if it picked up moisture or got forced through a temperature swing it didn't need to endure. If your stone cracked even though it was cordierite, the material wasn't the problem, the handling was.
For post-cook cleaning, keep it dull and mechanical. Scrape off residue after it has cooled, and store it dry. Don't soap it, don't soak it, and don't wash it while it's still hot. The internal guide on why a pizza stone cracks is worth a look if you've already lost one and don't want to lose the next.
Dry stone, gradual heat, natural cool-down. That's the whole survival plan.
If a stone darkens or smells on a later preheat, that usually points to residue or trapped moisture, not magic wear and tear. Clean it properly, store it dry, and stop treating it like cookware that can be dunked and forgotten.
Putting It All Together and Answering the Questions First-Timers Still Ask
The repeatable routine is simple. Put the dry stone on a cold grill, preheat with the lid closed for 30-plus minutes until the stone is hot, launch a floured pie once the surface is ready, and bake for 8–10 minutes without fussing over the lid. If the toppings lag behind the crust, shift the heat pattern instead of cranking the flame harder.
Food safety sits beside heat management, not inside it. Keep perishable toppings refrigerated until you're ready to build, don't leave pizza sitting out for more than 2 hours, hold cooked pizza at 140°F or above if it's waiting to be served, and use a thermometer for meat toppings so you're not guessing from crust color alone. The USDA's 40°F to 140°F Danger Zone is the line that matters when you're cooking outside with a lot of moving parts. USDA food safety guidance for take-out foods
People still ask four things. Do you oil the stone? No. Do you season it like cast iron? No. Do you leave it on the grill between cooks? Only if it stays dry and protected from thermal shock. What if the first pizza sticks anyway? Your launch was probably too wet, the stone wasn't hot enough, or you opened the lid too often and stole the heat.
Hans Grill makes cordierite pizza stones, steel, and proofing tools for backyard pizza cooks who want a repeatable setup, not a guessing game. If you want to build a cleaner grill-to-crust workflow and compare the tools before your next cook, visit Hans Grill.


