

Bread Proofing Box Temperature Guide for Perfect Dough
You've mixed a pizza dough, covered the bowl, and left it on the counter. Hours later, the dough is either barely moving or so inflated and fragile that it tears when you try to shape it. The recipe hasn't changed, but your kitchen has. A cold worktop, a warm oven nearby, a winter draft, or a sunny summer counter can all change the pace of fermentation.
That's why bread proofing box temperature should be treated as a control knob, not a fixed rule. The right setting depends on the dough, the yeast, the schedule, and the flavor you want. Once you control the environment, your dough becomes easier to predict, easier to handle, and much more consistent from one pizza night to the next.
Table of Contents
- Why Kitchen Ambient Temperature Fails Your Dough
- How Heat and Humidity Drive Fermentation
- Ideal Proofing Targets for Different Dough Types
- Setting Up and Calibrating Your Proofing Box
- Balancing Cold Retardation and Warm Proofing
- Troubleshooting Under-Proofed and Over-Proofed Dough
- Elevating Pizza Night with Professional Gear
Why Kitchen Ambient Temperature Fails Your Dough
A dough ball can look perfectly healthy when it goes into a covered container. Then the room changes. The kitchen cools after dinner, the counter stays cold, or the bowl sits beside a warm appliance. Yeast keeps working, but it no longer follows the timing you planned.
That creates familiar problems. A dough that should be ready for shaping still feels tight and heavy. Another batch rises too quickly while you're preparing toppings, loses strength, and spreads across the bench. Home bakers often blame the flour, the yeast, or the hydration first, even though the surrounding temperature may be the variable that changed most.
Practical rule: If the dough behaves differently from the same recipe made previously, check its temperature before changing the formula.
A kitchen counter is an uncontrolled fermentation chamber. Even when the air feels comfortable to you, the dough can sit in a colder bowl or on a colder surface. Dough temperature also changes gradually, so the room may feel stable while the center of the dough remains behind or ahead of the expected fermentation schedule.
A proofing box makes timing a choice
A dedicated enclosure gives the dough a more stable environment. You can choose a gentle setting for a long rise, a warmer setting when you need same-day dough, or a cooler setting for a more deliberate fermentation. The box doesn't replace judgment, but it removes much of the guesswork.
That matters particularly with pizza. Pizza dough needs enough fermentation to become extensible and flavorful, but it also needs enough strength to stretch without tearing. If the dough spends the whole rise in a fluctuating kitchen, you may not know whether it's under-proofed or only cold at the center.
A dough box also protects the surface from drafts and accidental drying. The practical difference between a dough that stays covered in a stable enclosure and one that sits exposed on the counter is often visible during shaping. For a closer look at how dough containers support fermentation, see this guide to what a dough box does for rising dough.
The aim isn't to force every dough to rise quickly. It's to make the fermentation rate intentional. Once temperature becomes a setting you can adjust, the kitchen stops dictating your baking schedule.
How Heat and Humidity Drive Fermentation
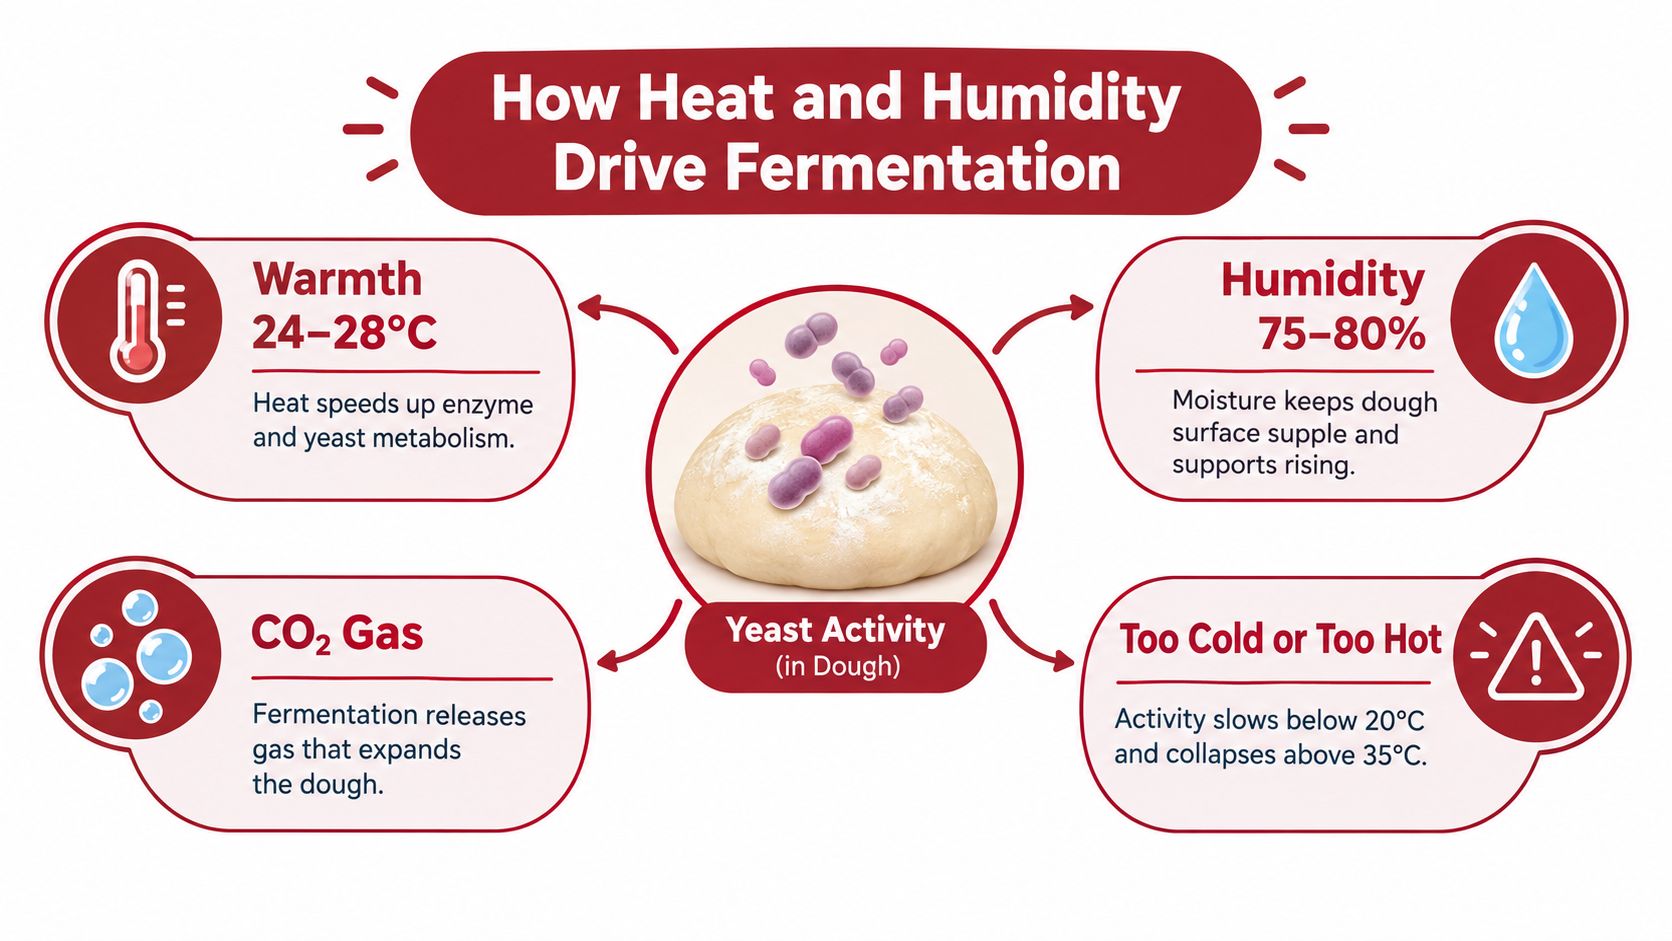
Yeast behaves less like a timer and more like a living workforce. In a suitable environment, yeast consumes available sugars and releases carbon dioxide, creating the gas that inflates the gluten network. Warmth generally encourages that activity, while cold conditions slow it.
Bread science sources place a narrower yeast activity optimum around 32–35°C, or 90–95°F, and the Food and Agriculture Organization's baking reference warns that temperatures above 42°C can kill yeast. Those figures describe yeast biology, not an instruction to set every home proofing box to the warmest possible level. Dough has to preserve its structure while fermentation proceeds.
Temperature controls speed
As the dough warms, yeast can produce gas more actively. That can be useful when you need dough ready for dinner, but fast gas production also reduces your margin for error. A dough that moves rapidly can pass its ideal proofing point before you've noticed the change.
Temperature also affects the enzymes that help make sugars available during fermentation. The result isn't just “warm equals good” or “cold equals bad.” Warmth can shorten the schedule, while a cooler environment gives you more time to develop flavor and coordinate the dough with the rest of the meal.
The box should therefore support the dough's schedule rather than compete with it. A lean pizza dough for a same-day bake may need more warmth than a dough that has already fermented overnight. A delicate enriched dough may need warmth, but not the aggressive heat used for commercial production.
Humidity protects the dough surface
Temperature controls the pace of fermentation. Humidity protects the dough while it rises.
When the dough surface dries, it forms a skin. That skin can resist expansion, tear as the dough grows, and make shaping less even. A covered container or humid proofing environment keeps the outer layer supple, so the dough can expand without fighting a dry crust on its surface.
Humidity doesn't make weak dough strong, and it won't correct an over-hot setting. It prevents moisture from escaping too quickly. You still need a lid, cover, or controlled moisture source that keeps the dough protected without allowing condensation to drip heavily onto it.
The useful mental model is simple: heat sets the pace, humidity preserves flexibility, and gluten provides the structure. Change one without considering the others and the dough may rise, but it won't necessarily rise well.
Ideal Proofing Targets for Different Dough Types
There isn't one perfect setting for every dough. A lean pizza dough, a sourdough boule, and a butter-rich brioche respond differently to the same enclosure temperature. The right setting should reflect how quickly you want fermentation to proceed and how much structure the dough needs to maintain.
Evidence summarized by Fond's dough proofing reference places most yeasted bread in the 24–27°C range, sourdough commonly at 22–26°C, enriched doughs such as brioche at 26–29°C, and rye dough at 27–30°C. Use those ranges as starting points, then judge the dough itself rather than waiting for a clock to declare it ready.
Dough-Specific Proofing Targets
| Dough Type | Temperature Range | Humidity Target | Primary Goal |
|---|---|---|---|
| Lean pizza dough | 24–27°C | Covered and protected from drying | Reliable expansion and easy stretching |
| Sourdough | 22–26°C | Covered, with a supple surface | Slower fermentation and flavor development |
| Brioche or challah | 26–29°C | Moist, protected enclosure | Support a rich dough that ferments more slowly |
| Rye dough | 27–30°C | Well covered to prevent skin formation | Encourage fermentation in a dense, less elastic dough |
Lean pizza dough
For most conventional pizza doughs, start in the middle of the standard yeasted range rather than immediately choosing the warmest setting. A moderate environment gives the dough time to develop strength and extensibility while keeping the schedule manageable.
If you're making dough for a same-day pizza session, moving toward the warmer end can help shorten the wait. Watch the dough, though. The goal is a smooth, aerated ball that stretches without snapping back, not the largest possible volume in the container.
For more pizza-specific guidance, compare your recipe and schedule with this guide to pizza dough proofing temperature. A dough with a long fermentation plan needs a different setting from one mixed shortly before baking.
Sourdough
Sourdough usually benefits from a more measured approach. A slightly cooler proof can give the culture more time to develop flavor and can make the fermentation easier to manage, especially when the dough will be held for a long period.
Don't judge sourdough by temperature alone. Starter strength, flour choice, dough acidity, and the amount of inoculated starter all affect the pace. Use the box to remove room fluctuations, then rely on volume, bubbles, elasticity, and the dough's feel to decide when it's ready.
Enriched and rye doughs
Butter, eggs, sugar, and other enriching ingredients can change how quickly dough ferments and how it responds to warmth. Brioche and challah often need a warmer environment than a lean dough, but their fat-rich structure still deserves gentle handling.
Rye has a different challenge. It doesn't build the same elastic gluten network as a wheat-heavy dough, so fermentation and handling cues can look unfamiliar. A stable warm environment may help it progress, but excessive heat can leave you with a fragile dough that lacks useful structure.
The best setting is the one that matches the dough's behavior. If the dough reaches its target volume too early, lower the temperature or shorten the proof. If it remains dense and cool, increase warmth gradually rather than making a dramatic adjustment.
Setting Up and Calibrating Your Proofing Box
A proofing box is only as precise as the conditions inside it. The display may show a reassuring number while the dough sits near a warm element, in a cold corner, or inside a container that hasn't reached the surrounding air temperature.
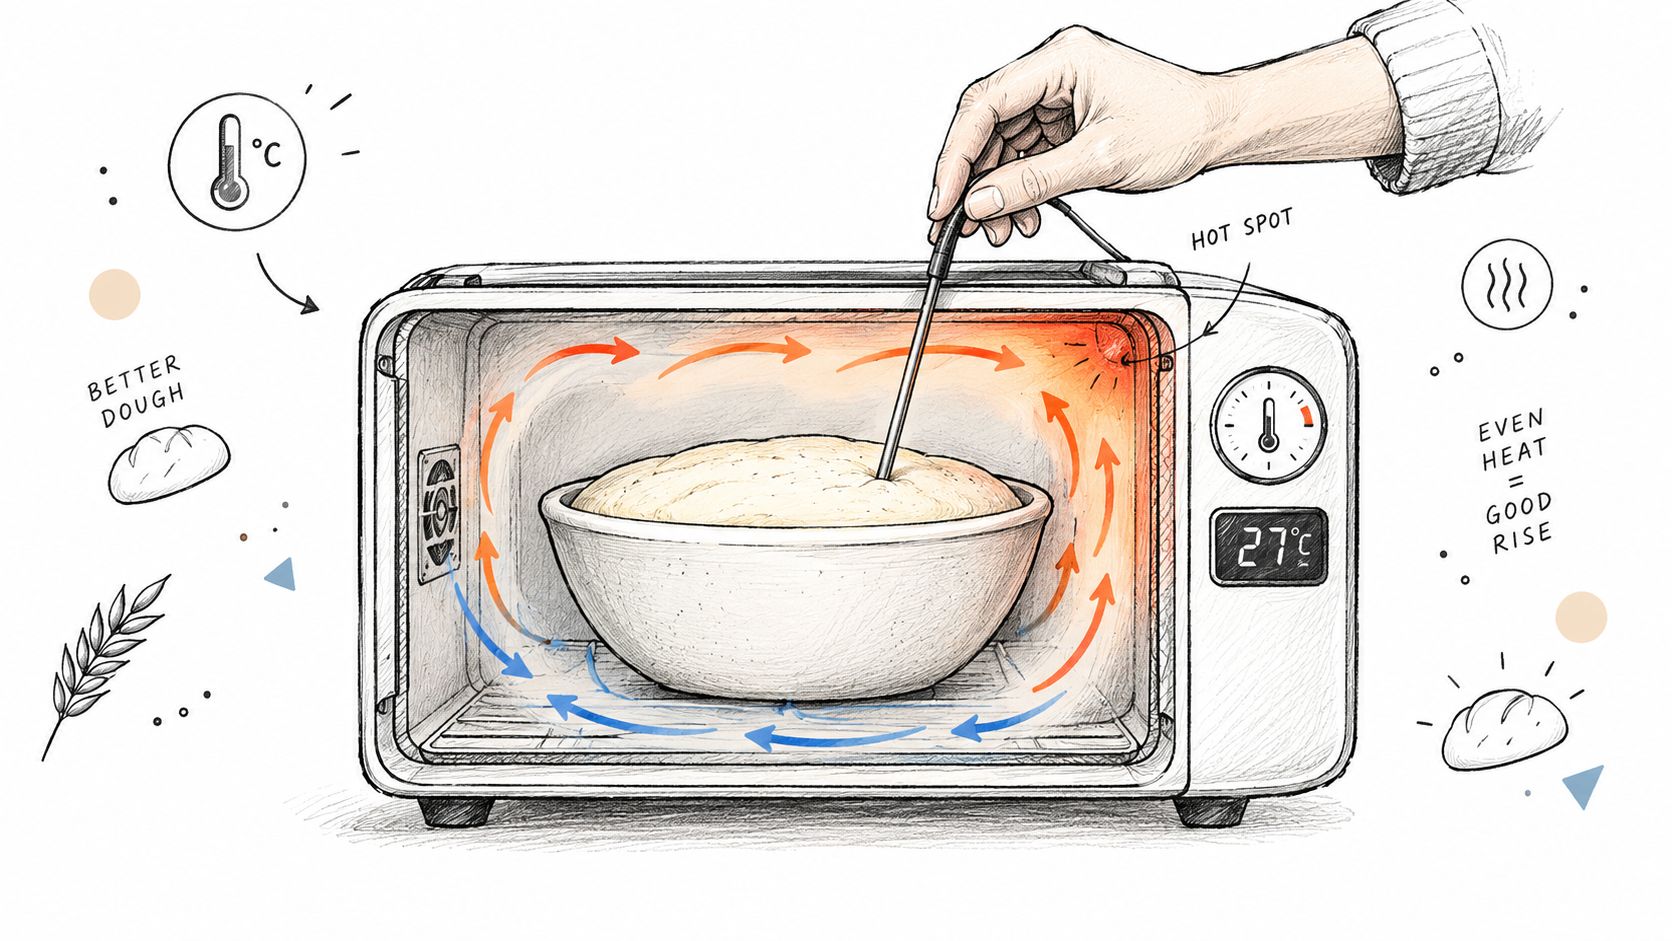
Start by placing an independent thermometer inside the enclosure. Put it near the dough container, not directly beside the heating element or on the lid. If you use a hygrometer, position it where it can measure the general enclosure rather than the damp surface immediately above a water reservoir.
Calibrate before trusting the setting
Run the empty box first and let its internal conditions settle. Compare the box display with the independent thermometer, then repeat the check with the actual container you use for dough. A thick bowl, a covered tray, or several dough balls can change how quickly the interior reaches the chosen temperature.
Check more than one location if the box is large enough. Move the independent thermometer from the front to the back and from a lower position to a higher one. A difference between locations tells you that placement matters, particularly when the dough sits close to a heat source.
A stable reading near the dough matters more than a precise display on the control panel.
Don't place a probe deep into the dough repeatedly during every proof. Opening the enclosure and disturbing the dough can create more variation than the original problem. Use an instant-read probe when you need to check the dough's center, then record the result alongside the box setting and the visible fermentation cues.
Control moisture without soaking the dough
If your proofing box uses a water reservoir, add moisture conservatively. The aim is to prevent a dry skin, not to create dripping condensation. A covered dough container often provides enough protection on its own, especially for pizza dough.
Keep the dough away from direct contact with water and wipe away heavy condensation before it falls onto the surface. If the dough develops a wet, sticky exterior, reduce the moisture source or improve air circulation while keeping the container covered.
A simple setup can work well: stable enclosure, independent temperature check, covered dough, and enough time for the dough to reach equilibrium. If you prefer to build rather than buy, use this practical guide to a DIY dough proofing box as a starting point for thinking about insulation, heat, and moisture control.
This video demonstrates the kind of enclosure and dough placement that makes temperature checks more useful:
Balancing Cold Retardation and Warm Proofing
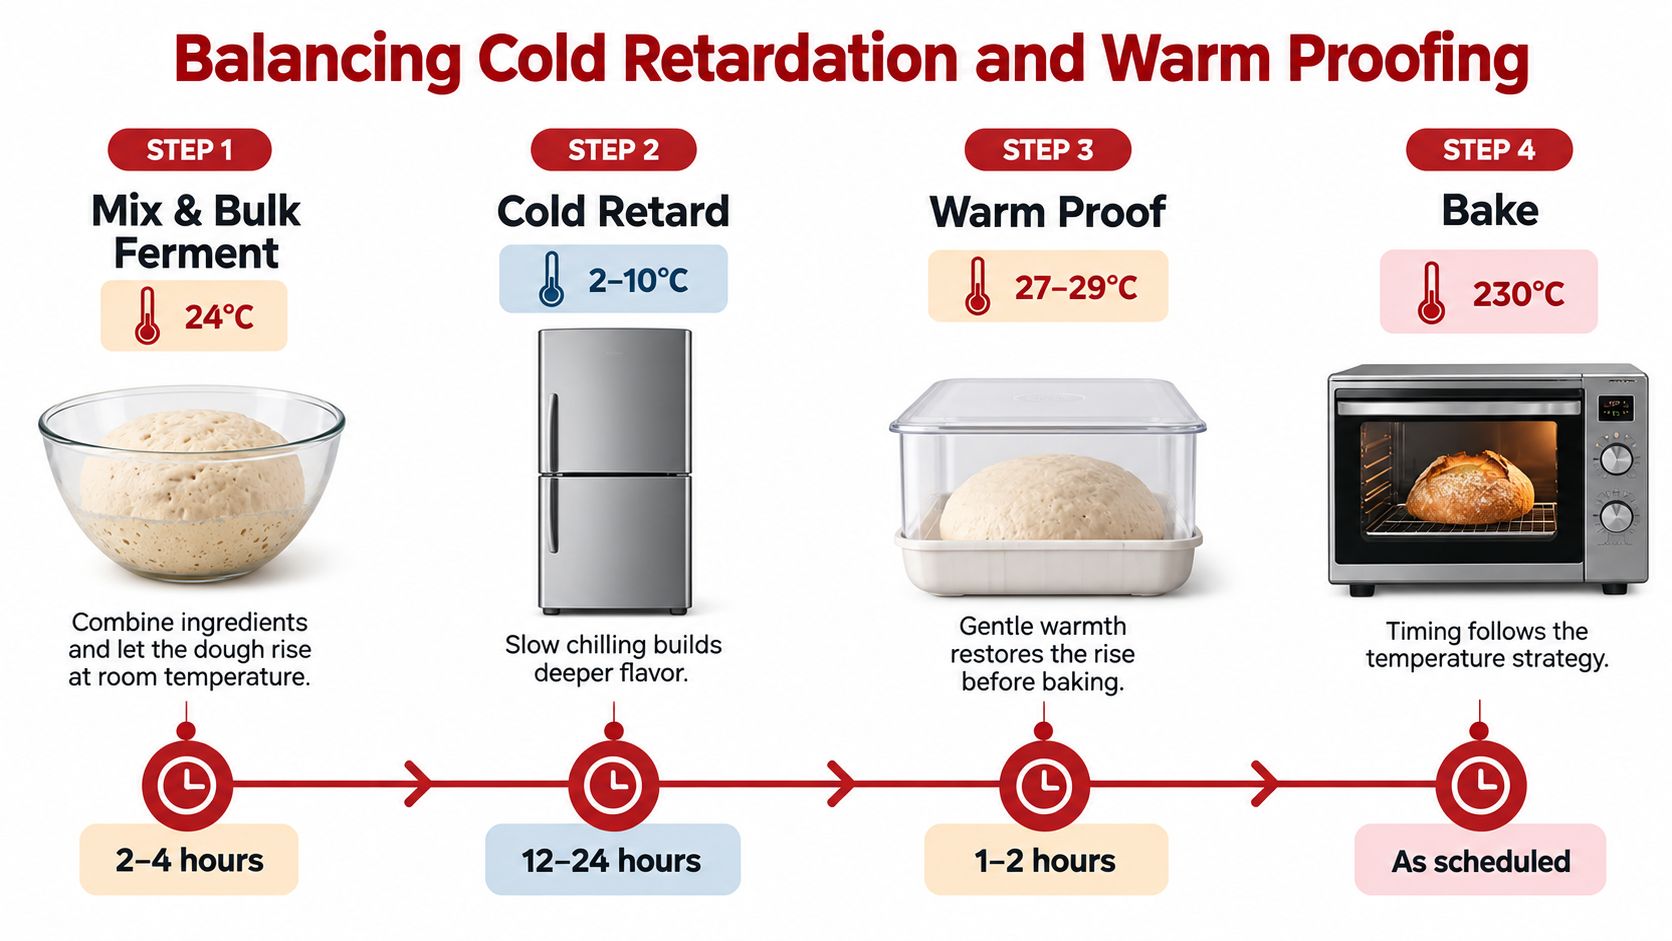
Temperature is also a scheduling tool. A warm proof gives you speed and helps dough become active before baking. A cold retard slows fermentation, buys time, and can support deeper flavor development.
Kitchen guidance describes dough held around 40–50°F, or 4–10°C, as suitable for longer cold proofing, while refrigerated proofing around 38–42°F, or 3–6°C, is used to extend fermentation and flavor development, as explained in this guide to proofing bread dough. The dough doesn't stop changing just because it has been chilled. It changes more slowly, and the pace depends on how cold the dough becomes.
Use warmth to finish, not to erase the schedule
A cold-retarded dough often needs time to become workable before shaping or baking. A gentle return to a warmer environment can help restore activity and soften the dough's handling characteristics. Don't treat that warm stage as permission to leave the dough unattended. It may accelerate quickly once the center warms.
For pizza, this approach works particularly well when you want to prepare dough in advance and bake later. Cold storage handles the long pause, while the proofing box helps you bring the dough into a more predictable state for stretching.
A practical multi-stage plan
- Mix and begin fermentation: Keep the dough in a moderate environment while its structure develops.
- Chill for flexibility: Move covered dough into the refrigerator when you want to slow the process and shift the baking schedule.
- Warm before baking: Use a controlled, gentle setting to take the chill off and encourage final expansion.
- Bake by dough condition: Look for a dough that feels aerated and extensible instead of following a fixed time blindly.
The mistake is to use heat as a universal accelerator. If the dough has already fermented substantially, a hot box can push it past its useful point before the oven is ready. If the dough is cold and underdeveloped, gentle warmth can help, but it still needs enough time for the internal temperature and fermentation activity to catch up.
Cold fermentation manages time. Warm proofing manages readiness. They work best as complementary stages, not competing methods.
Troubleshooting Under-Proofed and Over-Proofed Dough
A failed dough isn't automatically a failed recipe. Temperature mismanagement can produce symptoms that look like a yeast problem, a flour problem, or a shaping problem.
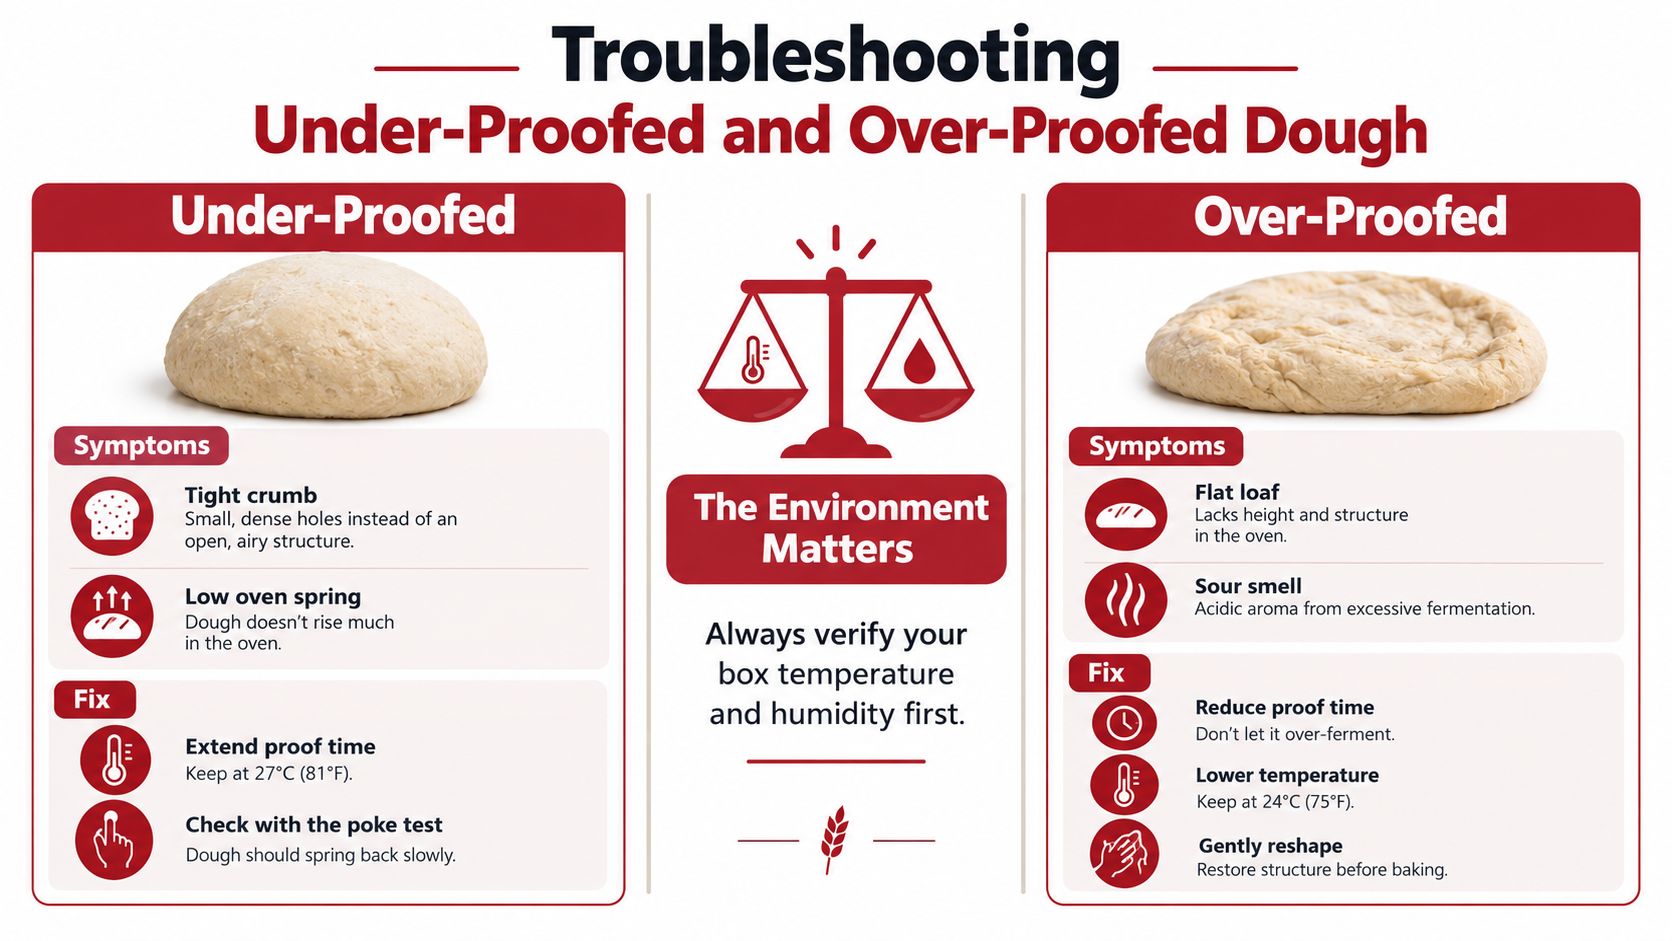
Under-proofed dough often feels tight and resistant. It may spring back aggressively when stretched, show limited gas development, and produce a dense result with less oven expansion. Give it more time in a stable, moderately warm environment, then reassess its feel rather than forcing it into the oven because the planned time has passed.
Read the dough before changing the recipe
If the dough is sluggish, check whether the enclosure is warm where the container sits. Confirm the lid is closed, inspect the independent thermometer, and look for a dry surface that could be restricting expansion.
If the dough is moving quickly, don't wait for it to become visibly collapsed. Rapid bubbling, excessive softness, and a sticky surface can signal that the dough is approaching or passing its useful proof. Shorten the remaining proof, lower the temperature, or move the container to a cooler environment.
| Symptom | Likely environmental issue | Useful response |
|---|---|---|
| Dense dough with little expansion | Dough is too cool or the proof is incomplete | Extend the proof in a stable moderate environment |
| Dough tears or resists stretching | Fermentation has not relaxed the dough sufficiently | Allow more time, then test the dough again |
| Very soft, fragile dough | Proofing is progressing too quickly | Reduce warmth and handle the dough gently |
| Dough surface feels dry | The enclosure or container isn't protecting moisture | Cover the dough and improve humidity control |
| Dough collapses after rising | The dough has gone beyond its strongest point | Shorten the proof and use a gentler temperature |
Avoid the thermal ceiling
Yeast activity falls sharply above 40–43°C, so roughly 35–40°C is a practical upper target for most conventional yeasted bread, according to Domson's bread proofing science reference. A home proofing box that runs too hot can push the dough out of its useful fermentation window and increase the risk of stress-driven over-proofing.
If the dough is over-active but still has some strength, chill it briefly and reshape it carefully if the recipe allows. Don't aggressively degas a delicate dough and expect the original structure to return. Sometimes the best rescue is to turn it into a thinner pizza, focaccia, or another format that can tolerate a less lofty rise.
For under-proofed pizza dough, patience usually beats force. Warm it gradually, keep it covered, and watch how the dough relaxes. For over-proofed dough, reduce the next batch's temperature or proof duration rather than just adding more flour. Flour may make handling easier, but it won't undo excessive fermentation.
Elevating Pizza Night with Professional Gear
A well-controlled proof is only half of the pizza process. The dough still needs a hot, stable baking surface that can transfer heat efficiently when the cold dough hits it. A thin crust can look properly fermented and still bake poorly if the surface loses heat too quickly.
That's why the proofing environment and the baking surface should be treated as one workflow. The proofing box helps you arrive at a dough that's relaxed, aerated, and easy to stretch. A high-thermal-mass stone or steel then helps convert that preparation into a firm base and properly developed crust.
The Hans Grill Rectangular Pizza Stone is made from cordierite and is designed for use in an oven or on a BBQ. The Pizza Steel PRO, including its XL version, offers a different heat-transfer profile for bakers who want a steel surface. Choose between stone and steel according to your oven, preferred crust texture, handling style, and available space.
The useful sequence is straightforward:
- Set the proofing temperature according to the dough type.
- Confirm the environment with an independent thermometer.
- Judge readiness by dough condition, not time alone.
- Preheat the baking surface thoroughly.
- Stretch gently and bake without undoing the structure you developed during fermentation.
Temperature control won't turn every dough into a pizzeria-style crust by itself. It does remove one of the biggest sources of inconsistency, allowing your recipe, shaping technique, and baking surface to work together.
Hans Grill offers pizza dough proofing boxes alongside the Rectangular Pizza Stone, Pizza Stone PRO XL Set, and Pizza Steel PRO for controlled preparation and high-heat baking at home. Visit Hans Grill to choose the proofing and baking tools that fit your pizza workflow, then put your new temperature targets to work on your next bake.


