

Cooking with Pizza Stone in Oven: A UK Guide
Turn your oven to maximum and bake when it beeps. That's the most popular advice for home pizza, and it's the reason so many first bases come out pale. The beep tells you the air is hot. It says nothing about the stone, and it's the stone that cooks your base.
If you're cooking with a pizza stone in oven heat you've already got, you don't need a higher setting. You need a charged slab and time for it to recover between pies. Start with the Hans Grill Rectangular Pizza Stone if you want that crisp base without buying a dedicated pizza oven, then learn to judge the stone, not the display.
Table of Contents
- Why the Oven Beep Is Not the Stone
- Settings Rack and Soak Time for a Home Oven
- How to Bake on the Stone from a Cold Oven
- How to Launch the Pizza and Recover Heat
- Fixes for a Soggy or Scorched Crust
- How to Cool Clean and Use the Stone on a Grill
- Bake One Test Pizza Then Repeat It
Why the Oven Beep Is Not the Stone
It's Friday tea time. Your fan oven hits 250°C, beeps, and you slide in the first pizza with confidence. Eight minutes later the cheese looks right, but you lift an edge and the underside is pale, soft and a little damp. The dough was fine. The stone had not finished heating.
A stone works like a small brick oven floor. It stores heat, then delivers it straight into the dough by contact, while the hot air above cooks the toppings. Air heats quickly because it is light. A dense slab heats slowly because it is heavy, and that slowness is exactly what makes it steady once it is ready.
The American Institute of Physics summary of brick oven research found that Roman pizza makers identify approximately 330°C (625°F) as the optimal oven temperature, with the fire-brick floor at about 208°C (406°F) and a pizza done in roughly two minutes. The same analysis calculated that a metal floor heated to 330°C could reach approximately 300°C (572°F), hot and conductive enough to burn dough before the toppings cook.
That contrast explains your kitchen. Brick moderates heat transfer, and metal rushes it. A cordierite stone sits closer to brick, so a normal oven can run at its hottest useful setting for the top of the pizza without the scorch you would risk on bare metal. A stone buys you stored heat, delivered at a steady pace.
There is one trade-off to plan for. Cordierite goes into a cold oven and heats up with it, so a cold stone never gets lowered into an oven that is already hot. And once a pizza lands, the stored heat drains into the dough, which means the slab needs a few minutes to climb back before the next launch. Charge it fully, bake, then let it recover.
Here's the stone heating in a home oven, which is the whole job in one picture.
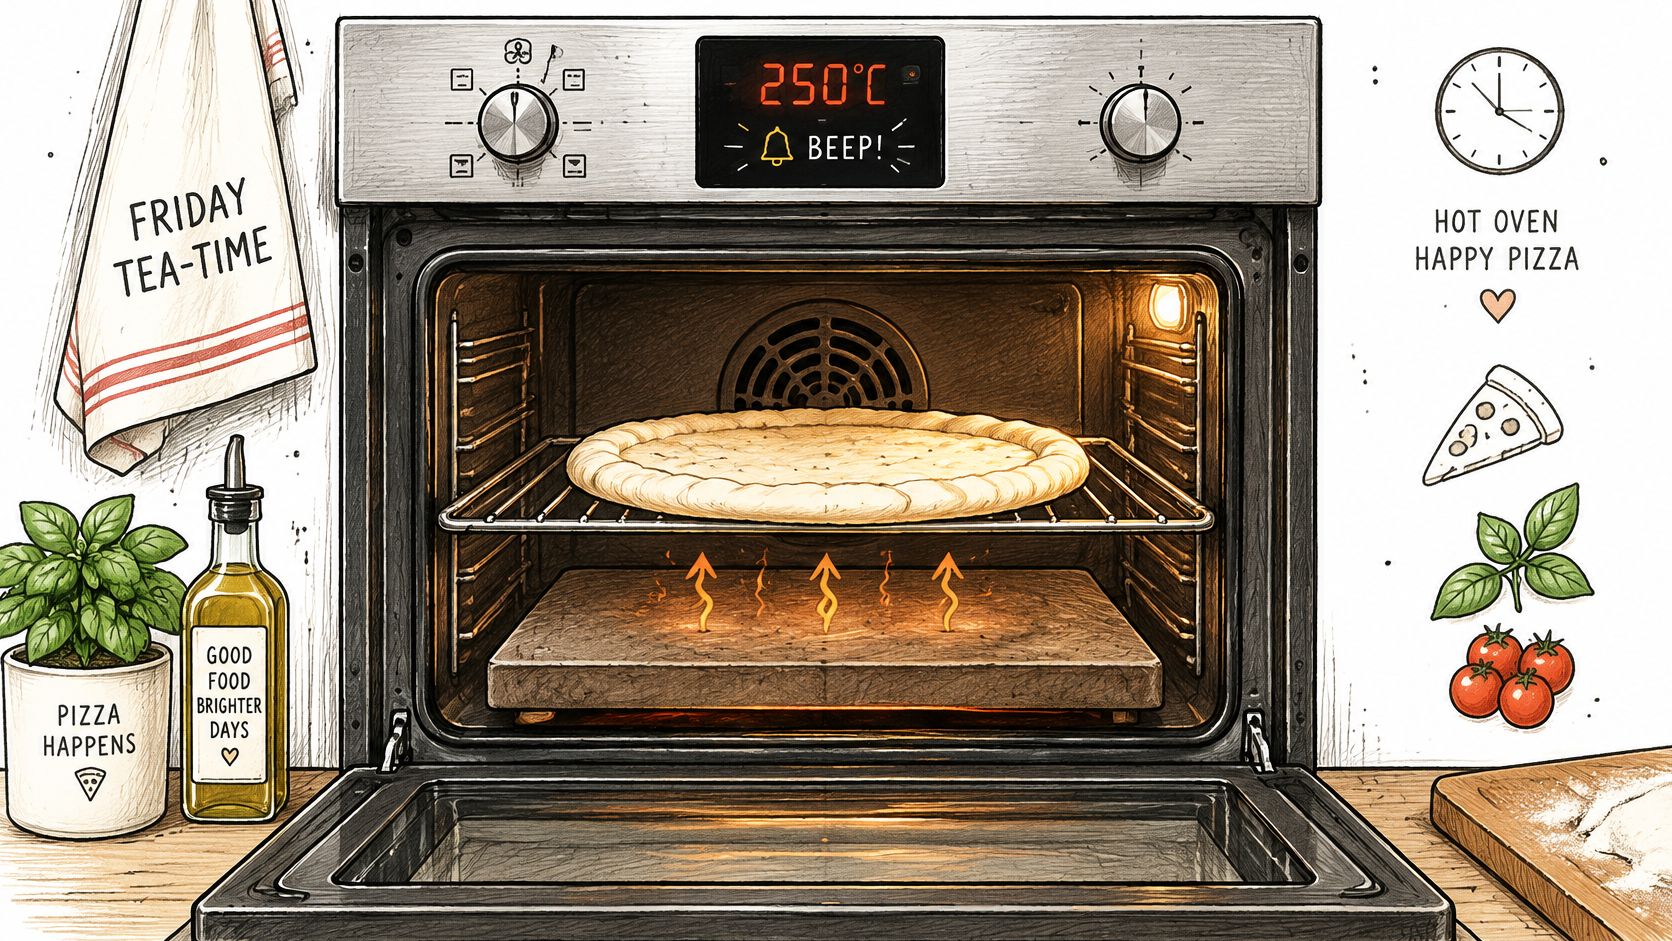
Keep one rule for everything that follows. The beep means the air is hot. The chart in the next section tells you when the stone is.
Settings Rack and Soak Time for a Home Oven
Pick your row first, then read why it works. Don't mix rows mid-bake.
| Setup | Oven temperature | Stone position | Heat from cold | Ready when |
|---|---|---|---|---|
| Everyday crisp base | 260 to 288°C or the oven maximum | Lower rack | 45 to 60 minutes, up to 90 for a thick stone | Infrared about 260°C (500°F) on the surface |
| Moderate domestic recipe | 240°C, 220°C fan, or gas mark 8 | Top shelf | Until the oven is up, then an extra soak | Dough starts cooking as soon as it lands |
| Display already at setpoint | Whatever row you chose | Same rack you will bake on | Add 5 to 30 minutes after the beep | A repeat centre reading stays high |
| Oven floor, avoid as default | Any high setting | Directly on the floor | Same long preheat as the lower rack | Scorch arrives before readiness can be checked |
The everyday row for a crisp base
For a crisp base, put the dry stone on the lower rack while the oven is cold. Set 260 to 288°C, or your oven's maximum if it stops lower, and give it 45 to 60 minutes. The Food Network pizza stone testing put a 30-minute preheat as a minimum readiness benchmark, while some stones required about 60 minutes to fully charge and performed better after 90 minutes.
Judge readiness by the slab, and treat the display as background noise. An infrared thermometer at the baking surface should read roughly 500°F, which is about 260°C on the stone itself. Point it at the centre, where your pizza will land.
Why the long wait after the beep? The surface can warm well before the core does, and the Examiner News outdoor pizza oven guide notes the stone can lag behind the oven's air temperature by roughly 5 to 30 minutes. A stone behaves like a hot-water bottle: the outside feels warm quickly, while the middle takes far longer to fill. A quick surface flash after 20 minutes can fool you. The soak after the setpoint is what packs the centre of the slab with heat you can spend.
Turning the dial higher doesn't fix a short soak. If your oven is already at its maximum, extra temperature isn't available anyway. Extra time is. That's the trade-off, plainly stated. You wait longer before pie one so pie one crisps.
The moderate row for recipe followers
Some domestic recipes run cooler and put the stone higher. The BBC Good Food quick pizza dough recipe specifies heating the oven to 240°C, or 220°C fan, equivalent to gas mark 8, with the stone on the top shelf before sliding the pizza directly onto it. Use this row when you're following that kind of method and you want the dough to start cooking the moment it lands. Still heat from cold. Still add a soak after the oven arrives.
Top shelf gives you more heat on the cheese and rim. Lower rack gives you stronger bottom heat. Neither is wrong, but they solve different problems, so don't swap halfway through a bake to chase both.
Why the oven floor is a trap
It sounds clever. The floor sits closest to the element, so it must be hottest. That guess is half right. The floor does run far hotter than any rack position, and that's exactly the problem: surface heat that extreme scorches the base before the toppings cook. A slab that size can also block the airflow a domestic oven was built around, which distorts the temperature the thermostat thinks it's holding. The lower rack is the safer compromise for strong bottom heat.
One more caution. A hot reading before pie one proves little about pie three, especially if the door stays open while you fuss. Stored heat is a budget. You spend it on each pizza and you top it up between bakes.
Lock one row for your first three pizzas. Same rack, same setting, same soak. Change nothing else yet, or you'll never know what worked.
How to Bake on the Stone from a Cold Oven
Cook this first pizza as a measurement, not a feast. One 30 cm margherita, same dough weight, same rack, one modest topping load. A simple pie gives you a clean answer about how your oven and stone behave together.
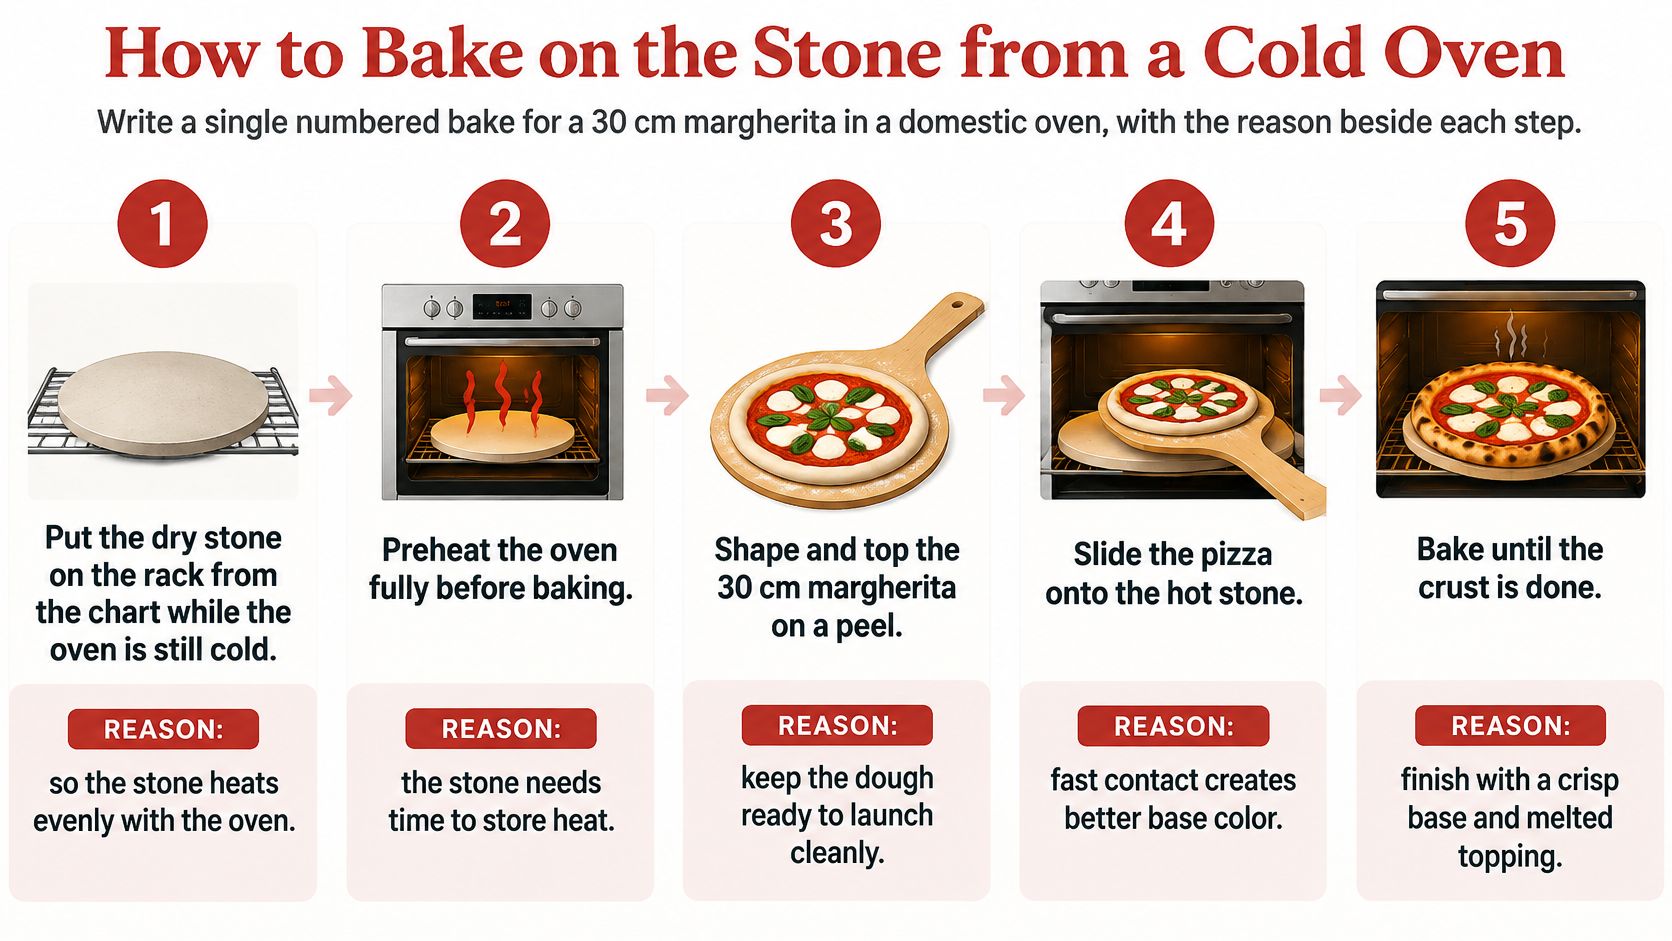
This flow shows the order from cold oven to finished base.
The numbered bake
- Put the dry stone in cold. Place it on the rack from your chosen row while the oven is still cold. The cordierite stone should always be placed in a cold oven and heated with the oven, and never put in a hot oven when cold, because gradual heating protects the slab.
- Set the temperature and wait out the soak. Use your row's setting and leave the stone for the full time. When the display arrives at temperature, that only tells you the air is hot. The slab keeps charging, and the quiet minutes after the beep are where crisp bases are made. Spend the wait bringing your dough to room temperature and laying out the toppings.
- Stretch a round that fits with a margin. Aim for 30 cm with a small bare border of stone showing around it. That margin stops cheese spilling over and gluing itself to the edge, and it leaves you room if the launch lands slightly off centre.
- Sauce lightly and top modestly. A thin layer of sauce and a modest scatter of mozzarella is enough for this test. Skip watery vegetables this time. You want to judge the stone, not fight a puddle.
- Launch from a dusted peel. Set the topped round on a peel dusted with flour or semolina, slide it onto the stone in one level motion, and shut the door at once. Seconds matter more than style here, and the launch gets its own checklist next.
- Bake until the rim browns and the underside firms. Lift an edge with the peel near the end and look for a firm, spotted base. Note the minutes it took. That number is your oven's real bake time for this setup, whatever any recipe promised.
- Switch off and leave the stone inside. Take the pizza out, turn the oven off, and leave the slab on its rack to cool where it is. Don't carry it anywhere while it's hot.
Watch the launch and timing in this short demonstration before your first attempt, then copy the order rather than the exact minutes.
What to notice while it bakes
Most first-timers judge the cheese instead of the base, because the cheese is the part they can see. The top cooks on the oven's hot air and the rim colours early, while the underside only firms through contact with the stone's stored heat. Judge doneness from underneath. A cooked top on a raw base is still raw.
Keep dry oven gloves on for every move. A cordierite stone is heated with the oven from cold and stays hot long after the food is out, so treat the rack, peel handle and oven door as hot until you've confirmed otherwise. Wet gloves conduct heat and steam, so swap them if they get damp.
If a second pizza is coming, remember the stone has just spent heat on this base. Give it a pause to recharge, the same way it needed the soak at the start. That recovery time is what buys back the crispness on the next pie.
How to Launch the Pizza and Recover Heat
A fully charged stone handles one pizza beautifully. The batch tends to fall apart at pie two, because every pizza you launch pulls stored heat out of the slab and leaves the surface cooler than the air the oven display is measuring. The air recovers within a minute or two of the door closing. The slab takes longer, and that difference is where second pizzas go wrong.
The launch itself is the shortest part of the job. Set the topped round on a dusted peel, shake to confirm the whole thing slides, aim the front edge toward the far side of the stone and pull the peel straight back in one level motion. Keep the door open for seconds. A crooked pizza that landed fast bakes better than a centred one that cost the oven a minute of heat.
If you use a perforated peel, the holes let steam escape from under the dough instead of trapping a damp patch against a solid surface, so the base stays drier while it waits. Our guide on whether a wooden or metal pizza peel suits you better covers the trade-offs for home ovens.
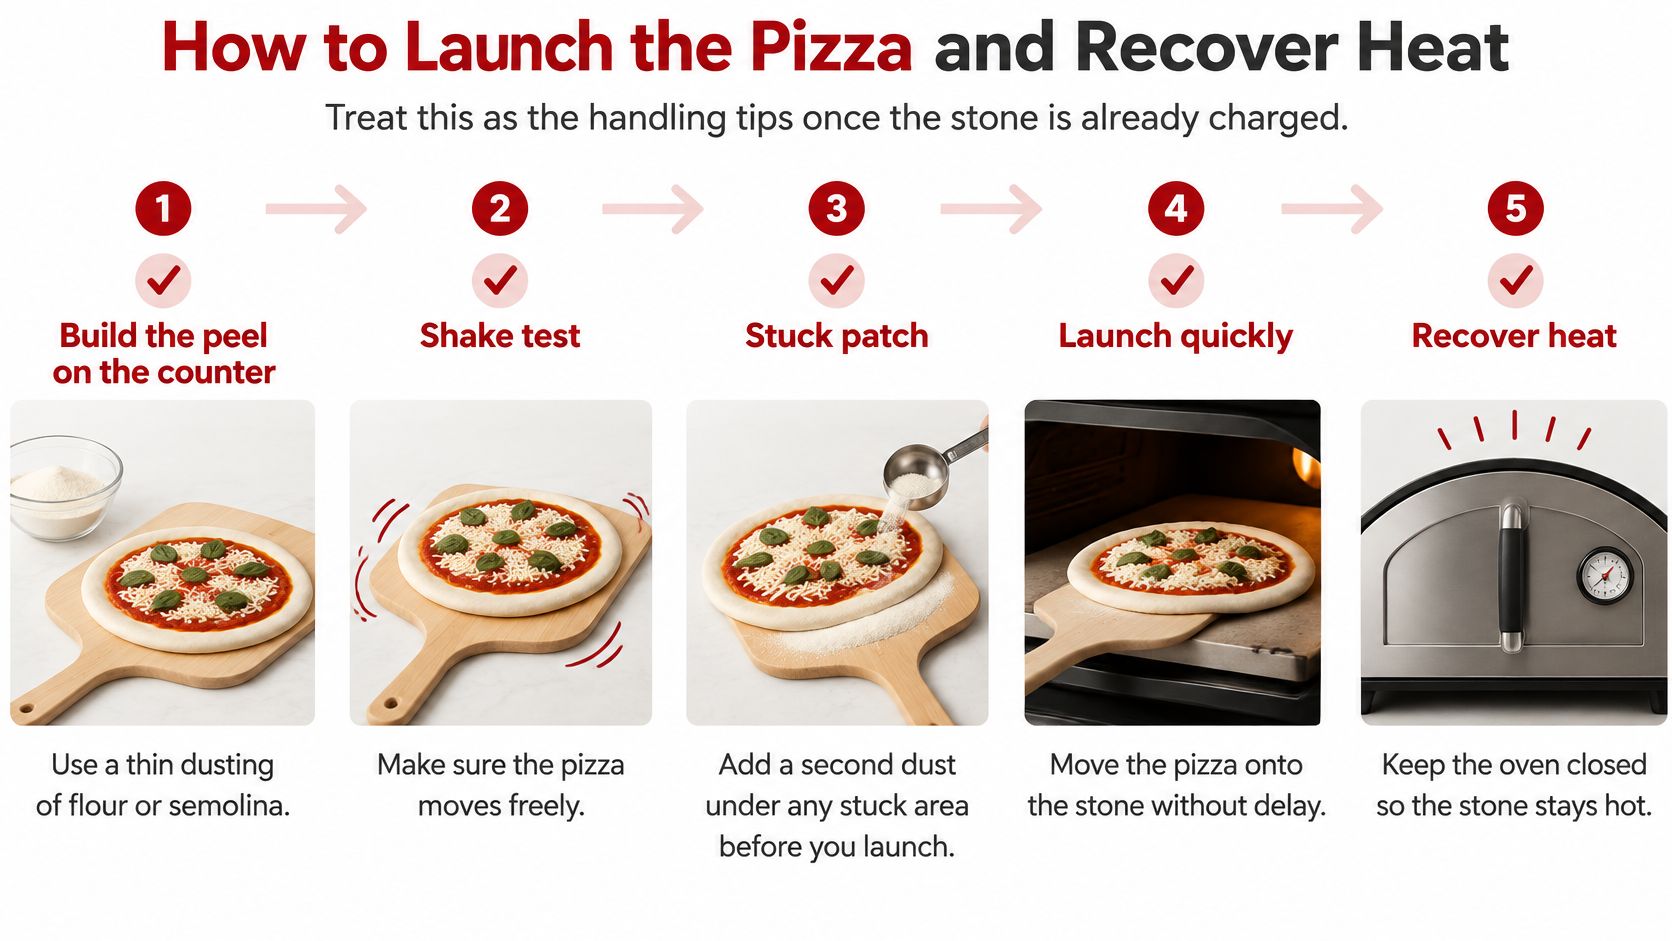
Let the stone climb back
The slab works like a rechargeable battery. Each pizza spends some of its charge, and it needs time back on the heat before it can spend again. When dough lands, stored heat conducts straight into the base, which is what crisps it, and the surface temperature drops as a result. Check the same spot right after a bake and it will read lower than it did at launch. Send pie two in too early and the base sits on a warm slab while the top cooks from hot air, which is how you end up with a browned rim over a pale, soft centre.
Between pizzas, run the same short routine:
- Shut the door the moment the pizza comes out. Every open second is heat the oven must replace before the slab can.
- Top the next round while you wait. The dough should be ready for the stone, so the recovered slab never waits on you.
- Check the same centre spot. An infrared reading well below your launch temperature means the wait continues.
- Keep the waiting dough loose. A gentle shake on the peel every minute or two stops it settling into the dusting and sticking.
- Launch, then shut the door again. The recovery clock restarts for the next pie.
A good launch is boring. Dust, shake, slide, shut. The skill sits in the patience after it.
Judge the batch by pie two
Cooking for a family of four means three or four pies back to back, so this routine matters more than any single launch. Resist opening the door to watch progress. Each look costs heat you then wait to replace.
Read the results. If pie two's base comes out softer than pie one's, identical dough on a cooler stone produces a softer base every time, so the gap was too short. Add minutes to the gap rather than degrees to the dial. Pushing a fan oven past 260°C rushes the toppings along while the slab still lags, and scorched cheese over a pale base is the result.
One last step before slicing. Rest each finished pizza on a wire rack for a minute, because a hot base on a solid plate steams itself soft. The rack lets that moisture escape downward and keeps the underside crisp.
Fixes for a Soggy or Scorched Crust
A pale base gets blamed on dough more than any other fault. Most of the time it is a cold stone wearing a hot oven's alibi. The beep means the air is hot; the slab can still be a heat battery with a flat charge, so the first minute drains its thin surface heat before the dough can set.
| What you see | Likely cause | Change one thing |
|---|---|---|
| Pale soft underside | Stone undercharged | Longer soak and a surface check near 260°C |
| Soggy centre, browned rim | Too much sauce, wet veg or cheese | Lighter, drier toppings |
| Base burnt, top still pale | Rack too low or stone on the floor | Move up one rack or shorten the bake |
| Rim burnt, middle raw | Too close to the top element or a heavy centre | One rack lower and a thinner middle |
| Second pizza worse than the first | Stone has not recharged | Shut the door and wait before launching |
| Crack on a later bake | Thermal shock or trapped moisture | Cool in the oven and never wet a hot stone |
Read the underside before you change anything
The Physics Stack Exchange technical discussion of pizza stone heat transfer puts the dominant variable as stored thermal energy in the slab, since the stone transfers heat to dough mainly by direct contact and a prematurely used slab produces a pale, soft underside even when the oven display says 500°F. In a fan oven the display can show 260°C while the core of the slab still lags behind. Give the stone its full 30–45 minute heat-up, then confirm a surface near 260°C before touching the recipe.
Lift one edge with the peel after the bake and read the colour like a dial: flour-white means undercharged, spotty gold means close, and deep brown means the balance has tipped too far downward. For a fuller walkthrough of base technique, our notes on how to get a crispy pizza crust at home cover dough handling in detail. Here, keep the discipline simple: one fault, one change, one more pizza.
When wet toppings cause a soggy centre
A browned rim with a wet centre points at toppings before temperature. Sauce, mushrooms, mozzarella packed in brine and piled vegetables all carry water that must evaporate before the base underneath can colour, so the centre steams while the exposed rim races ahead. Cut the load, drain wet ingredients, and keep the middle thin. Cutting the load gives the stone a job it can finish.
Keep oil off the slab to stop sticking. Oil on hot unglazed cordierite smokes, soaks in and does less for release than a light scatter of semolina on the peel. If dough grips during launch, the fault sits in dusting, shaking and speed at the peel.
When heat balance is the problem
A burnt base under pale cheese means bottom heat is winning. The stone is too low, or it sat on the oven floor where heat pools. Move up one rack or shorten the bake, and change only one of those on the next pie. The reverse pattern, a burnt rim with a raw middle, means fierce top heat or a centre piled too high; drop one rack from the top shelf and spread the middle thinner.
When only the later pizzas fail, stop adjusting racks because the first pie already proved the setup can work. Wait longer with the door shut and let the slab recharge; raising the setpoint only makes the oven air hotter while the stone stays tired. If a crack appears after careful preheating, suspect water and sudden cooling before the material: keep liquid off a hot stone and let it cool in the oven. Change one variable per pizza, and each base becomes a readable result instead of a mystery.
How to Cool Clean and Use the Stone on a Grill
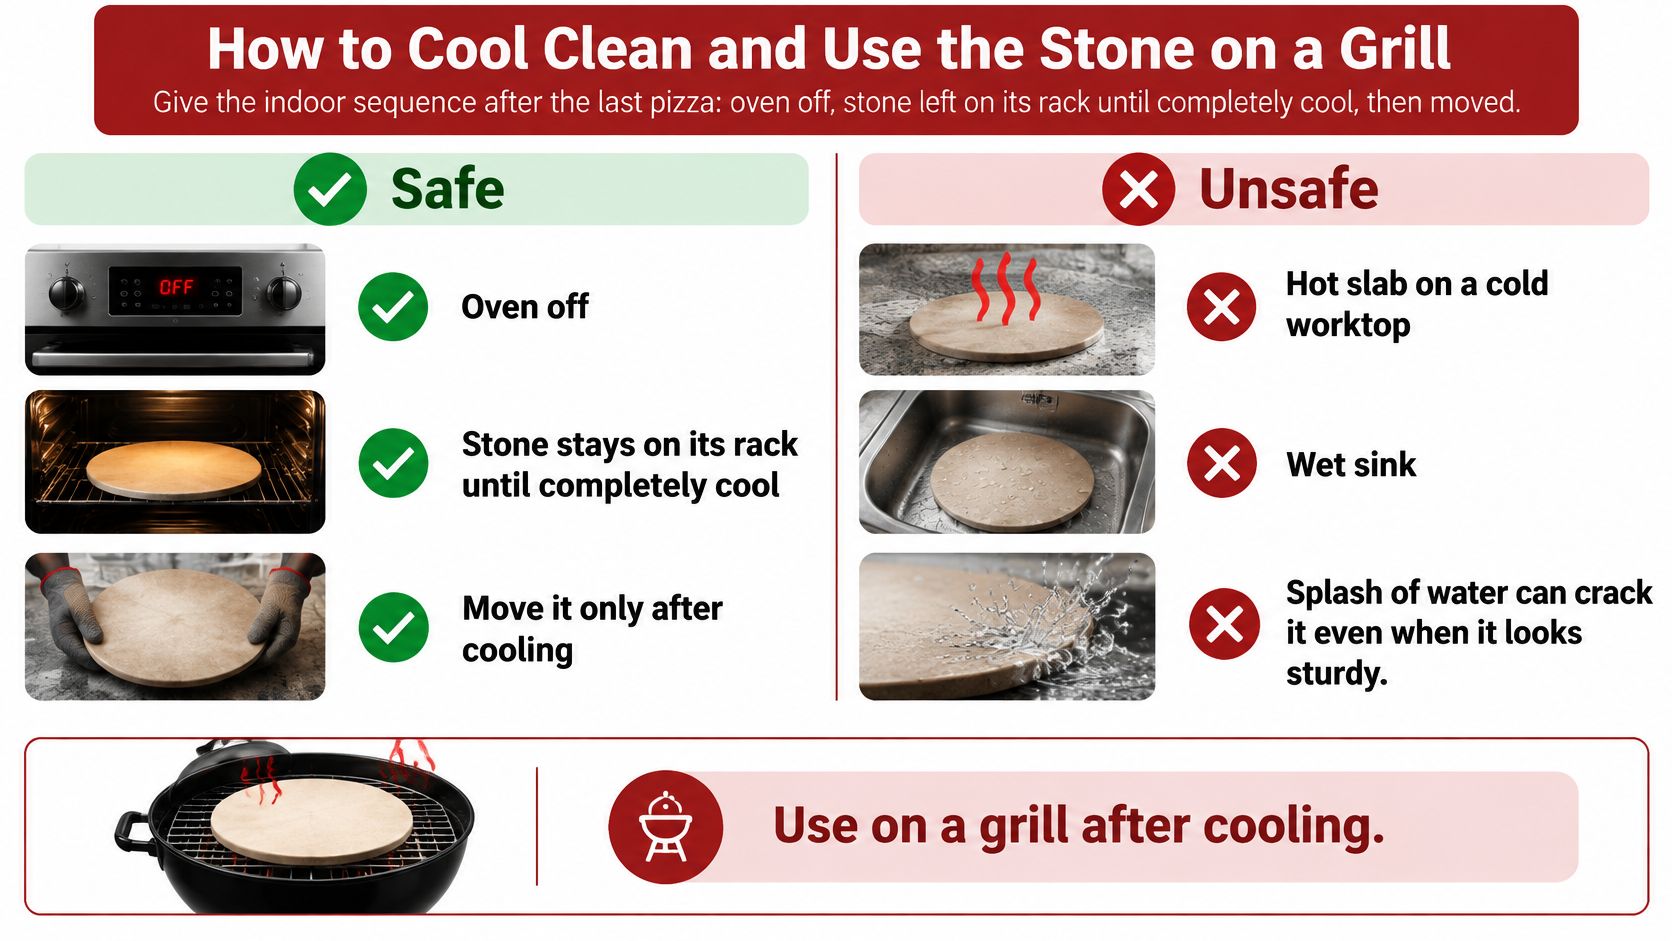
After the last pizza, turn the oven off and leave the stone on its rack until it's completely cool. Then move it. That's the whole indoor sequence, and the order matters more than any cleaning product.
This comparison shows the safe finish against the moves that crack slabs.
Cooling and cleaning indoors
A hot slab on a cold worktop, in a wet sink, or under a splash of water can crack even if your preheat was perfect. Surviving high heat and surviving a sudden temperature gradient are different properties. The PizzaHQ pizza stone equipment guide identifies rapid, uneven expansion as the key cracking mechanism and adds that moisture absorbed by a porous stone can create damaging steam pressure during heating.
Cleaning is plain work. Scrape baked-on residue when cool, use no oil and no soap on unglazed cordierite, and don't soak it. A barely damp cloth is enough for loose flour. Dark stains are normal and harmless, so leave them. Our step-by-step notes on how to clean a baking stone without damaging it cover stubborn marks in more detail.
If the stone did get wet, air-dry it fully, overnight if needed, before the next cold-oven heat. Trapped moisture turning to steam inside a heating slab is how careful cooks still lose stones. Remember that pizza stones, steels, and ovenware get extremely hot in use and retain heat for a long time, so use dry gloves, keep a clear rack ready, and keep children away from the cooling oven.
The same stone outdoors
A BBQ adds hazards a kitchen doesn't. Wind cools one edge, rain spits on hot ceramic, a cold metal side table waits beside you, and a damp shed stores the stone between weekends. Each one is a shock risk. Don't set a hot stone on cold outdoor metal, and don't fire a stone that was stored damp.
Don't trust the hood gauge either. The BBC Good Food gas barbecue testing found a BBQ stone could be approximately 80°C cooler than the hood gauge indicated, so use the same infrared check on the slab itself. Leave the stone to cool in place outdoors too, under cover from rain, then store it dry.
Bake One Test Pizza Then Repeat It
Two baked pizzas teach you more than a month of reading. Run one margherita this week on the chart row you chose, write down the surface temperature and the minutes, then bake a second pie after a closed-door recovery.
Recovery is the part a home cook skips most. A stone works like a battery: it spends its stored heat on the first base, then needs a shut door to charge up again. A higher setpoint does not speed that up.
The oven beep tells you the air is hot. The slab decides the crust.
If both bases come out crisp and spotted and the tops cook without you turning the pizza, your setup is done. Don't keep tweaking a system that works. Repeat it until it's boring, then experiment from a position of strength.
A working method comes first. Add a peel once two test pies are repeatable. Your action list is short enough to stick on the fridge: cold oven, full soak at 260°C (500°F), one pizza, notes, then the second pizza.
Hans Grill makes the cordierite Rectangular Pizza Stone for exactly this job: a thin, crisp, golden base from your existing oven or BBQ, with no expensive oven and no mid-bake rotation. Put it in cold, give it the full soak, run your two test pizzas, and keep the notes. Visit Hans Grill to get the stone and start your first measured bake this week.


