

Neapolitan Pizza Stone: The Complete Guide 2026
You're standing in a hot kitchen, the oven is screaming at its highest setting, and the pizza on the peel still doesn't look like the ones from Naples. The bottom goes pale, the rim doesn't puff the way you want, and by the time the top looks done, the base has already missed its moment. That's the puzzle behind a neapolitan pizza stone, because the stone isn't there to make pizza look fancy. It's there to help a home oven behave more like a pizzeria floor.
Neapolitan pizza traces back to 18th-century Naples, when it was sold as a cheap street food, and by the 1700s it was already being baked as a simple leavened flatbread. Tomato became a standard topping around 1760, and the style's modern milestone came in 1889 with Raffaele Esposito's Margherita for Queen Margherita of Savoy, the red-white-green combination that still defines the style for many people today. The method was later codified in 1984 through AVPN standards and recognized by UNESCO in 2017 as Intangible Cultural Heritage. Historical timeline and UNESCO recognition
Table of Contents
- What Makes a Pizza Stone Neapolitan-Ready
- Cordierite, Ceramic, and Steel Compared
- The Real Temperature Story for Home Ovens
- Oven Placement, Preheat, and Launch Technique
- Taking the Stone to the Backyard Grill
- Cleaning, Care, and Troubleshooting
- Choosing the Right Stone for Your Setup
What Makes a Pizza Stone Neapolitan-Ready
A lot of home cooks buy a stone, slide a pizza onto it, and wait for magic. The oven preheats, the dough goes in, and the result is usually a compromise, not a revelation. A Neapolitan-ready stone is defined by its thermal job, not by its shape or marketing copy.
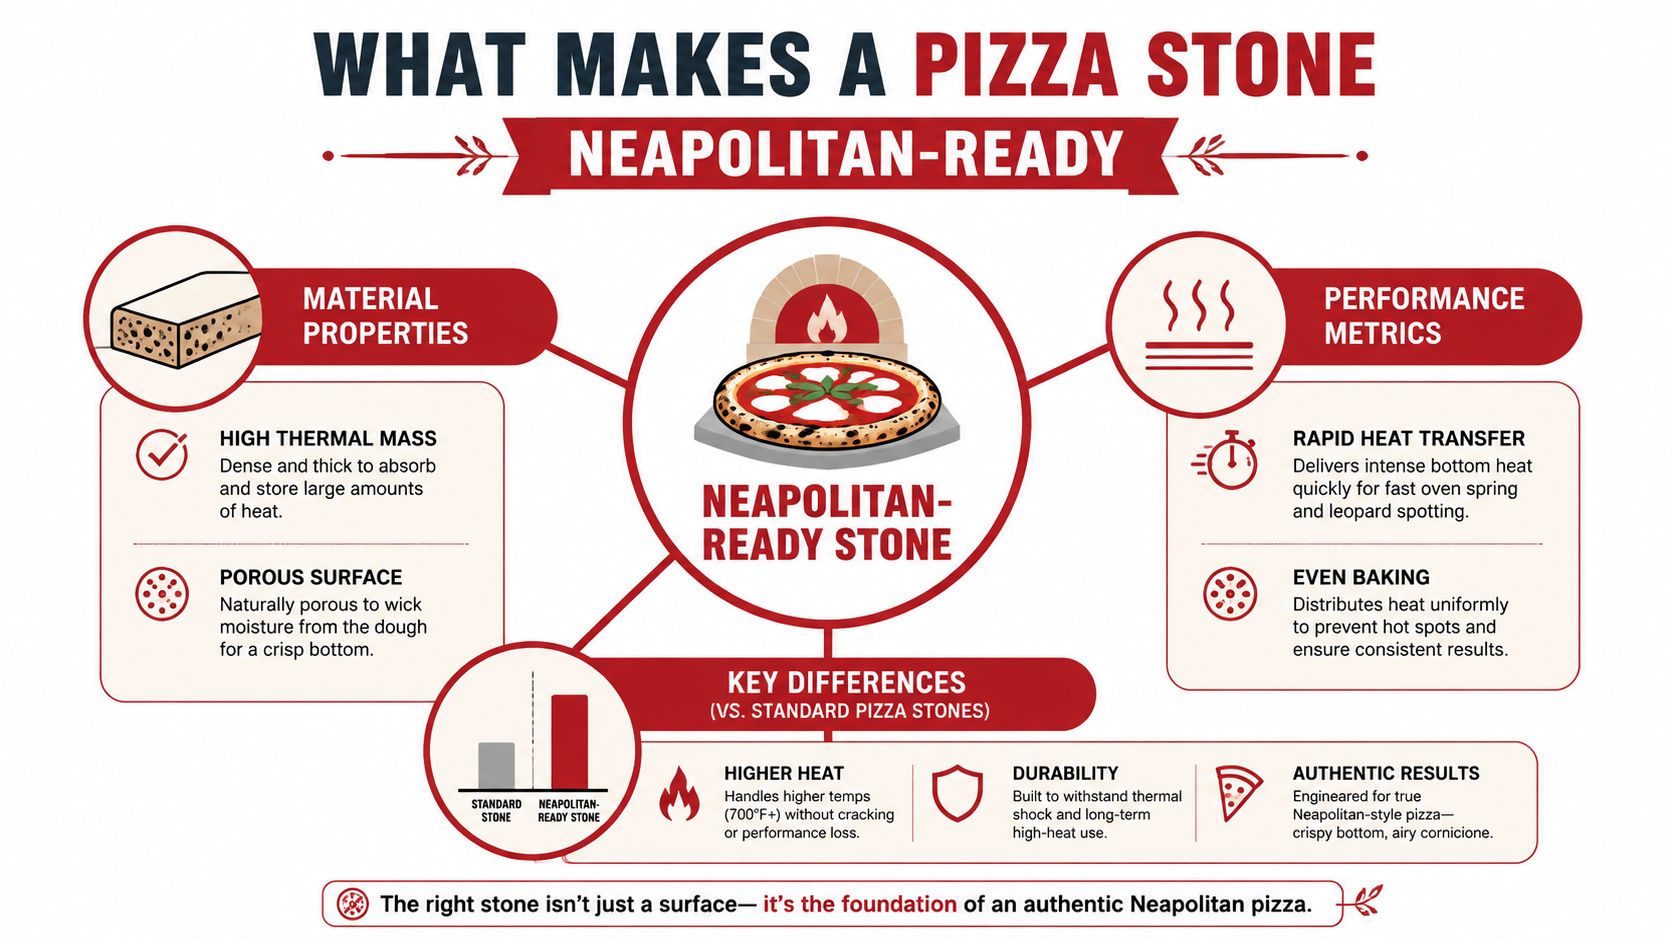
The stone has one job
A proper stone absorbs oven heat and sends it back into the dough fast enough to build a blistered base and a puffed rim before the bake runs away from you. In Neapolitan pizza, that matters because the traditional bake is very short, often around 60 seconds in a wood oven, with the dough developing for at least 12 hours before baking. Heat, bake time, and dough development
Practical rule: if the bottom browns before the top has time to finish, the stone is transferring heat too aggressively for your setup.
Thickness and material matter more than surface area alone. A stone that stores heat well acts like a miniature oven floor, especially when the goal is to mimic the intense heat of Naples rather than warm a tray of dough. The AVPN standard places the bake in a very hot oven, and the stone is there to hold and return that heat in a controlled way. AVPN-aligned stone temperature and cook time
Neapolitan means performance, not branding
That is the part many buyers miss. A product label can say “pizza stone,” but “Neapolitan-ready” only means something if the stone helps you cook in the AVPN heat window of 430°C to 480°C and the pizza leaves the stone in 60 to 90 seconds without the base scorching. AVPN-aligned stone temperature and cook time
The home version is a practical stand-in for the masonry cooking floors used in Naples for generations. The home cook does not need a literal brick oven floor, but the physics still matter. A stone that radiates heat evenly, holds its temperature under a cold launch, and supports quick base browning is the one that gets closest to the old Neapolitan idea.
For a broader look at how cordierite, ceramic, and steel behave in real ovens, see this pizza stone material comparison from Hans Grill.
Cordierite, Ceramic, and Steel Compared
Once you understand the stone's job, the next question gets easier. You're not choosing between “good” and “bad,” you're choosing between different heat behaviors. That's why most product pages mention cordierite, ceramic, or steel, and each one suits a different kind of cook.
Cordierite gives beginners the most room to breathe
Cordierite is the safest all-round choice for many home ovens because it handles heat changes well and stays steady once hot. It's the material most readers end up wanting when they're still learning how long to preheat, how fast to launch, and how much topping their dough can carry without collapsing. If you want one stone that behaves predictably in both an oven and a grill, cordierite is the least fussy path.
Ceramic behaves differently. Biscotto-style clay stones are designed to transfer heat more gently, which is why they're prized for extremely hot Neapolitan baking. A thicker biscotto stone, often around 2.0 to 3.0 cm, can be porous and moisture-absorbing, which slows heat transfer to protect the base at very high oven temperatures. Biscotto-style stone construction and thickness
Steel is the forceful option. It heats fast, sears hard, and can help in ovens that struggle to give the dough enough bottom energy, but it's less forgiving if your launch is slow or your toppings are wet. If you're chasing speed and bottom color above all else, steel is compelling. If you want grace under pressure, it can feel unforgiving.
| Pizza Stone Materials at a Glance | Heat Retention | Thermal Shock Resistance | Best For |
|---|---|---|---|
| Cordierite | Steady and reliable | Strong | Home ovens, grills, beginners |
| Ceramic | High, but slower transfer | Moderate to lower | Hot Neapolitan-style bakes |
| Steel | Very high and fast | Strong, but less forgiving in use | Fast searing, weak ovens, advanced control |
For a deeper product-material breakdown, this guide from Hans Grill's material comparison article lines up well with what many home cooks notice in practice.
The cleanest way to think about it is this. Cordierite copies the feel of a dependable oven floor. Ceramic tries to soften the blast in a very hot environment. Steel pushes heat aggressively into the dough. The right choice depends on whether your main problem is a weak oven, a fragile base, or a launch that needs more forgiveness.
The Real Temperature Story for Home Ovens
The AVPN target of 430°C to 480°C is real, but so is the fact that most home ovens stop much lower. That gap is where a lot of pizza advice goes sideways. Home baking isn't about pretending your kitchen oven is a Naples deck oven, it's about using the stone and the broiler to narrow the gap as much as the machine allows.
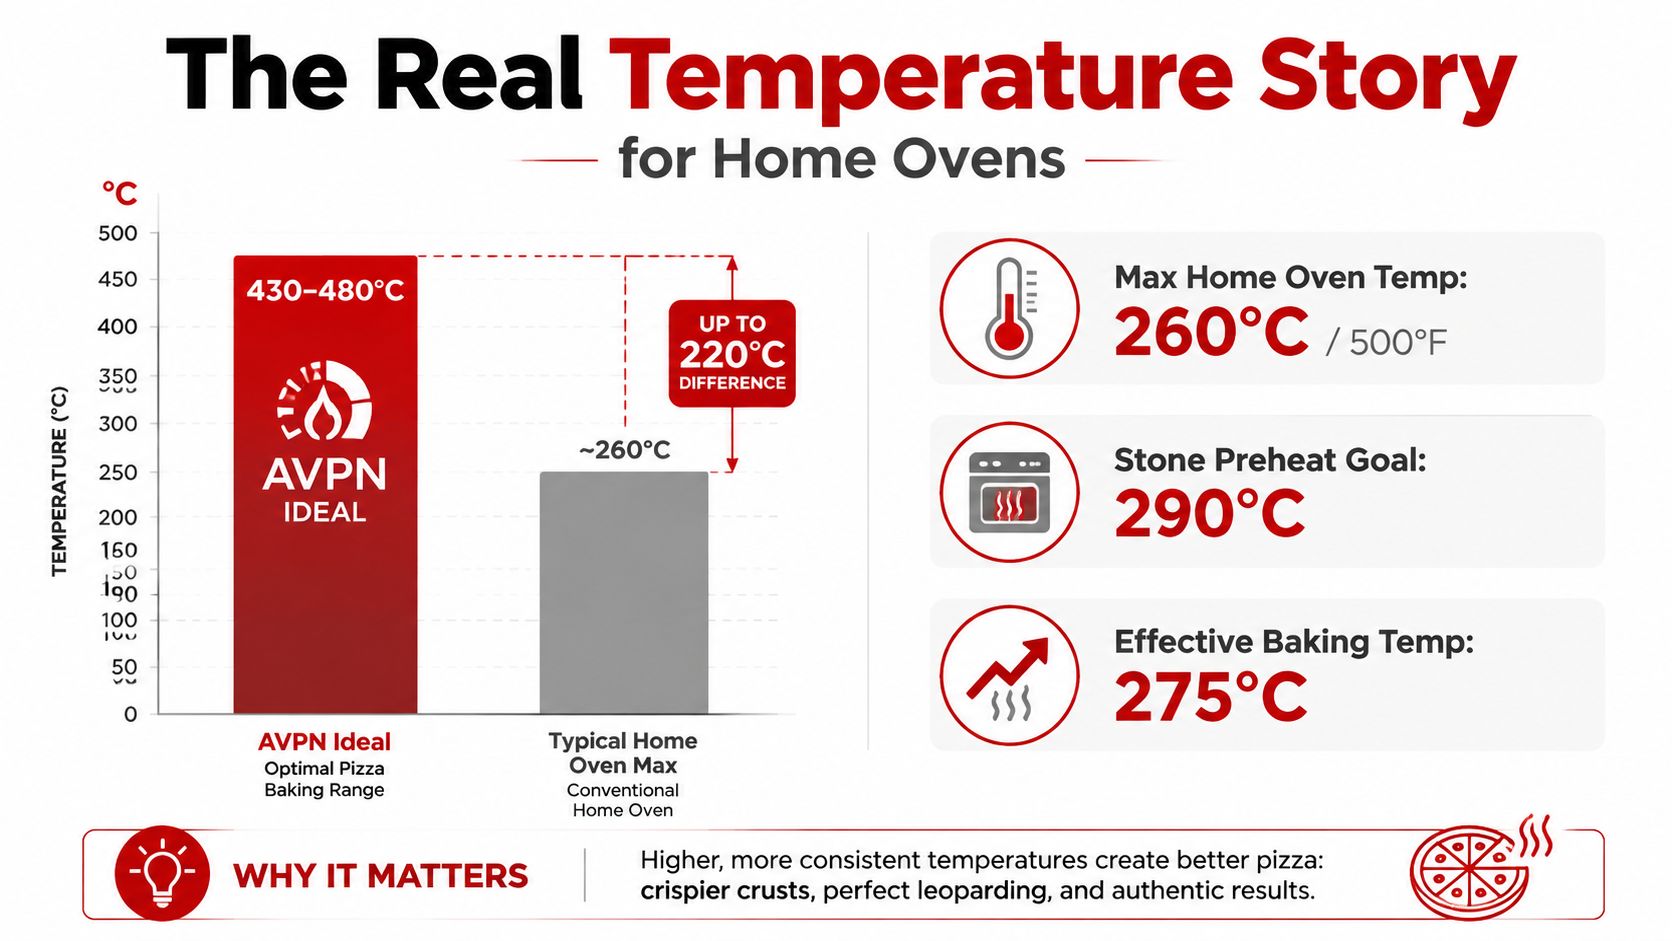
Your oven is a compromise, so treat it like one
Many home-oven guides top out around 500°F to 550°F, and that's why the bake times stretch beyond the classic Neapolitan window. One independent guide shows a common home setup with the stone on a middle rack at 550°F for at least 45 minutes, then a switch to the broiler to finish the top. Home-oven guidance and broiler workaround
That doesn't make the result inauthentic in spirit. It means the process is different because the heat source is different. A stone with more thermal mass helps because it stores energy during the long preheat and releases it when the dough lands, which is exactly what you want when the oven can't give you pizzeria-floor conditions on demand.
The target is useful heat, not bragging rights
A thick stone lets you build a reservoir of heat, then spend that heat efficiently during the bake. The practical aim isn't to reach a fantasy number on a thermometer. It's to create enough energy at the surface of the dough to develop a crisp base while the top finishes under strong overhead heat.
Good home result: a pizza that finishes with a browned underside, an airy edge, and a top that's set without drying out.
That's why the home version often lands as a 90 percent solution rather than a literal copy of Naples. A solid stone, a long preheat, and a broiler finish can get surprisingly close, but only if you stop expecting a kitchen oven to behave like a wood-fired dome. The stone closes the gap. It doesn't erase it.
Oven Placement, Preheat, and Launch Technique
The first time a dough round sticks to the peel, the blame often falls on the recipe. Sometimes the problem is the recipe, but more often it's placement or timing. A Neapolitan-style bake in a home oven lives or dies on three decisions, where the stone sits, how long it preheats, and how confidently you launch.
Rack position changes everything
Middle-rack placement is the safest default because it gives the stone enough exposure to store heat while leaving room for overhead browning. Some cooks place the stone on an inverted tray or steel rack so air can circulate below it, which helps the deck heat more evenly. If your oven has a hot top and a weak floor, moving the stone too low can make the base brown before the rim catches up.
A 45 to 60 minute preheat at the oven's highest setting is the most useful habit to build. The stone has to soak up heat all the way through, not just feel hot on the surface. If you're using a stone that's thick and refractory, that waiting period isn't wasted time. It's the part that makes the next six minutes worthwhile.
Launch quickly, then stay out of the way
Use a lightly dusted peel, often with semolina or a similar fine flour, and keep the pizza moving in one confident slide. Hesitation is what causes sticking, and sticking ruins the shape before the bake even starts. Once the pie lands, the oven should stay closed as much as possible because every look steals heat from the stone and the top.
A halfway rotation can help if your oven has a hot side, which many residential ovens do. That's especially useful with a rectangular stone because the larger surface gives you room to place the pie cleanly and still adjust it during the bake.
The pizza wants one thing from you, speed. The stone wants one thing from the oven, stored heat.
For a practical reminder on prep timing, this guide on whether to preheat a pizza stone matches what home cooks usually learn the hard way. And if you want a visual reference while you practice the launch, the clip below shows the rhythm well enough to copy at home.
The useful mental model is simple. A hot stone is only half the job. The other half is giving the dough a clean landing, then letting heat do the rest without opening the door every thirty seconds.
Taking the Stone to the Backyard Grill
A grill changes the game because it gives you direct, concentrated heat in a way many kitchen ovens can't. With the lid down, gas and charcoal grills can run hot enough to make a stone useful in a very Neapolitan direction. That's why a cordierite stone on a grill feels so close to a pizzeria floor, especially when you want fast recovery between pies.
Set the grill up for indirect baking
The stone should sit over indirect heat, not directly above a roaring flame if you can avoid it. That keeps the base from scorching before the top has a chance to set. On a gas grill, turn on the burners around the stone and give the deck time to saturate. On charcoal, arrange the coals so the stone gets steady heat rather than a flame-driven blast.
Preheat the grill longer than you think you need to. The lid traps heat, but the stone still needs time to absorb that energy all the way through. Once you launch the pizza, keep the lid closed unless you're checking a brief rotation. Every open lid dumps heat and slows the bake.
Use the stone's shape to your advantage
A rectangular stone is handy on a grill because it gives you a larger landing zone for the dough and room to fit more than one small pie in a cookout session. That matters for backyard pizza nights where timing, crowd control, and quick turnarounds matter more than perfect theatrical baking. The shape also makes it easier to manage rotation and removal without fighting a cramped surface.
Burn risk goes up on the grill if fatty toppings drip, so keep the build lighter than you would for a pan pizza. The heat is strong enough already. You're not trying to load the pizza down, you're trying to let the stone and the lid do the work together.
When the pie comes off, transfer it quickly to a board and let the next one launch while the stone is still screaming hot. That recovery is one of the reasons grill cooks love stones. The floor heat feels closer to the wood-fired experience because the system stays aggressive, direct, and fast.
Cleaning, Care, and Troubleshooting
The first time a stone comes out of a grill with dark marks on the underside, plenty of people think they've done something wrong. Usually they haven't. A pizza stone is a working tool, not a serving platter, and a few stains are part of a normal life in high heat. If you've ever used a grill hard enough to smoke the crust, you already know the stone will look used before it looks polished.
What to do after the bake
Scrape off loose bits once the stone has cooled, then brush away the dust. A slightly damp cloth is fine for surface cleanup, but soaking the stone is not. If you want the short version of the care rules, this guide on washing pizza stones lays out the basic caution clearly.
Do not oil the stone. Seasoning belongs to cast iron, not to a pizza deck.
Small stains usually mean nothing. A faint smoky smell on first use can happen too, especially if the stone has picked up residue from manufacturing or from a previous bake. What matters is that the stone stays dry, stored flat or in a place where it won't crack from pressure.
Troubleshoot the common mistakes
Black soot on the bottom usually points to flame management or a grill that ran too dirty. A crack can happen from a hard thermal shock, such as moving a hot stone onto a cold, wet surface. That kind of failure is less about normal use and more about a sudden temperature swing the material wasn't meant to absorb.
Cordierite is generally the most forgiving material for weekend cooks because it stands up well to repeated heating and cooling. Still, the stone isn't indestructible if you abuse it. Don't rinse it under cold water while it's hot, don't leave it in a soaking sink, and don't assume that cosmetic discoloration means it's finished.
The backyard-grill version of pizza care is simple. Heat it, use it, cool it slowly, and store it where it won't get knocked around. Do that, and the stone will keep giving you crisp bottoms without asking for much in return.
Choosing the Right Stone for Your Setup
Choosing the right stone gets easier when you stop asking which one is “best” and start asking which one matches your oven, grill, and patience level. A first-time buyer has different needs from a weekend pizza host, and a backyard griller needs a different tool again. The right answer is the stone that solves the problem you have.
Match the stone to the cook
- First-time buyer: Look for cordierite with enough thickness to hold heat without feeling fragile. You want a forgiving stone that gives you room to learn launch timing and oven behavior.
- Friday-night family cook: Choose a rectangular stone with a generous surface so you can work efficiently and avoid crowding the dough. That extra room makes rotation and cleanup easier.
- Backyard griller: Pick a stone that can live in high heat and move between oven and BBQ without fuss. Cordierite fits this use case well because it handles repeated heating and cooling predictably.
- Heat chaser: If your main goal is the closest possible Neapolitan floor feel, look at a thicker, highly refractory stone or a ceramic biscotto-style option that softens the heat transfer in extreme conditions.
The one practical sizing rule that saves a lot of frustration is simple. Leave at least an inch of clearance on every side of the dough so it can expand without catching the edge of the stone. If the pie is cramped, the rim can deform before the base has a chance to set.
For shoppers who want one tool that works in both an oven and a grill, Hans Grill's Rectangular Pizza Stone fits that brief as a cordierite option designed for even heat distribution and crisp bases without rotating the pie. That kind of setup is useful if you want to keep one stone in regular rotation rather than building a whole collection of niche tools.
A quick checklist before you buy
- Check the material: Cordierite for forgiveness, ceramic for gentler high-heat behavior, steel for aggressive bottom heat.
- Check the size: Make sure your dough has breathing room, not edge-to-edge coverage.
- Check the heat plan: Decide whether you're baking in a home oven, on a grill, or in both.
- Check the handling: Heavy stones and fragile materials are less fun if you move them often.
- Check the cleanup routine: If you don't want a fussy tool, choose something that tolerates normal scraping and brushing.
The best purchase is the one that matches how you cook on a Tuesday night, not the one that sounds most like a pizzeria brochure. If your oven runs hot but not Naples-hot, the stone should help you bridge that gap. If your grill does the heavy lifting, the stone should be able to keep up without drama.
If you want a stone, peel, or full pizza setup that's built for home ovens and backyard grills, take a look at Hans Grill. Their tools are aimed at the same problem this guide is about, helping a home cook get closer to pizzeria-style heat and a crisper base without turning pizza night into a project.


