

Pizza Dough Tools: The Complete Home Guide
You've shaped the dough, added the toppings, and reached the moment when dinner should be easy. Instead, flour is everywhere, the dough is stuck to the counter, and the pizza comes out with a charred bottom and a raw center. That frustrating result usually isn't caused by one bad ingredient. It's caused by a workflow in which each stage lacks the right tool.
Pizza dough tools work best as a connected system. A scale controls portions, a scraper divides the dough, a proofing box protects fermentation, a peel handles the launch, and a stone or steel transfers heat into the crust. Once you understand what each tool does, pizza making becomes less about collecting gadgets and more about removing specific points of friction.
Table of Contents
- Why the Right Pizza Dough Tools Change Everything
- Every Pizza Dough Tool Explained and What It Actually Does
- Matching Tools to Stones, Steels, and Outdoor Grills
- Building Your Toolkit by Budget and Skill Level
- Caring for Your Pizza Dough Tools the Right Way
- The Dough Shaping Debate and Why Stretching Wins
- Fixing Common Pizza Problems Before They Ruin Dinner
- Your Quick-Reference Pizza Dough Tools Checklist
Why the Right Pizza Dough Tools Change Everything
A dough ball can look perfect in the bowl and still fail at the oven. If you divide it unevenly, one pizza may bake thin and crisp while another stays thick and pale. If the dough ferments uncovered, its surface can dry and tear. If you shape it too aggressively, the center may become dense before you've even added sauce.
The problems continue at launch. Dough that feels slack may stretch unevenly, then cling to the peel because it sat too long under wet toppings. A peel that's too rough or poorly paired with the baking surface can drag the pizza instead of releasing it. By the time the pie reaches the oven, you're trying to correct mistakes made during mixing, portioning, proofing, and shaping.
Follow the dough from mix to bake
Think of the workflow as a chain:
- Mixing: A bowl, dough whisk, hands, or mixer brings flour and water together without adding unnecessary flour.
- Dividing: A bench scraper cuts and lifts dough cleanly while protecting the counter.
- Proofing: A covered box limits drying and keeps dough balls organized during fermentation.
- Shaping: Your fingertips and hands preserve the structure created during proofing.
- Launching: A peel moves the topped dough quickly and smoothly onto the hot surface.
- Baking: A stone or steel provides the contact heat needed to set the base.
- Finishing: A turning peel adjusts the pizza, while a cutter or rocker blade portions it cleanly.
No single tool can perform all of these jobs well. A bench scraper can lift dough, but it can't carry a topped pizza into a hot oven. A docker can control bubbles in a thick crust, but it can't divide a sticky mass into equal portions. The value comes from pairing each tool with the moment when it solves the most important problem.
The category itself reflects that shift toward repeatable preparation. The global pizza dough former equipment market was valued at USD 0.52 billion in 2024 and is projected to reach USD 1.33 billion by 2033, with a projected 11.0% compound annual growth rate from 2026 to 2033, according to Verified Market Reports' pizza dough former market overview. That equipment is commercial, but the underlying lesson applies at home: consistent portioning, forming, and handling make consistent crusts easier.
Practical rule: Buy the tool that fixes your current failure, not the tool that looks impressive in a product photo.
This guide focuses on that practical system. You'll see what each pizza dough tool does, how stones and steels change your choices, how to build a kit around your oven and budget, and how to care for the equipment so it stays useful through many pizza nights.
Every Pizza Dough Tool Explained and What It Actually Does
Start with the stage that causes your most trouble. A stand mixer with a dough hook can combine and develop dough while reducing hand work, but you still need to watch the dough temperature and texture. Hand mixing remains a perfectly workable option for many home cooks, especially when you want to learn how the dough feels.
A digital scale gives you repeatable portions and hydration. It matters because a slightly larger dough ball behaves differently from a smaller one, even when both look similar. A bench scraper then turns that repeatability into clean handling. Use it to divide dough, lift sticky sections, gather flour, and clean the work surface without dragging a damp cloth through the mess.
A proofing box protects the dough during fermentation. Stackable polypropylene boxes with smooth tapered walls help release dough balls, while lids reduce surface drying. One independently described design holds up to six 250 g dough balls per box and is refrigerator- and freezer-safe, as described by Ooni's pizza dough box specifications. The design also uses a white exterior to limit heat absorption, which can help reduce the risk of over-proofing in batch preparation.
Match the tool to the dough's next move
A pizza peel handles the most delicate transfer in the process. Wooden peels often suit launching because dough can release cleanly from a lightly dusted surface. Perforated metal peels reduce contact with the dough and can help remove excess flour before baking. A turning peel is smaller and rounded, giving you control when you need to rotate or reposition a pizza in the oven.
A dough docker has a narrower role. Its spikes create small openings that limit large bubbles in thick or pan-style dough. It isn't automatically useful for every thin-crust pizza, where aggressive docking can remove the air you want in the rim. Use a rolling pin selectively for stuffed pizzas, flatbreads, or styles where an even, compact texture matters.
An infrared thermometer reads the surface temperature of a stone, steel, or grill setup without touching it. A stem thermometer, timer, and scale also belong in a serious dough workflow because time and temperature influence fermentation and handling, a point emphasized in PMQ's dough equipment guide. Professional tool guidance also pairs scrapers with scales, thermometers, and proofers because portion weight, dough temperature, and proofing conditions affect gas retention, gluten relaxation, and crust structure, as outlined by GI Metal accessory guidance from Whites Food Equipment.
| Tool | Workflow Stage | What It Solves |
|---|---|---|
| Stand mixer with dough hook | Mixing | Combines and develops dough with less hand work |
| Digital scale | Mixing and dividing | Keeps ingredient and portion measurements consistent |
| Bench scraper | Dividing and handling | Cuts, lifts, gathers, and cleans |
| Proofing box | Fermentation | Protects dough balls and organizes batch proofing |
| Dough docker | Shaping and pre-bake preparation | Limits oversized bubbles in thicker styles |
| Pizza peel | Launching and retrieval | Transfers dough onto and off the hot surface |
| Turning peel | Baking | Rotates and adjusts the pizza |
| Infrared thermometer | Heat preparation | Checks surface readiness |
| Cutter or rocker blade | Finishing | Creates clean portions after baking |
For a closer look at launch choices, compare wooden and metal pizza peels before buying a single-purpose paddle.
Matching Tools to Stones, Steels, and Outdoor Grills
The baking surface sets the rhythm for the rest of your workflow. A thick cordierite stone stores heat and gives the dough a forgiving contact surface, useful when the base needs more time to firm. Its resistance to thermal shock also makes cordierite suitable for high-heat baking surfaces.
Steel changes the handoff. Carbon steel transfers heat more aggressively, so the launch must be quick and the dough must release cleanly. A metal or perforated peel can reduce dragging, while a light layer of semolina helps separate the dough without covering the underside in flour. Compare pizza steel versus stone before choosing the surface that fits your oven and handling speed.
Let heat capacity guide your handling
A thick stone gives you more time to correct a hesitant launch and can suit dough with slightly higher moisture. A thinner steel plate heats and recovers quickly, but it exposes a slow launch or heavily topped center sooner. The hotter the contact surface, the less time you have to adjust the pizza after it leaves the peel. Match the peel, dusting material, and topping load to that window.
| Surface | Best Peel Type | Key Tool Adjustments |
|---|---|---|
| Thick cordierite stone | Wooden launch peel | Use moderate dusting and avoid excessive docking |
| Carbon steel plate | Metal or perforated peel | Launch quickly and use light semolina |
| Stone on a two-zone grill | Long-handled wooden or metal peel | Add heat-rated gloves and monitor the fire |
| Steel over outdoor coals | Long-handled perforated metal peel | Keep toppings light and turn the pizza promptly |
Outdoor grilling adds fire management to the dough workflow. With a two-zone fire, place the stone over the cooler side and let surrounding heat cook the top. Steel positioned closer to direct heat browns the base faster, so watch it closely and keep a turning peel within reach.
Handle length affects both safety and control. A longer handle keeps your hands farther from radiant heat, but it changes your grip and the timing of the launch. Practice with an un-topped dough round before transferring a loaded pizza. Heat-rated mitts, a thermometer, and a clear landing area matter outdoors because wind, fire intensity, and grill height can change during the bake. Each tool supports the next step, from stable contact to a controlled turn and safe retrieval.
Building Your Toolkit by Budget and Skill Level
The right starter kit depends on the oven you own and the style you want to bake. A beginner using a standard indoor oven doesn't need a mixer, turning peel, docker, and proofing cabinet on the first night. Start with a digital scale, plastic bench scraper, wooden launch peel, and baking stone or steel. Those tools address portioning, handling, transfer, and heat, which are the steps most likely to affect your first results.
A backyard griller needs a different arrangement. Choose a long-handled perforated metal peel, a heat-capable baking surface, heat-rated gloves, and an infrared thermometer. Add a docker only if you regularly make thick Sicilian or deep-dish dough, where large trapped bubbles can distort the bake.
Spend first on contact and heat
Budget shoppers can use a simple wooden peel for launching and an inverted, rimless baking sheet as a temporary transfer surface. A bench scraper can replace several specialized dough-handling accessories, while a household bowl can cover dough during a short proof. Upgrade only after you've identified a repeatable limitation.
Enthusiasts can add a stand mixer with a dough hook, stackable proofing boxes, a thermometer, and separate launching and turning peels. A heat mat or controlled proofing setup may help when your kitchen temperature varies, but it won't replace good portioning or careful shaping.
| User Type | Launch Peel | Baking Surface | Mixing Method | Extra Tools |
|---|---|---|---|---|
| Beginner | Wooden or aluminum peel | Stone or steel | Hands, bowl, or basic mixer | Scale and bench scraper |
| Backyard griller | Long-handled perforated metal peel | Grill-safe stone or steel | Hands or stand mixer | Thermometer and heat-rated gloves |
| Budget shopper | Wooden peel or rimless sheet pan | Existing hot tray or baking stone | Bowl and hands | Scraper and timer |
| Enthusiast | Separate wooden and metal peels | High-thermal-mass stone or steel | Stand mixer with dough hook | Proofing box, turning peel, thermometer |
Hans Grill offers a Pizza Peel PRO with a perforated non-stick metal paddle for launching, turning, and retrieving pizzas, so it can fit a setup where one metal peel must handle several oven tasks. The key buying principle remains simple: prioritize stable surface contact and heat capacity before adding more gadgets.
Caring for Your Pizza Dough Tools the Right Way
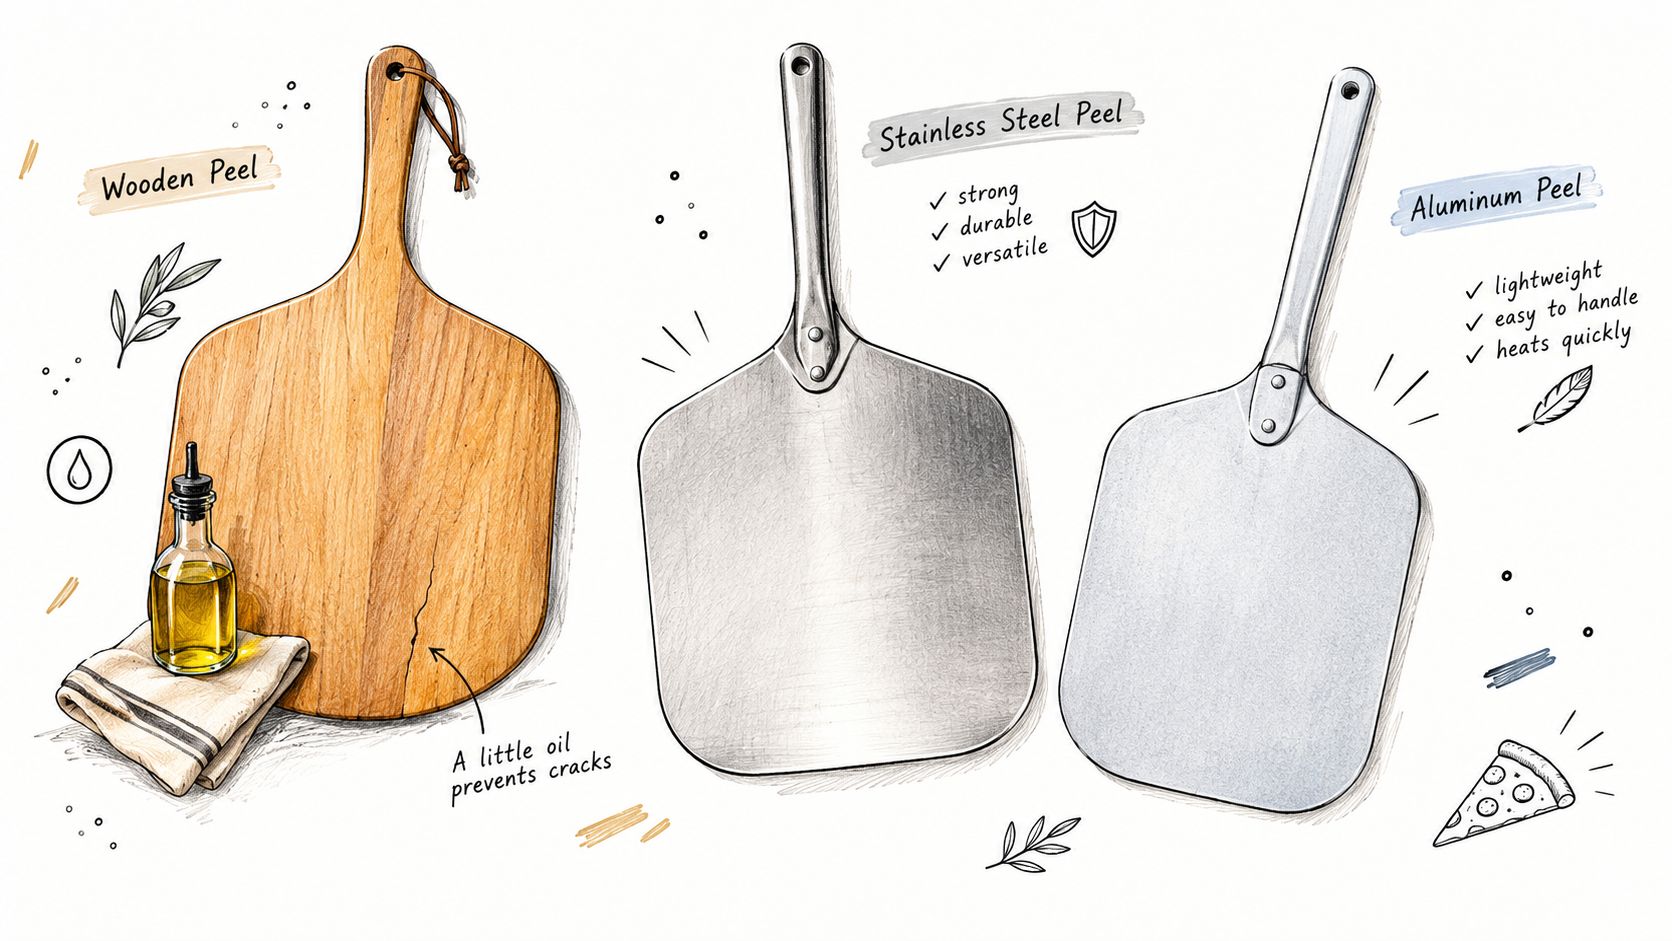
Tool care starts with material. Wooden peels should stay dry, because soaking encourages swelling, warping, and cracking. Wipe them promptly, let them dry fully, and apply food-safe mineral oil as part of a regular maintenance routine. Don't leave a wooden peel leaning against a damp sink overnight.
Stainless steel and aluminum peels are easier to clean and may be dishwasher-safe, but towel-drying prevents water spots and keeps handles, joints, and edges in better condition. Plastic and stainless dough scrapers can usually go in the dishwasher. Keep the scraper edge smooth enough to lift dough without gouging a worktop or proofing box.
Clean baking surfaces without damaging them
Treat stones and steels differently from ordinary cookware. Scrape baked-on residue with a bench scraper, wipe the surface with a damp cloth, and avoid soap that can interfere with a seasoned steel surface. Cast iron needs a thin oil coating after use, while a steel plate benefits from the seasoning approach described in this pizza steel care guide.
Proofing boxes deserve attention because dough residue and moisture can remain in corners. Wipe the interior after each batch, dry the lid and base, and refresh any humidity tray or water reservoir according to the manufacturer's instructions. Store boxes with enough airflow to prevent unwanted odors and mold.
Storage rule: Keep peels upright or hang them flat, and let stones and steels cool before moving them onto a cold surface.
Assigning each scraper and container a role also helps prevent cross-contamination. Use one set for raw dough handling and clean it before it touches baked food. Store peels away from grease, and don't stack heavy stones where they can fall or chip an edge.
The Dough Shaping Debate and Why Stretching Wins
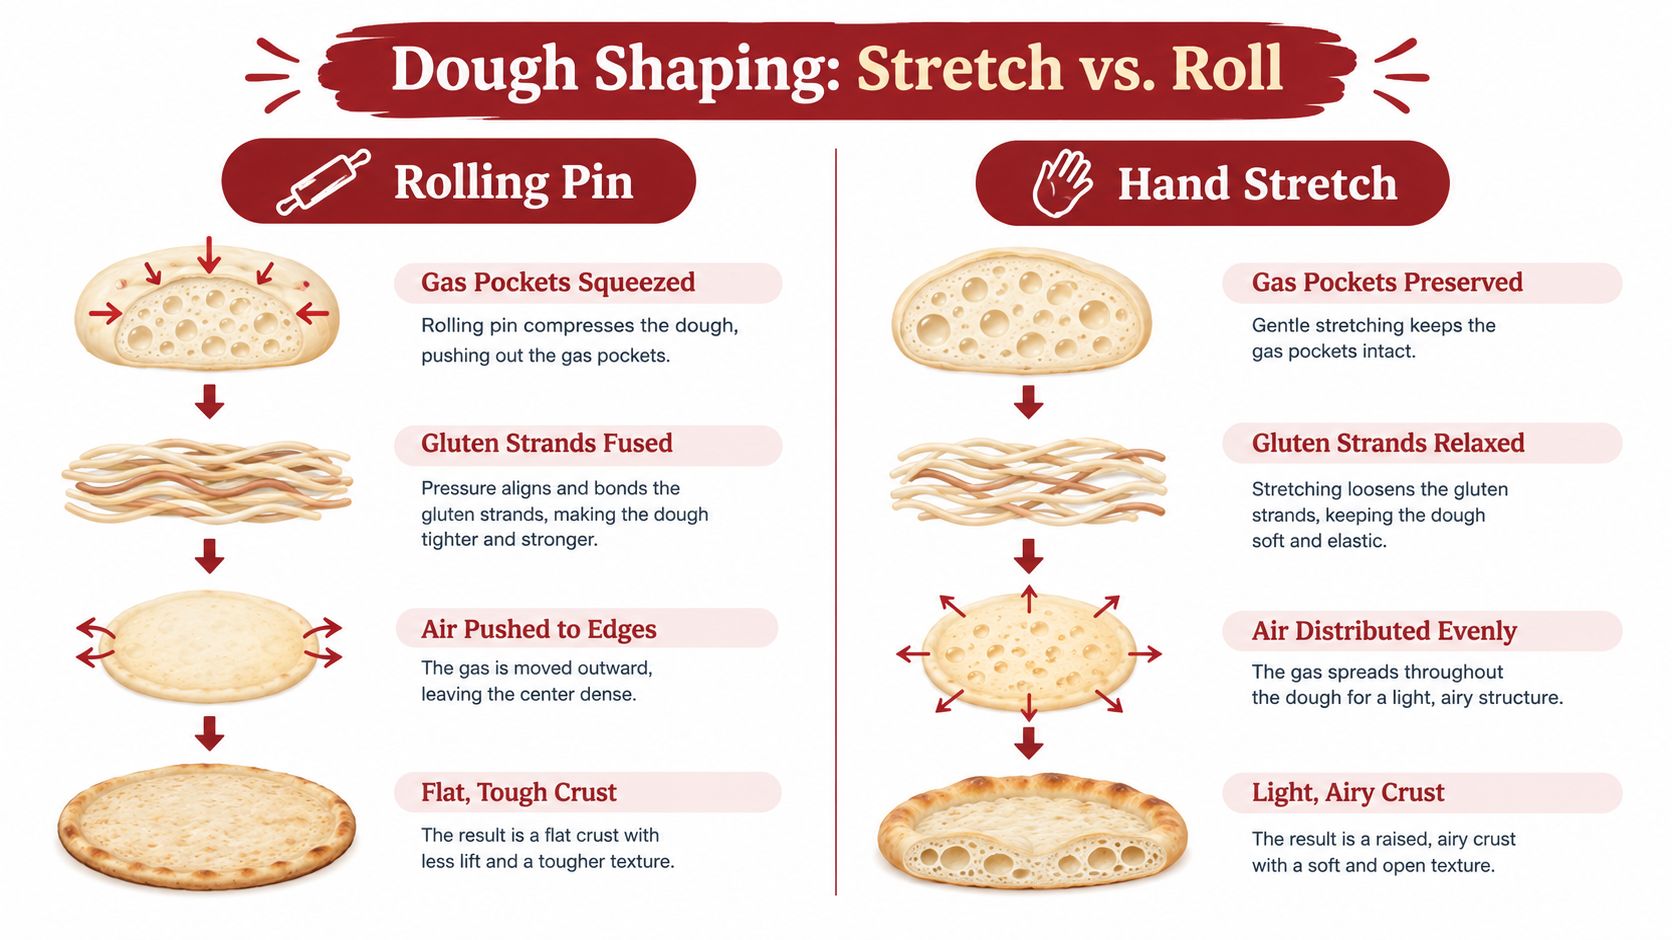
A rolling pin isn't wrong. It's the wrong tool for many airy, hand-stretched pizza styles. Pressing a pin across a fermented dough ball squeezes out gas pockets, compresses the interior, and pushes air toward the edge. The result can be a flatter, denser crust when your aim is a light rim.
Hand stretching keeps more of the fermentation structure intact. Begin with the dough ball on a lightly floured surface, then press from the center outward with your fingertips. Stop before the rim, leaving a thicker border for the cornicione.
Use your hands as a controlled tool
Once the center is flatter, lift the dough and let gravity extend it across your knuckles. Rotate it gradually rather than pulling one area hard. For a thin-crust style, support the center with a fist beneath the dough; for a broader, more flexible shape, drape it over your knuckles and let the weight do part of the work.
If the dough springs back or refuses to expand, stop pulling. Set it down, cover it, and let the gluten relax before trying again. A short rest can prevent the small tears that happen when you force resistant dough.
Watch the technique in motion before practicing with a heavily topped pizza:
Save the rolling pin for stuffed pizzas, flatbreads, and other preparations where an even, compact thickness matters. For a classic open rim, your fingertips and knuckles provide better control than a cylinder pressing in one direction.
Fixing Common Pizza Problems Before They Ruin Dinner
Stuck dough usually becomes a problem before the peel reaches the oven. Dust the peel lightly with semolina, place the shaped dough on it, and give the peel a small shake before adding toppings. If the dough moves freely early, you'll know the launch remains possible.
If it begins sticking, don't keep decorating. Lift one edge, add a little semolina underneath, and shake again. A perforated metal peel can also reduce the contact area, especially when wet toppings make the dough harder to release.
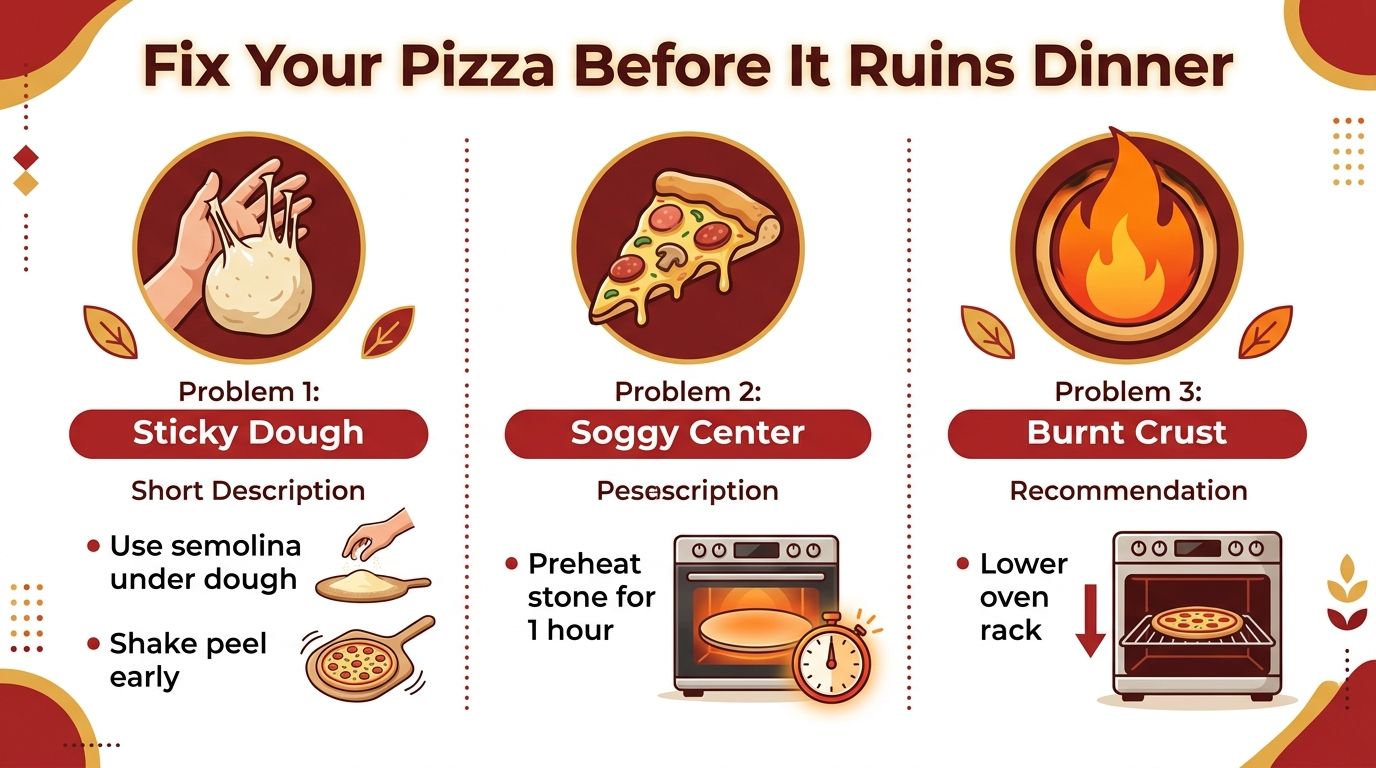
A soggy center points to a mismatch between heat, dough, and toppings. Move the baking surface to a position that receives stronger bottom heat, preheat it thoroughly, use less sauce, and reduce the dough's hydration if the center repeatedly stays wet. Keep toppings restrained while you diagnose the bake, because excess moisture can hide the cause.
Torn dough needs patience rather than more flour. Dust your hands or knuckles lightly, not the entire counter, and let the dough rest if it resists. Pinch a small tear closed before adding sauce, then continue with gentler pressure.
Change one variable at a time. If you alter the peel, hydration, oven position, and topping load together, you won't know which adjustment solved the problem.
Your Quick-Reference Pizza Dough Tools Checklist
Use this checklist by workflow stage, not as a shopping challenge:
- Mix and measure: Bowl, hands or dough hook, digital scale, and thermometer.
- Divide and handle: Bench scraper or dough scraper.
- Proof: Covered proofing box or container.
- Shape: Fingertips, knuckles, and a docker for thick styles.
- Launch: Wooden peel for a forgiving start, or perforated metal peel for a low-contact transfer.
- Bake: Cordierite stone or steel, infrared thermometer, and heat-rated gloves for grilling.
- Finish: Turning peel and pizza cutter or rocker blade.
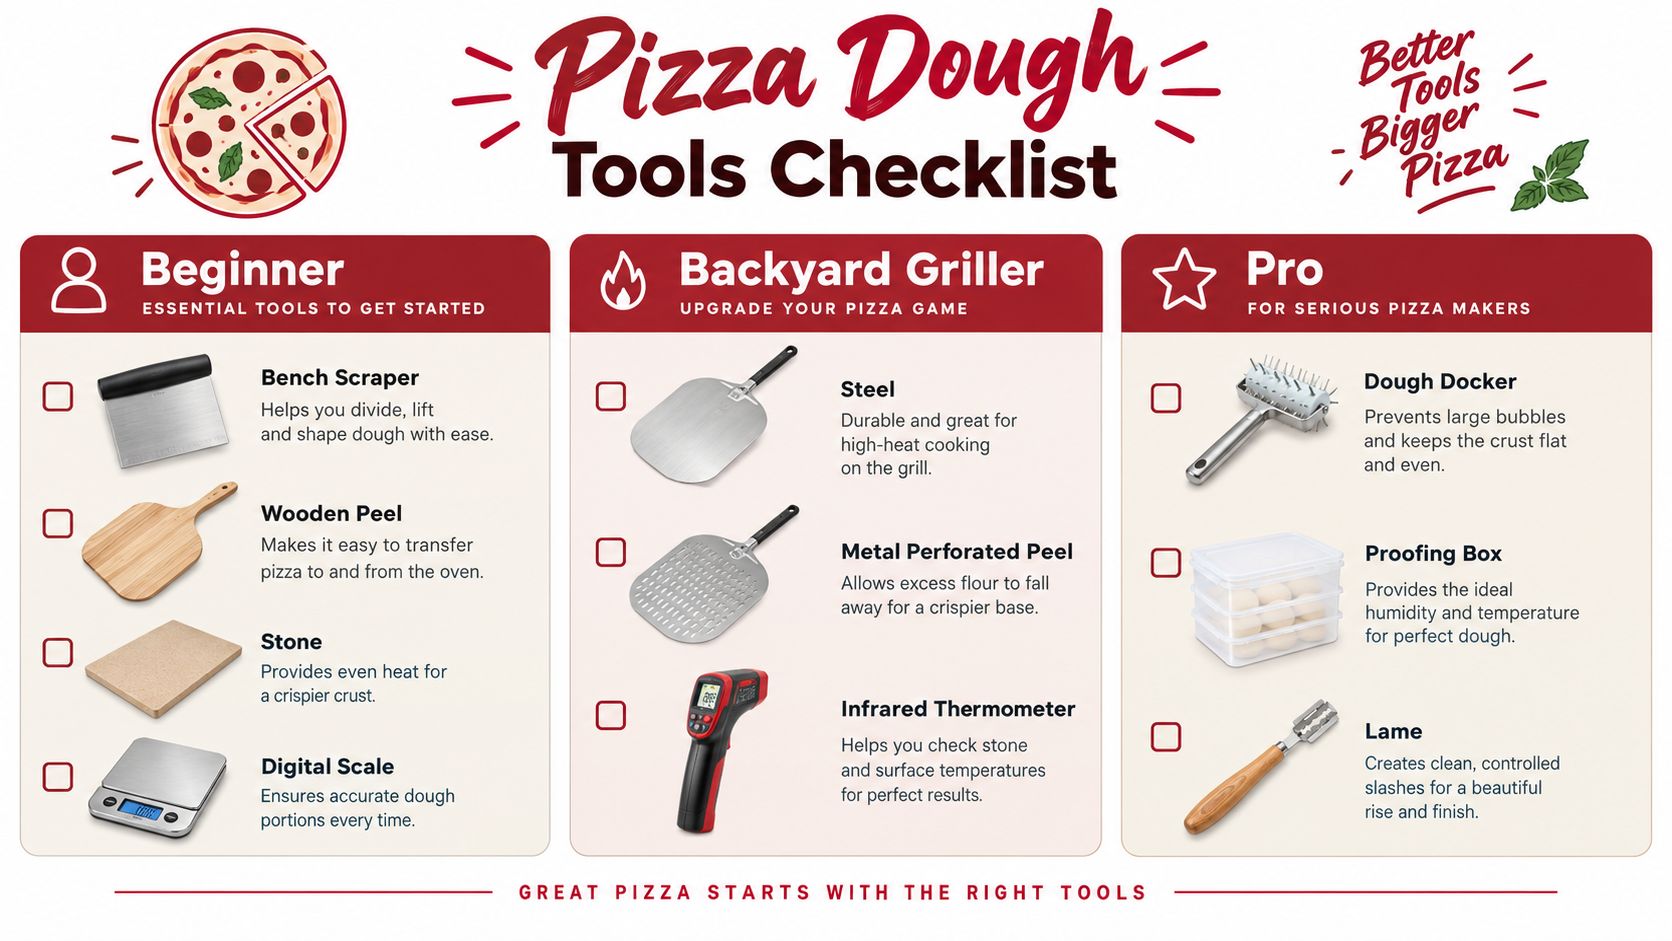
Build around the stage that currently fails. A beginner may need only a scraper, scale, peel, and stone, while a griller may need steel, a long-handled peel, and a thermometer first.
Hans Grill offers pizza stones, pizza steels, proofing boxes, a Pizza Peel PRO, and pizza cutters for home ovens and backyard grills. Visit Hans Grill to match your baking surface and handling tools to the pizza workflow you want to practice next.


