

Same Day Pizza Dough: Fast Recipes and Baking Tips
Friday afternoon, the pizza craving arrives before the dough does. Most recipes point you toward an overnight or multi-day cold ferment, but dinner is only a few hours away. Same day pizza dough can absolutely deliver a crisp, airy crust, provided you manage dough temperature, yeast activity, and proofing by physical cues instead of trusting a timer alone.
The trade-off is real. A compressed fermentation produces a milder, bread-like flavor than a slow-fermented dough, but it also gives you a practical route to homemade pizza in one afternoon. The key is to build enough structure quickly, keep the dough from racing ahead, and give it a properly heated baking surface.
Table of Contents
- The Reality of Fast Fermentation
- Calibrating Yeast and Hydration for Speed
- Mixing and Bulk Fermentation Cues
- Shaping and Final Proofing Milestones
- Baking on Stones and Steels for Maximum Crisp
- Troubleshooting Common Same Day Dough Mistakes
The Reality of Fast Fermentation
You've mixed the dough, cleared a space on the counter, and started checking the bowl every few minutes. The recipe says the dough should be ready in a fixed number of hours, yet your kitchen is warmer than expected and the surface already looks inflated. Or the opposite happens, the dough barely moves and dinner is approaching.
That's why I treat rapid fermentation as a calibration problem rather than a countdown. Same day dough typically works through a room-temperature process lasting about 4 to 8 hours at 68 to 78°F, or 20 to 26°C, with part of that time spent in bulk fermentation and the rest in shaped dough proofing. The fermentation guidance for same-day pizza dough places the process around 1 to 3 hours in bulk and another 1 to 5 hours after shaping, depending on the formula and conditions.

What speed changes
Yeast creates gas, while gluten traps that gas and gives the crust its framework. When you compress the schedule, you increase yeast activity so the dough gains volume quickly, but the dough has less time to develop the deeper aroma, extensibility, and complexity associated with slower fermentation. That doesn't make same day dough a failure. It makes it a different style of dough.
Professional proofing practice also gives you a more useful endpoint than the clock. A dough mass is commonly considered ready when it has doubled in volume, while a shaped dough ball may expand by roughly 50% in diameter, according to traditional pizza proofing references. Those visual benchmarks still need interpretation, because a warm room can produce the same expansion with a weaker dough than a cool room.
Practical rule: Use time to plan dinner, but use volume, texture, and spring-back to decide whether the dough is ready.
How to compensate at the bake
A shorter fermentation benefits from decisive baking. A well-preheated stone or steel supplies strong bottom heat, which helps the crust set before the dough spreads too far. High top heat also improves surface browning and encourages the rim to inflate, especially when the dough itself has developed a relatively mild flavor.
Same day dough works particularly well for weeknight thin crust, backyard grill pizza, and home-oven baking where reliable handling matters more than maximum fermentation character. If you want the deeper flavor and more relaxed extensibility of a cold ferment, compare it with this cold-ferment pizza dough method, but don't force an overnight process onto a dinner you decided to make today.
Calibrating Yeast and Hydration for Speed
Fast dough becomes more predictable when yeast is measured against flour weight instead of by packet. For a 4 to 8 hour room-temperature fermentation, practical guidance commonly places instant yeast around 0.3% to 0.5% of the flour weight at 68 to 78°F, or 20 to 26°C. Very fast 2 to 4 hour schedules may call for roughly 1% to 2% yeast, as described in the pizza fermentation calculator guidance, but that range leaves little tolerance for a warm room or dough that starts too hot.
With 500 grams of flour, 0.3% yeast equals 1.5 grams, while 0.5% equals 2.5 grams. Those amounts are small, so a scale that measures fine increments is more reliable than a teaspoon. Extra yeast only increases the rate of fermentation. If the dough heats up or the room runs warm, it can pass its strongest point before the gluten has developed enough resilience.
A practical calibration matrix
| Kitchen Temp | Instant Yeast % | Water Temp |
|---|---|---|
| 68 to 70°F | 0.5% | Cool to neutral |
| 71 to 74°F | 0.4% | Neutral |
| 75 to 78°F | 0.3% | Cool |
Use this matrix as a starting setting, then adjust for the dough's temperature and behavior. In a warm kitchen, choose the lower yeast level and cooler water. In a cool kitchen, choose the higher level and water that does not chill the dough excessively. Instant yeast can be mixed directly with the flour, allowing the final dough temperature to guide the process rather than relying on hot liquid to activate it.
Why 67% hydration is forgiving
A 67% hydration dough contains 67 grams of water for every 100 grams of flour. Baking Steel's same-day dough method uses that practical benchmark with increased yeast and an approximately 8-hour readiness target. The moderately firm dough is easier to divide, ball, launch, and stretch without losing its shape.
Higher hydration can create a more open, extensible crust, but it requires stronger gluten and cleaner handling. During compressed fermentation, slightly less water gives you more control. The dough may stretch with a little more resistance, yet it stays manageable while the oven heats and toppings are prepared.
Set water temperature as a correction for the whole kitchen. Warm flour, a warm bowl, and a warm room call for cooler water so fermentation does not accelerate immediately. A cool room and consistently slow rise may benefit from water closer to room temperature. Hot water is unnecessary. Aim for dough that begins fermenting steadily, then confirm the setting through temperature, expansion, and texture rather than the clock alone.
Mixing and Bulk Fermentation Cues
Start with a controlled mix. Add the water, then flour, yeast, and salt, and combine until no dry flour remains. Let the shaggy dough rest briefly so the flour can absorb the water. This short pause limits the urge to add flour before the dough has finished hydrating.
Knead until the dough is smooth, elastic, and slightly tacky. A mixer develops gluten efficiently, yet high speed can raise the dough temperature and push fermentation ahead of schedule. By hand, use folds followed by short rests. Heavy bench flour makes the dough stiffer and works against the hydration you set.
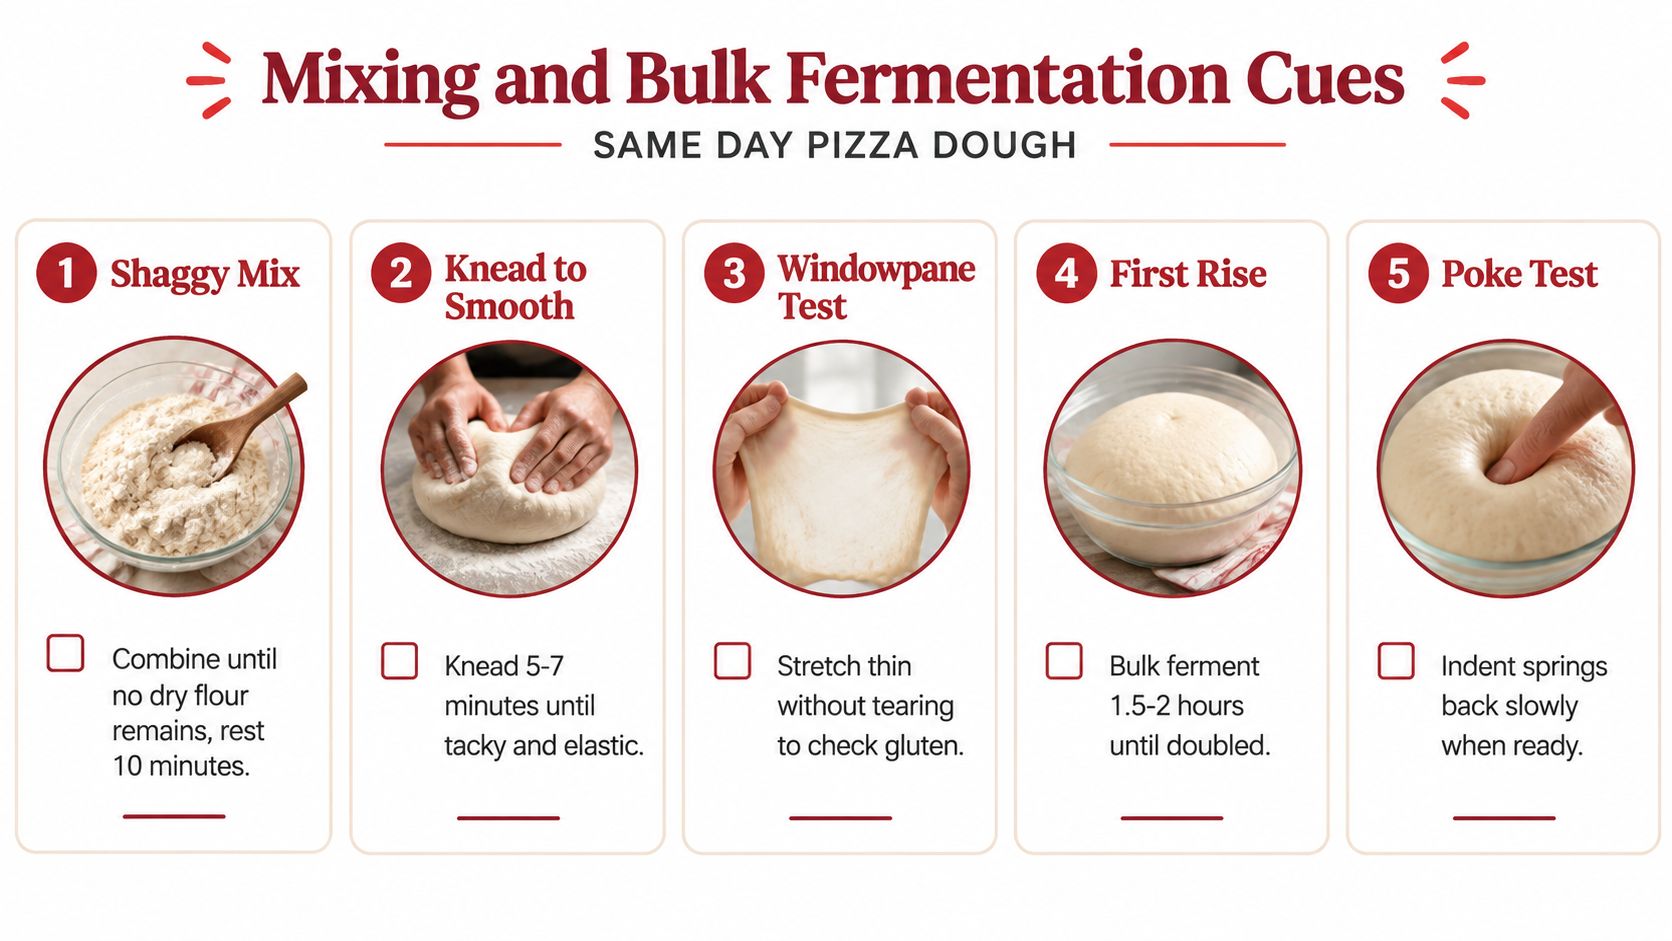
Readiness starts in the mixing bowl
Before bulk fermentation, the dough should feel cohesive and supple. If it smears across the bowl like batter, the gluten has not organized or the flour needs more time to absorb water. If it feels stiff and tears immediately, rest it briefly before changing the flour or water balance.
Check development with a windowpane-style stretch. Pinch off a small piece and pull it gently into a thin sheet. It should extend without ripping straight away. Properly fermented dough should become smooth, slightly tacky, and airy while retaining enough strength for this test. Use the dough's temperature and texture to confirm that progress, rather than relying on a fixed schedule.
Bulk fermentation without the stopwatch
Transfer the dough to a lightly oiled, covered container, then mark its starting level with tape or a washable marker. Fermentation is ready for dividing when the dough has expanded substantially, commonly approaching double its original volume, and feels inflated instead of dense.
Room conditions change the result. A hot countertop, warm bowl, or dough that left the mixer too warm can shorten the process. A cool floor or room can slow it. Press the surface with a lightly floured finger. An indentation that disappears immediately means the dough needs more time. A dough that sinks and feels fragile has gone too far. Slow spring-back, paired with visible expansion, signals useful maturity.
Watch the dough, not the recipe's promise. A fixed rise time applies only to the conditions in which the recipe was tested.
Avoid aggressively punching down the dough. Gas already held in the gluten network helps create a light crust. Turn the dough out gently, divide it cleanly, and preserve that internal structure before shaping.
Shaping and Final Proofing Milestones
Dividing is where a fast dough can either become organized or lose its tension. Turn the fermented dough onto a lightly floured surface, divide it evenly, and avoid tearing the pieces. Each portion should be folded inward until the outer surface becomes smooth, then tightened against the bench with a cupped hand.
A tight dough ball isn't just visually neat. Surface tension helps the dough hold gas during the final proof and gives the edge enough structure to inflate in the oven. If the ball spreads immediately into a flat puddle, the bulk dough may be overproofed, too warm, or insufficiently developed.
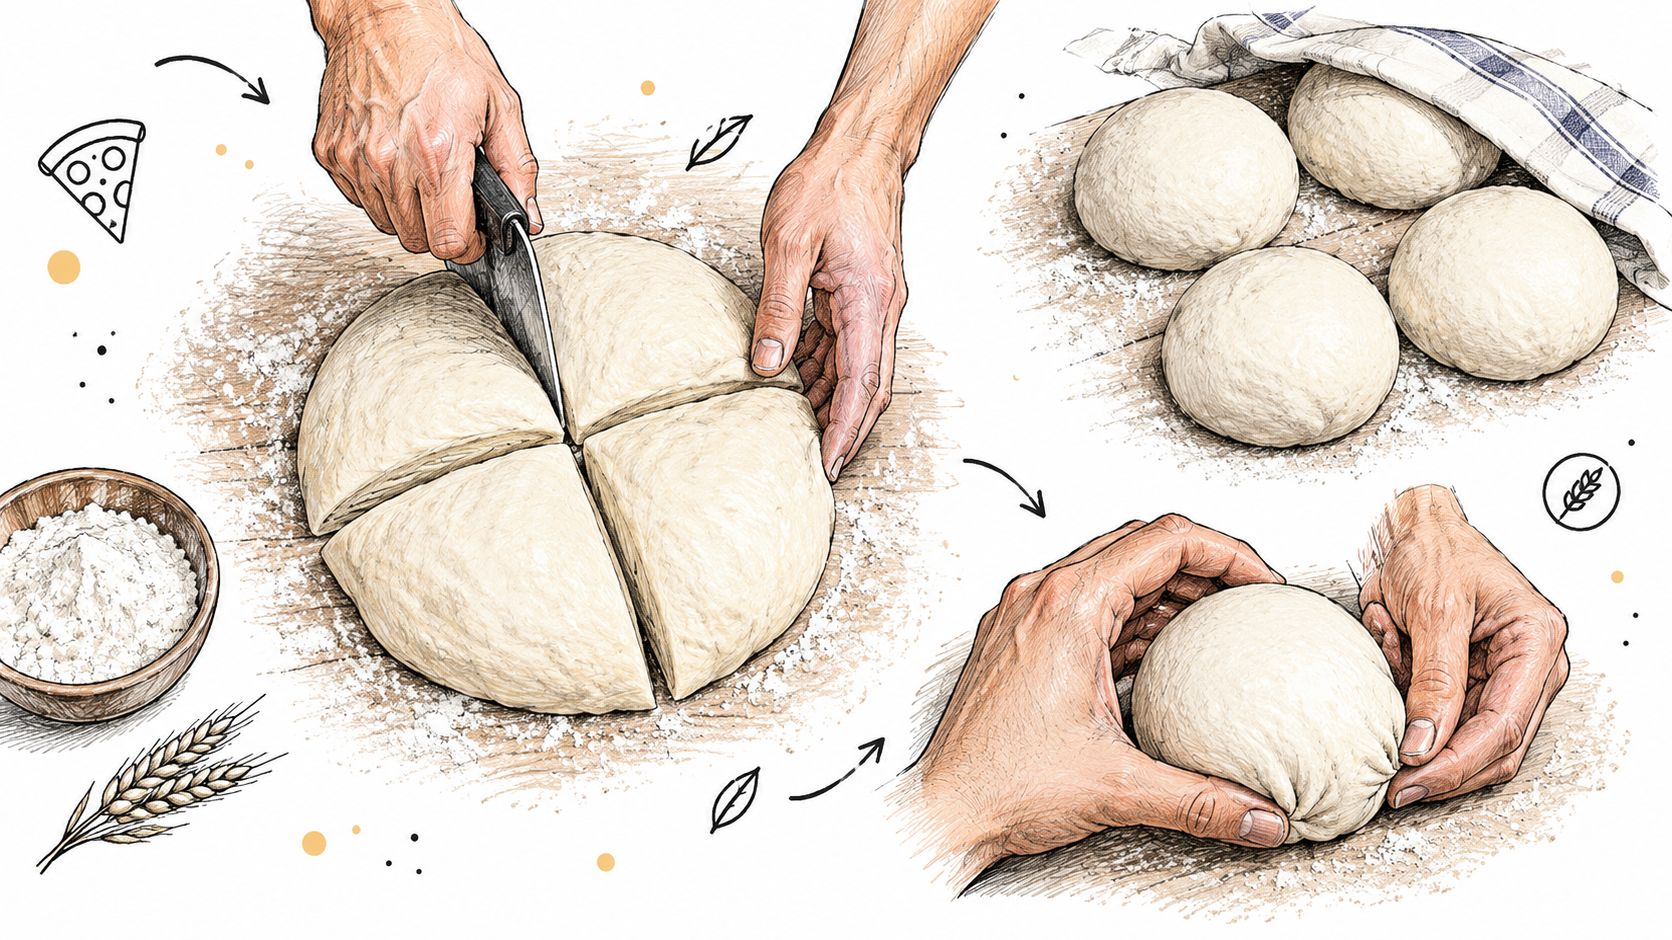
Use expansion as the milestone
Place the balls in a covered tray or proofing box with space between them. The cover matters because a dry skin will resist stretching and can tear before the crust has a chance to expand. A proofing box also reduces the effect of drafts and keeps the surface from drying while the interior ferments.
For more detail on how heat changes the timing, use this guide to pizza dough proofing temperature. A warm environment may make the final proof finish quickly, while a cool one may leave the dough tight long after the recipe's stated time.
Judge the balls by appearance and touch:
- Volume: The balls should look visibly fuller, with the dough expanding rather than just spreading.
- Surface: The skin should remain smooth and supple, not dry, cracked, or blistered with weak spots.
- Poke response: A light indentation should spring back slowly and partially, rather than vanishing immediately or collapsing completely.
- Relaxation: The dough should open without fighting your fingers or snapping back into a smaller circle.
Opening the dough without losing the rim
Dust the work surface lightly with flour or semolina. Turn the dough out gently so the upper surface becomes the base, then press from the center outward while leaving the outer rim less disturbed. That untouched edge contains the gas you want to preserve.
If the dough resists, don't pull harder. Let it rest covered for a short period and try again. Same day dough often needs a little patience at this stage because it may have gained volume faster than it gained extensibility. A relaxed ball stretches with steady pressure and keeps its shape on the peel.
Baking on Stones and Steels for Maximum Crisp
The baking surface determines whether the bottom sets with a clean crunch or remains pale and soft. A thin tray heats quickly but stores little energy, so the dough can lose moisture slowly while the toppings cook. A substantial stone or steel behaves more like a commercial oven deck, delivering concentrated heat at the base during the launch.

Stone versus steel
A cordierite pizza stone offers steady, even heat and is less likely to transfer an aggressive burst to the bottom than a metal surface. It suits home ovens and covered grills where you want a crisp base with controlled browning. A stone must be heated thoroughly because its performance depends on the entire slab reaching baking temperature, not just the surface.
A baking steel transfers heat more forcefully. That makes it useful for thin crust and for home ovens that need help setting the base, but it also increases the chance of scorching if the dough is delicate, heavily floured, or loaded with sugary toppings. The pizza steel guide is useful when you're adapting steel placement and launch technique to your oven.
For either surface, preheat until the baking deck is fully charged. An infrared thermometer can help you monitor the surface directly, but the practical test is consistent baking from one pizza to the next. If the first base is pale and the second suddenly burns, the surface or heat balance wasn't stable.
Managing a home oven
Place the stone or steel where it receives strong bottom heat while leaving enough space above for the rim to brown. Preheat the oven thoroughly, then launch a lightly topped pizza so the base isn't weighed down by excess moisture. Slide the dough with one confident motion, because hesitation lets the underside stick to the peel.
After the crust sets, watch the top rather than rotating automatically. A steel may brown the base before the cheese is ready, while a stone may give you a gentler progression. Move the pizza higher if the bottom is finished but the top needs color. If the rim darkens too quickly, reduce the direct top exposure or use fewer wet toppings.
A short visual demonstration can help you understand how a pizza surface, peel, and baking setup work together.
Managing a backyard grill
A grill gives you strong heat, but the lid becomes your broiler. Preheat the stone or steel over the appropriate part of the grill, then create enough top heat to cook the rim and cheese without putting the base directly over an uncontrolled flame.
Hans Grill sells cordierite stones, high-thermal-mass steels, and dough proofing boxes designed for oven and BBQ use. Those tools address separate problems, the stone or steel supplies a stable baking deck, while the box protects shaped dough from drying during its final rise.
Keep the pizza lightly dressed. Same day dough doesn't need heavy toppings to taste satisfying, and excess sauce or wet vegetables can soften the crust before the bottom has finished crisping. Bake until the underside is firm and browned, then rest the pizza briefly on a rack so steam doesn't soften the base on a plate.
Troubleshooting Common Same Day Dough Mistakes
Fast fermentation is easiest to rescue when you diagnose the dough before changing the formula. Check its temperature, volume change, surface tension, and response to touch. Adding yeast to a warm dough that is already active can push it past its usable strength, while a cold dough may only need controlled warmth.
When the dough is overproofing
A dough that has expanded to roughly twice its starting volume, spreads across the container, and feels weak under a fingertip is already close to its limit. Move the covered dough into the refrigerator as soon as those cues appear. Cooling slows fermentation and firms the dough before shaping.
If the dough is merely puffy and still holds a rounded edge, divide and ball it immediately. Use firm, even tension during balling, then shorten the final rest. Tight shaping can restore surface tension, but it cannot rebuild gluten that has already weakened. If the dough collapses when lifted, make a smaller, thinner pizza and keep the toppings light.
Rescue the schedule, not the original plan. Cooling a moving dough is safer than adding flour to a fermenting dough that has already lost structure.
Overproofed dough often tears because the gluten network can no longer contain the gas it produced. Extra bench flour only dries the surface and hides the weakness. Keep the dough lightly floured, preserve its remaining gas, and move from shaping to baking without another long wait.
When the dough refuses to rise
Check the dough temperature before changing the yeast. A dough below the warm range of your kitchen will ferment slowly, especially if the mixing water chilled the flour. Move the covered container to a gently warmer place, such as a switched-off oven with the light off, and look for a visible increase in volume rather than relying on the clock.
A warm water bath around the container can help when the dough remains dense and its volume has barely changed. Keep the container sealed, and monitor the bath so the dough warms gradually instead of forming a hot pocket. If the dough stays nearly unchanged after reaching a comfortably warm temperature, weak yeast or uneven salt distribution may be responsible.
Do not add yeast directly to developed dough. Fresh yeast will not spread evenly without reworking, and reworking can damage the structure. If the dough is cool but shows bubbles or a slight lift, give it controlled warmth. If it remains dense after warming and still has little volume gain, choose a thinner bake and accept a tighter crust rather than forcing a large rise.
When the dough snaps back
Snapback usually comes from insufficient relaxation, a dough that is still cool, or excessive tension from balling. If the dough feels noticeably cool to the touch and shrinks as soon as you stretch it, cover it and rest it before trying again. A short pause is more effective than pulling harder, which creates a thin center and stresses the rim.
Press outward from the center while leaving the edge intact. If the round contracts by more than a small amount after each stretch, pause again and keep it covered. Same day dough can look fully proofed while its gluten remains tight, particularly after a cool final proof.
When the dough tears
Tearing can indicate incomplete gluten development, excessive fermentation, rough handling, or a dry skin. Test the dough before shaping with a gentle windowpane-style stretch. It should extend thinly for a moment without ripping immediately. If it fails, avoid loading it with toppings or stretching it to a large diameter.
A small edge tear can be pinched closed. A central tear usually calls for a smaller pizza, gentler handling, or a short covered rest if the dough still feels elastic. If the surface feels dry rather than tacky, lightly cover it and allow the skin to soften before touching it again. Do not solve weakness with a thick layer of flour. Fold gently only when the dough still has enough elasticity to hold its shape.
When the bottom burns
A steel can deliver intense bottom heat when it sits close to the lower element or directly over a grill flame. If the base darkens before the rim colors, move the surface higher and reduce direct heat. Brush excess flour or semolina from the peel, because loose flour burns quickly and leaves bitterness. A thick layer of oil on the peel can darken the underside as well.
Use the underside as your temperature check. If it browns almost immediately after launch while the top remains pale, the baking surface is too aggressive for that dough and topping load. If the stone produces a pale base after the top is ready, improve its preheat rather than extending the bake indefinitely. When the base is crisp but the cheese lacks color, shift the pizza toward stronger top heat.
Same day pizza dough becomes predictable when you track dough temperature, volume change, and response to touch. Those cues show whether to warm, cool, rest, reshape, or bake. The result is a shorter fermentation that follows the dough's condition instead of a vague timetable.
For a reliable pizza night, pair calibrated same day dough with a suitable baking surface and a covered proofing setup. Visit Hans Grill to explore cordierite stones, pizza steels, and proofing boxes designed for home ovens and backyard grills.


