

How to Make Thin Crust Pizza at Home
You slide the pizza onto the oven surface, wait several minutes, and pull it out expecting a crisp base. Instead, the center folds beneath the cheese, the underside looks pale, and the first bite has the texture of damp bread. That result usually isn't caused by one bad ingredient. It comes from a mismatch between dough, toppings, heat, and timing.
A good thin crust pizza made at home should have a dry, crisp underside, enough structure to carry sauce, and a foldable bite that snaps before it bends. You don't need a 900°F pizza oven to get there. A thoroughly preheated stone, steel, or even an inverted heavy sheet pan can push a standard home oven surprisingly far, while a covered grill can supply still more heat.
Table of Contents
- What Crisp Thin Crust Actually Means at Home
- Building Dough for a Crisp Snap
- Stretching the Base Without Killing Crispness
- Choosing and Preheating Your Baking Surface
- Baking Times, Temperatures, and Reading the Crust
- Troubleshooting the Most Common Thin Crust Problems
- Your Next Pizza Night and the Gear Worth Upgrading
What Crisp Thin Crust Actually Means at Home
The target here isn't a puffy Neapolitan rim or a thick New York slice. Neapolitan pizza is built around a soft, airy edge and a tender center, while New York style usually balances a foldable slice with more chew. A cracker-style home thin crust aims for something different: a thin, dry base with a clean snap, a lightly raised edge, and enough strength to support toppings without sagging.
Look underneath before you judge the pizza. You want an evenly browned surface with small blistered spots rather than broad pale patches. Fold a corner. It should bend with resistance and give a faint crackle, not collapse like a wet tortilla. The edge can puff during the bake, then settle into a narrow, lightly blistered rim.
That style has deep roots. Antica Pizzeria Port Alba's history places one of Naples' earliest pizzerias in 1738, while thin-crust traditions became established in New York by the early 1900s and developed through regional American forms in later decades. Thin crust isn't a recent shortcut. It's a long-running format that keeps changing with local ovens, ingredients, and eating habits.
The four conditions that matter most
- Lean dough gives you less internal moisture and less puff. The dough should have enough gluten to hold its shape, but not so much that it turns rubbery.
- Cold fermentation develops flavor while relaxing the dough. It also makes shaping easier without aggressive kneading.
- A hot baking surface transfers heat into the base immediately. Oven air alone won't brown a thin pizza fast enough if the pan starts cold.
- A short bake limits moisture loss from the toppings while setting the bottom quickly. Thin dough can move from pale to burnt in a narrow window.
A standard oven capped around 500°F can handle this style if you preheat the surface properly and keep the topping load modest. A grill with the lid closed can go hotter, but temperature alone isn't a substitute for a dry dough, restrained sauce, and a surface that has stored enough heat.
Practical rule: If the center is soft, fix moisture and heat transfer before changing the flour.
Building Dough for a Crisp Snap
For a firm, crisp base, start with bread flour containing roughly 12% to 14% protein. Tipo 00 works well when you want a smooth, delicate dough, though its performance depends on the specific flour rather than the label alone. All-purpose flour can make a pleasant, tender crust, but it generally gives you less chew and structure when you stretch the dough thin.
Keep hydration controlled. A useful starting point is 60% to 63% hydration, which produces a comparatively firm dough that spreads without becoming slack. For baker's percentages, use salt at 1.6% of the flour weight and instant dry yeast at 0.1% to 0.3%, with the lower end suited to a longer cold ferment.
A reliable mixing schedule
Combine the flour, water, salt, and yeast, then mix by hand or with a stand mixer for 5 to 7 minutes. Stop when the dough looks smooth and cohesive. It doesn't need to become highly elastic or pass an extreme windowpane test. Overmixing builds a stronger gluten network than a thin, crisp base needs, and that strength can make the dough spring back during shaping.
Transfer the dough to a lightly oiled container, cover it, and refrigerate it at approximately 38°F to 40°F for 24 to 72 hours. This long, cold rest develops flavor and relaxes the dough without the loose, over-proofed feel that can appear after a warm rise. If you're new to the process, the easy pizza dough guide is a useful reference for organizing the fermentation and handling stages.
After the bulk ferment, divide the dough into 200 to 220 gram portions and shape each into a ball. Refrigerate the balls for another 4 to 12 hours, then remove them about 90 minutes before baking. That final rest lets the gluten loosen enough to stretch, but the dough should still feel cool rather than warm and puffy.
Why less kneading works here
Aggressive kneading creates a dough that fights you. You press it outward, it shrinks back, and you respond by pressing harder. That cycle compresses the dough and encourages a dense, tough bite.
A short mix followed by cold time gives you a better division of labor. The mixer or your hands bring the ingredients together, while fermentation improves extensibility and flavor gradually. Keep the dough covered throughout. A dry skin on the surface will tear during stretching and force you to add excess flour.
Stretching the Base Without Killing Crispness
Take one chilled dough ball and place it on a lightly floured work surface. Press the center with your fingertips, working outward in small movements and leaving about a 1 cm border untouched. That border becomes the rim. Don't flatten it with the same pressure you use in the center.
Turn the dough as you press. Once the middle has widened, lift the round and drape it over both fists. Let gravity do some of the work, then rotate the dough while gently moving your fists apart. Aim for a diameter of about 11 to 12 inches, depending on the dough weight and the thickness you prefer.
Keep the center thin and the edge intact
A rolling pin is fast, but it works against this style. It compresses the small pockets created during fermentation and can leave the dough uniformly dense. Hand-stretching preserves subtle differences in thickness, which helps the center bake dry while the edge gains a little lift.
Set the stretched dough on a peel dusted lightly with semolina. Use only enough to prevent sticking. Heavy flour on the underside burns against the hot surface and leaves bitter, dark patches. If semolina isn't available, use a restrained amount of regular flour, but don't treat the peel like a workbench covered in loose powder.
A slight bubble or thicker area isn't a failure. The oven will even out minor variations, and a few irregular spots can create useful blistering. The disc is ready to top when it has an even center, no visible tears, and enough slack to drape over the peel without immediately shrinking.
A quick pre-launch check
- Surface: The center is thin, with a defined but not bulky border.
- Handling: The dough moves without sticking heavily to the peel.
- Extensibility: It relaxes when lifted instead of snapping back.
- Timing: Sauce and toppings are ready before the dough reaches the peel.
Top the pizza only when the oven surface is ready. The longer wet sauce sits on raw dough, the more time it has to soften the center.
Choosing and Preheating Your Baking Surface
A hot surface matters because it delivers heat directly into the dough. In a home oven, that stored heat often matters more than chasing the highest air temperature. A surface that has reached temperature and retained it can set the base quickly, while a thin, cold pan loses its advantage as soon as the dough lands.
| Surface | Thickness | Preheat Time | Oven Temp | Heat Retention | Best For |
|---|---|---|---|---|---|
| Cordierite stone | Varies by model | 45 to 60 minutes | Up to the oven's rated temperature | High | Even baking and moisture control |
| Baking steel | 1/4 to 1/2 inch | 30 to 45 minutes | Up to the oven's rated temperature | Very high | Fast bottom browning and recovery |
| Inverted heavy-gauge sheet pan | Thin metal sheet | 20 to 30 minutes | Up to the oven's rated temperature | Moderate | Budget setups and beginners |
A cordierite stone absorbs moisture from the dough and spreads heat steadily. It tends to be forgiving across multiple pies, though it needs a meaningful preheat. A 1/4-inch to 1/2-inch steel plate transfers heat more aggressively and recovers quickly after a launch, making it especially effective for thin crust. It can also overbrown the bottom if the pizza sits too low or the dough is unusually dry.
An inverted, heavy-gauge sheet pan is the simplest option. It doesn't store as much heat, but its flat underside provides a clean launch surface and is far better than baking directly on a cold rack.
Rack placement and preheat routine
Place a stone or steel on the middle rack, or slightly above center if the top routinely lags behind the base. Keep it away from the broiler element. For a stone, preheat at least 45 to 60 minutes. A steel usually needs 30 to 45 minutes, while an inverted pan can be ready after roughly 20 to 30 minutes.
Put an upper rack about 4 to 6 inches below the broiler for finishing the cheese or edge, but don't launch the pizza directly beneath the element unless you've already learned how quickly your oven browns the top. The guide to preheating a pizza stone explains why warming the surface, not just the oven cavity, changes the bake.
Outdoor grills offer another route. A stone or steel under a closed lid can reach 600°F or higher, provided the grill is designed for that heat and the surface is positioned safely. Watch the underside closely because a grill can scorch thin dough faster than a household oven.
Baking Times, Temperatures, and Reading the Crust
With a fully heated stone or steel, bake thin crust pizza in a standard oven at 500°F to 550°F for 5 to 8 minutes. Launch quickly, close the door, and avoid repeated checking. At about the halfway point, rotate the pizza 180 degrees to compensate for the oven's hot spot.
A grill with the lid closed can bake at approximately 600°F to 700°F for 3 to 5 minutes on a suitable stone or steel. That shorter window leaves less room for distraction, so prepare the peel, toppings, and turning tool before launching.
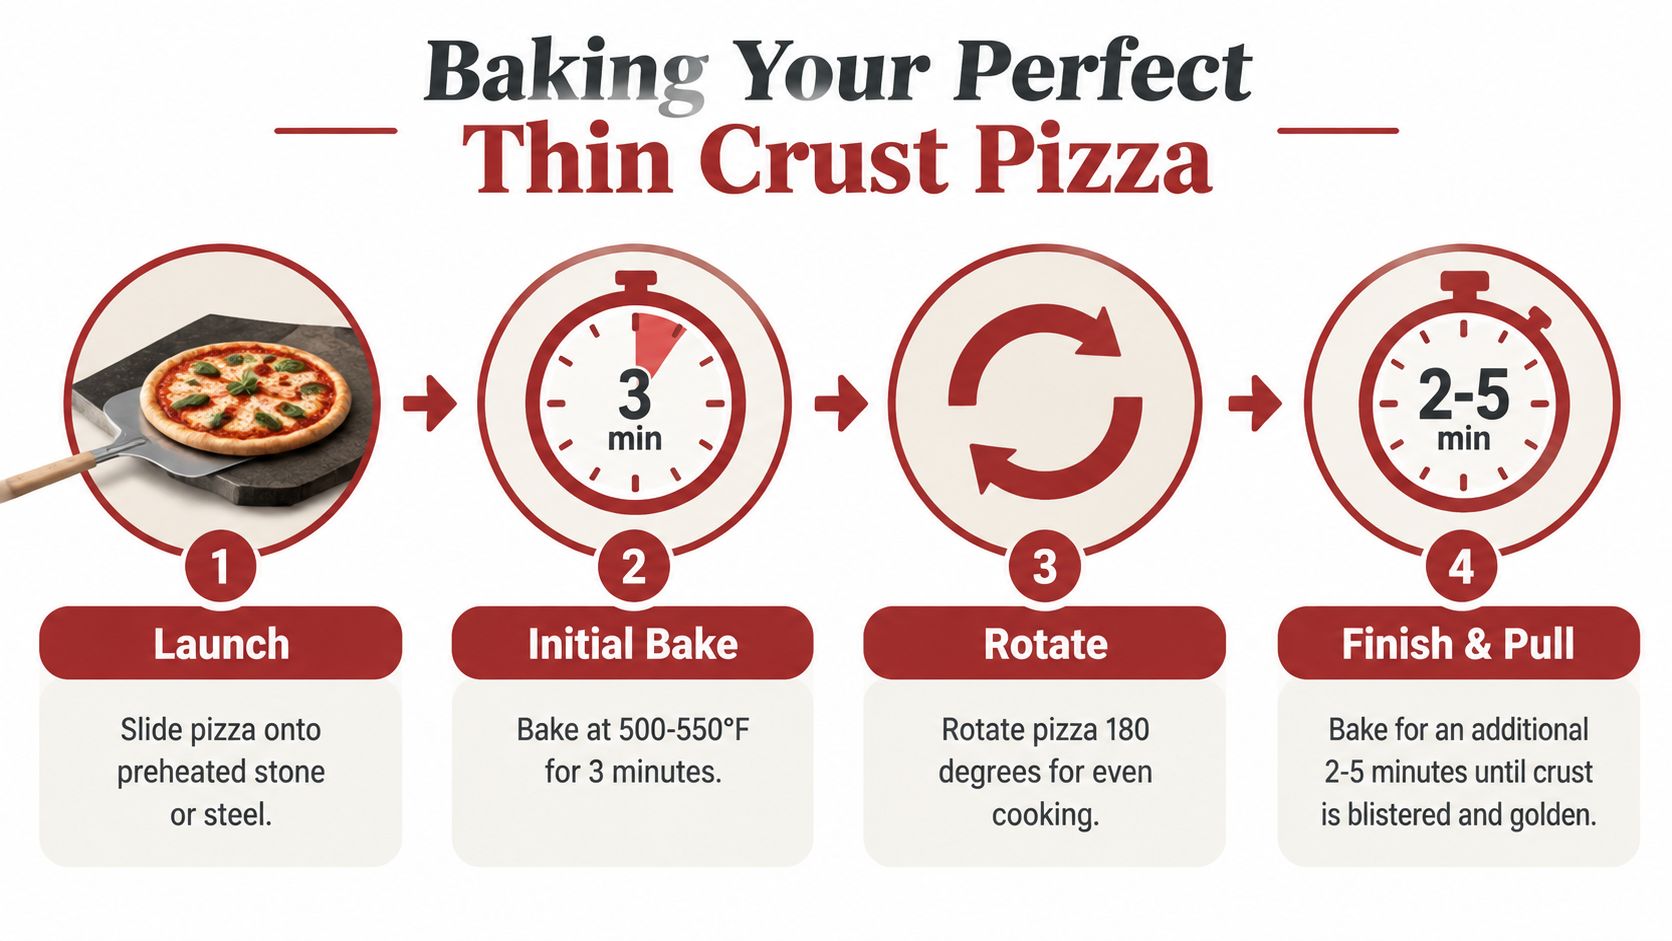
Read the underside, not just the cheese
Lift an edge with a metal peel after several minutes. The base should show even golden-brown spots and feel dry rather than flexible and damp. Pale areas usually indicate insufficient surface heat, too much moisture, or a pizza that hasn't baked long enough.
On top, look for bubbling cheese with light brown freckles. The rim should puff during the early bake, then settle into a narrow edge with some leopard spotting. If the cheese is dark while the underside is pale, move the surface higher or reduce the top heat. If the base is dark and the toppings remain raw, the surface is too aggressive for the current topping load.
The exact topping changes the schedule. Thick vegetables, raw meat, or a heavily loaded pie need either pre-cooking, lighter portions, or a longer finish. A par-baked base can receive delicate toppings later and finish under the broiler for 60 to 90 seconds, but stay beside the oven during that final stage. Broilers turn a good pizza into a burnt one quickly.
Let the pizza sit briefly before cutting. That pause gives the molten cheese and sauce time to settle, so the center is less likely to slide off the slice.
Troubleshooting the Most Common Thin Crust Problems
Thin dough exposes mistakes quickly. A thick crust can hide excess sauce or an uneven bake inside its crumb. A thin base has nowhere to hide, so diagnose the symptom before changing the recipe.
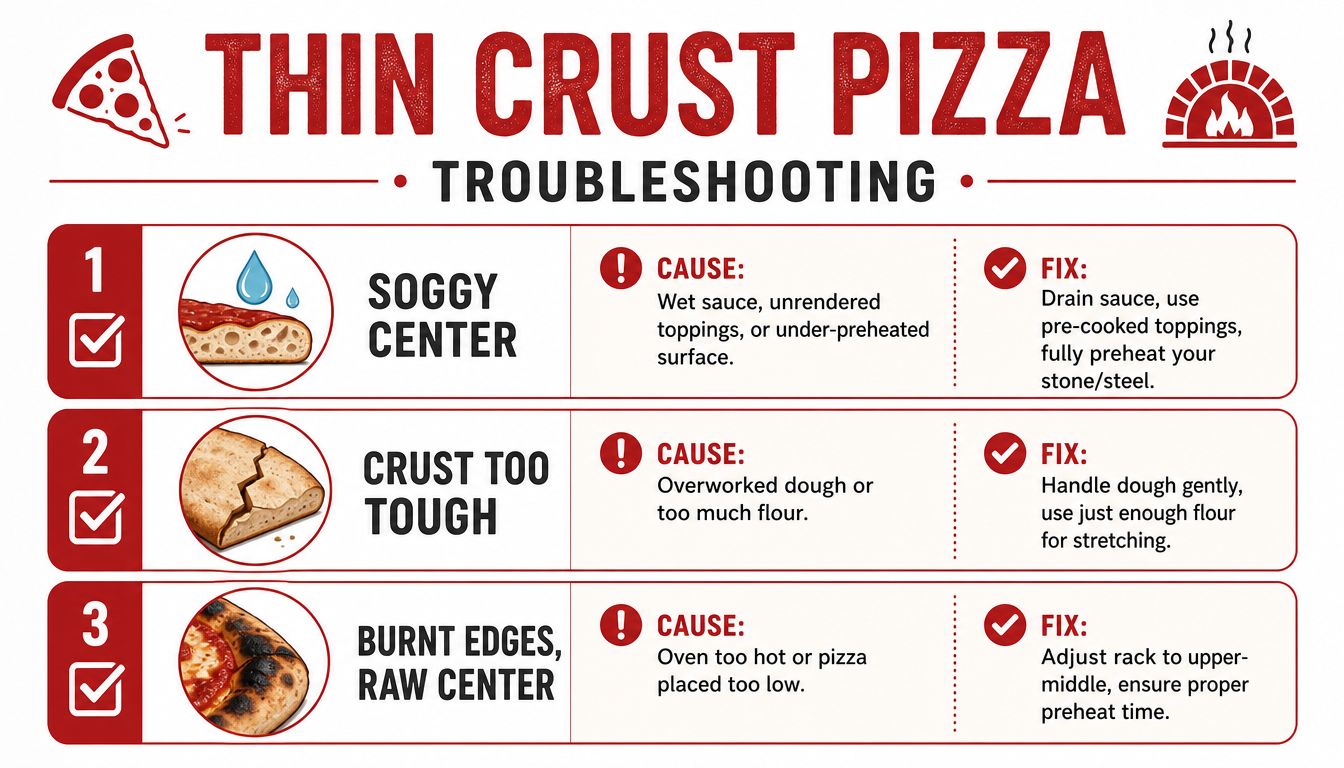
Soggy center
A soft middle usually comes from one of three sources: wet sauce, toppings that release water or fat during baking, or a surface that wasn't fully heated. Crushed tomatoes should be strained if they're watery, and low-moisture mozzarella is safer than a wet fresh cheese for this format. Cook mushrooms, sausage, and other moisture-heavy toppings before they reach the dough.
Give the stone or steel more time to heat before launching. A pale, damp underside combined with a bubbling top is a strong sign that the surface hasn't transferred enough heat into the base.
Tough, chewy crust
A tough crust isn't proof that you need more kneading. It often means you developed too much gluten or compressed the dough while shaping. Long aggressive mixing, repeated re-rolling, and a rolling pin can all produce a base that springs back and eats dense.
Use the short mix and cold fermentation schedule described earlier. Stretch with your hands, keep the rim intact, and resist the urge to keep working the dough after it has reached its final diameter.
Burnt bottom with a raw top
This failure points to an imbalance between the floor and the ceiling. The surface may sit too close to the lower heating element, or the steel may be transferring heat faster than the toppings can cook. Move the baking surface up one rack position and keep the upper heat available for finishing.
Don't add fragile toppings at the beginning if your base browns quickly. Place delicate greens, thin seafood, or other ingredients that scorch easily during the final two minutes. For a particularly forceful steel, reduce the topping moisture and watch the underside earlier rather than lowering the oven temperature.
The fix should match the symptom: soft center means less moisture or more stored heat, tough dough means gentler handling, and a burnt floor means changing the rack or surface balance.
Your Next Pizza Night and the Gear Worth Upgrading
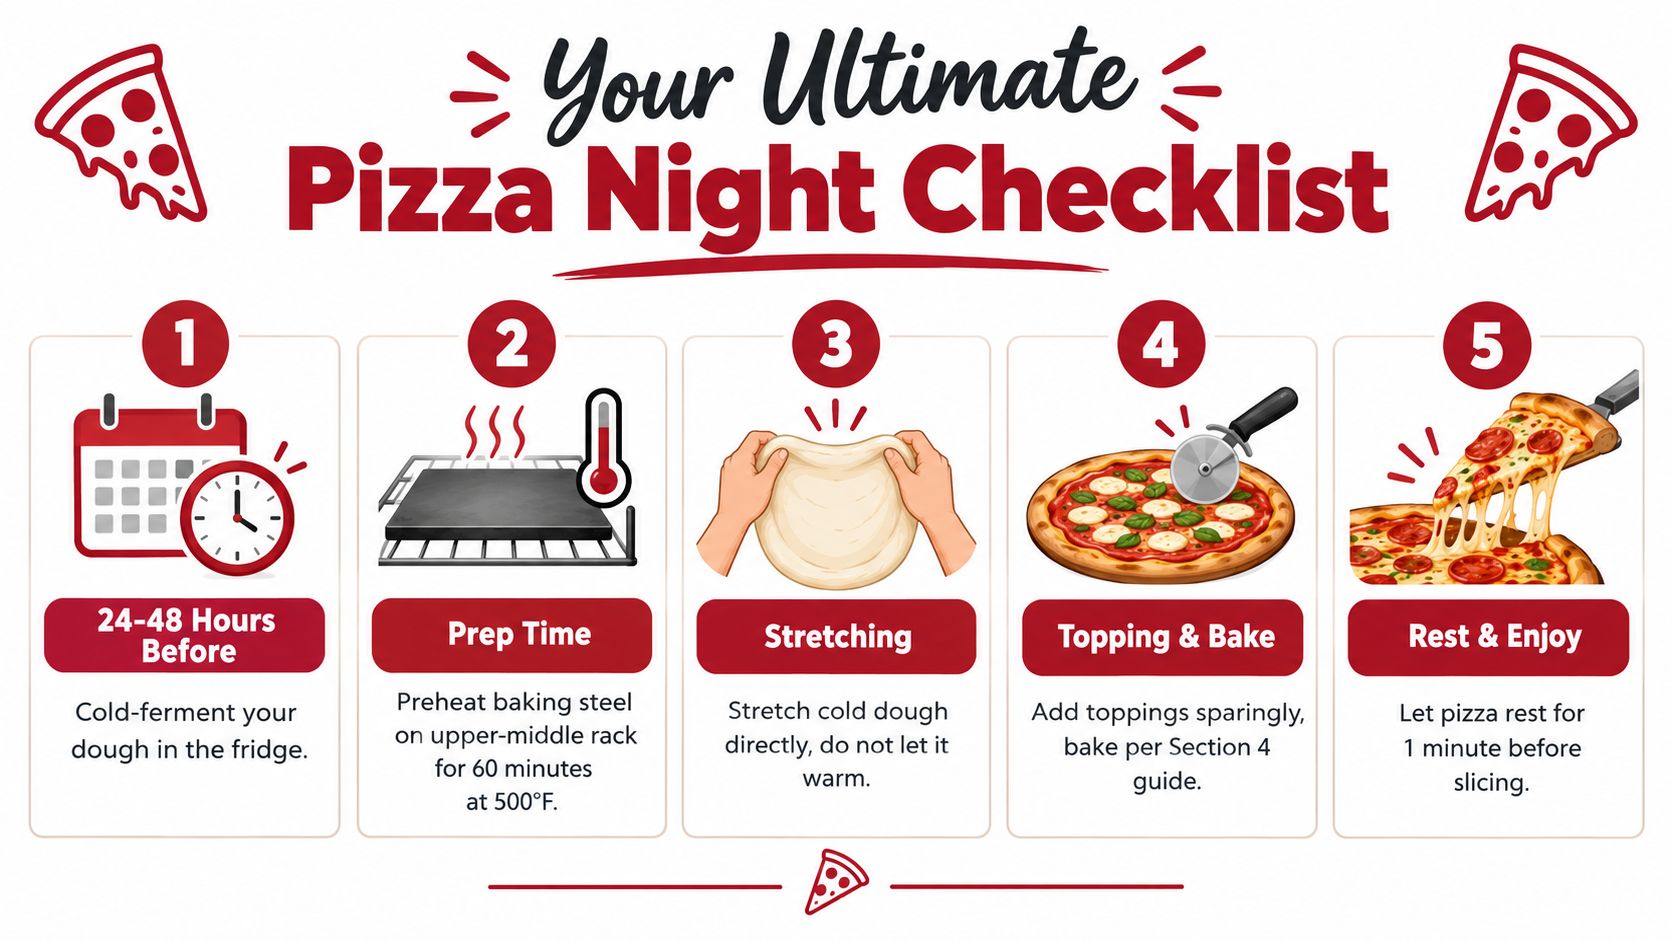
Use a simple session plan:
- Cold-ferment the dough for 24 to 48 hours.
- Preheat a steel on the upper-middle rack for 60 minutes at 500°F.
- Stretch the chilled dough by hand and keep the center thin.
- Top lightly and bake for 6 to 8 minutes, rotating once if your oven has a hot spot.
- Rest briefly, then cut and check the underside before declaring the bake finished.
If you upgrade one piece of equipment, choose a 1/4-inch baking steel. It delivers the largest practical improvement in a home oven because it transfers heat directly and recovers quickly between pizzas. An infrared thermometer helps you check the surface, semolina keeps the peel moving, and an inexpensive pizza wheel makes serving easier, but none of those replaces a properly heated baking surface.
Hans Grill offers cordierite stones, a Pizza Steel PRO, proofing boxes, and pizza peels for oven or backyard-grill use. You can review the Hans Grill baking steel range when you're ready to compare surfaces, but a 700°F-plus outdoor oven can remain a later upgrade rather than a requirement.
Pick a Friday, start the dough in the refrigerator, and follow the checklist without piling on extra toppings. Visit Hans Grill to find a baking surface or peel suited to your oven or grill, then aim for the result that matters most, a base that snaps when folded.


