

Thin Crust Pizza Dough Recipe That Actually Crisps
You pull a thin pizza from the oven expecting a crisp snap. Instead, the edge is browned, the cheese is bubbling, and the center folds like a wet towel. The usual culprit isn't a mysterious flour defect. It's a dough that carries too much water, a center stretched thicker than the rim, or a baking surface that never got hot enough.
A reliable thin crust pizza dough recipe treats crispness as a connected system. Hydration controls how much moisture the dough must lose, shaping controls how quickly the middle sets, and the stone, steel, or grill controls how forcefully heat reaches the underside. Adjust those three variables with intent, and you can get a light, crisp base from ordinary home equipment instead of flattening a soft pizza dough and hoping for the best.
Table of Contents
- What Makes Thin Crust Thin
- Ingredients and Hydration Ratios
- Mixing and Kneading the Dough Right
- Fermentation Schedules for Flavor and Crispness
- Shaping Without Shrink Back
- Baking on Stone, Steel, or Grill
- Troubleshooting Common Thin Crust Problems
What Makes Thin Crust Thin
A thin crust can look finished while the center still folds and feels gummy. That usually comes from three interacting choices: the dough's water level, the thickness left in the middle, and the heat reaching the underside. Crispness improves when those choices are adjusted together, rather than treating rolling, flour, or oven temperature as separate fixes.
Hydration sets the amount of moisture the dough must lose. Cracker-style thin crust typically falls around 55–58% hydration, while standard pizza dough commonly runs around 60–63%, according to the pizza dough hydration guide. Lower hydration makes the dough firmer and easier to handle, and it generally produces a drier, crisper bite. Higher hydration stretches more readily, but the extra water takes longer to escape, so the center can stay soft at the same bake temperature.
Thickness matters just as much. A pizza with a thin rim and a thick center can brown around the edge while retaining moisture under the toppings. Rolling or stretching the middle evenly gives heat a shorter path through the dough and lets the base set before the cheese dries out.
The baking surface supplies the other half of the result. A fully heated stone, steel, or grill transfers heat into the underside quickly. A cooler surface leaves the dough steaming against a warm pan, which encourages a pale, flexible base even when the top looks done.
Use three dials when adjusting a recipe:
- Water-to-flour ratio: Lower hydration favors firmness and crispness. Higher hydration favors stretch and a softer bite.
- Finished thickness: A thinner, even center dries faster than a thick one.
- Baking surface temperature: Stronger bottom heat sets the base sooner and improves browned contact points.
Practical rule: If the center is thick, fix shaping first. Then adjust hydration or surface heat if the crust still needs more crispness.
The target is controlled oven spring, not maximum puff. Flour choice, fermentation, docking, and the bake surface each change either dough strength or moisture loss, so adjust them with the same framework.
Ingredients and Hydration Ratios
Use a kitchen scale. Thin dough exposes small changes, particularly near the crisp end of the hydration range. Baker's percentages keep the formula easy to resize, with flour fixed at 100%.
Start with 55% to 62% water by flour weight. For 500 g flour, that is roughly 275–310 g water. Choose the lower end for a dry, cracker-like base or a pizza carrying heavy toppings. Move toward the higher end when you need more stretch and a less brittle edge. The choice should match the bake surface and fermentation time, because a wetter dough needs stronger heat and enough time to lose its moisture.
Salt usually sits around 2–2.5% of flour weight. It seasons the dough and slows fermentation, while too much can make a low-hydration dough feel tight. Instant yeast can range from 0.25% to 1%, with the lower end suiting a longer fermentation and the higher end suiting a quick bake. Oil is optional, generally 0–3%. It makes the dough easier to handle and softens the crumb, while leaving it out usually gives moisture a clearer path out of the crust.
Flour changes both handling and texture. A high-protein bread flour, commonly around 12–14% protein, builds a stronger, chewier crust. Italian 00 flour can produce a more tender, delicate crispness when the bake is hot enough. All-purpose flour sits between those results, useful when you want neither a notably chewy nor especially brittle crust.
Choose the profile before mixing
The table gives three starting points. Each percentage uses flour as 100%, and each water amount assumes 500 g flour.
| Ingredient | Crispy-Cracker, 55% | Balanced Thin, 60% | Soft-Edge Thin, 62% |
|---|---|---|---|
| Flour | 500 g, 100% | 500 g, 100% | 500 g, 100% |
| Water | 275 g, 55% | 300 g, 60% | 310 g, 62% |
| Salt | 10–12.5 g, 2–2.5% | 10–12.5 g, 2–2.5% | 10–12.5 g, 2–2.5% |
| Instant yeast | Adjust to schedule | Adjust to schedule | Adjust to schedule |
| Olive oil | 0–15 g, 0–3% | 0–15 g, 0–3% | 0–15 g, 0–3% |
| Result | Firm, dry, cracker-like | Crisp with workable stretch | Thin with a softer edge |
For a first attempt, 60% hydration with little or no oil gives a useful middle ground. It stretches without making the center unnecessarily wet. If the crust turns brittle, increase the water gradually next time. If it stays floppy or develops a gummy middle, reduce the water first, then consider a hotter baking surface or a longer bake.
Mixing and Kneading the Dough Right
Start by whisking the flour, salt, and yeast together so the yeast doesn't sit in one concentrated pocket. Add most of the water, then the oil if you're using it, and stir until no dry flour remains. The dough should look shaggy and uneven, not smooth.
Cover the bowl and let the mixture rest for 15–20 minutes. This short pause gives the flour time to absorb water, which reduces kneading resistance. It matters more in a lower-hydration dough because the initial mass can feel stiff and reluctant even when it will become workable after resting.
Use the dough as your timer
Knead by hand until the dough becomes smooth, elastic, and slightly tacky. A practical hand-kneading window is 6–8 minutes, while a stand mixer on low often needs about 5 minutes, but those are secondary cues. Stop when the dough stretches into a thin membrane without tearing immediately during a windowpane test.
If the dough feels dry and cracks, wet your hands rather than pouring in a large splash of water. If it sticks heavily to the worktop, dust in a small amount of flour instead of kneading aggressively. Excess flour pushes the dough toward a brittle crust, while forceful kneading can make it snap back during shaping.
A thin crust needs strength, but it also needs relaxation. Smooth and elastic is ready. Tight and springy needs time, not more mechanical work.
Shape the dough into a ball and cover it for a 30–60 minute bulk rest at room temperature. This rest lets the gluten loosen before dividing, so each portion can be rounded without fighting the dough. If you're using a longer fermentation, divide and ball after this initial rest, then move the covered portions into the refrigerator according to your chosen schedule.
Fermentation Schedules for Flavor and Crispness
Fermentation changes more than flavor. It changes how readily the dough stretches, how much resistance you feel at the counter, and how evenly the thin base browns. Modern home-baking guidance commonly places cold fermentation at 24–72 hours in a refrigerator around 2–5°C, while some thin-crust methods extend the process further for flavor and handling, as detailed in this pizza fermentation calculator and guide.
For a 60% hydration dough, choose the schedule based on when you want to bake:
- Same-day: Use about 1% instant yeast for a 2–4 hour counter ferment. The dough should look visibly puffed and airy. This is the practical weeknight option when speed matters more than layered flavor.
- Next day: Use about 0.4–0.5% instant yeast and refrigerate for roughly 24 hours at about 38–40°F. The dough becomes cleaner-tasting, more relaxed, and easier to stretch without tearing.
- Planned pizza night: Use about 0.25–0.3% instant yeast for a 48–72 hour cold rise. Expect a lightly collapsed dough with a deeper aroma and more extensibility. Bring it out in time for the dough to lose its refrigerator stiffness before shaping.
The longer schedules aren't automatically better. A three-day dough needs tighter temperature control and a hot, well-preheated surface because its thin skin can brown quickly while the center still releases moisture. A same-day dough may feel more elastic and require a longer bench rest before it opens easily.
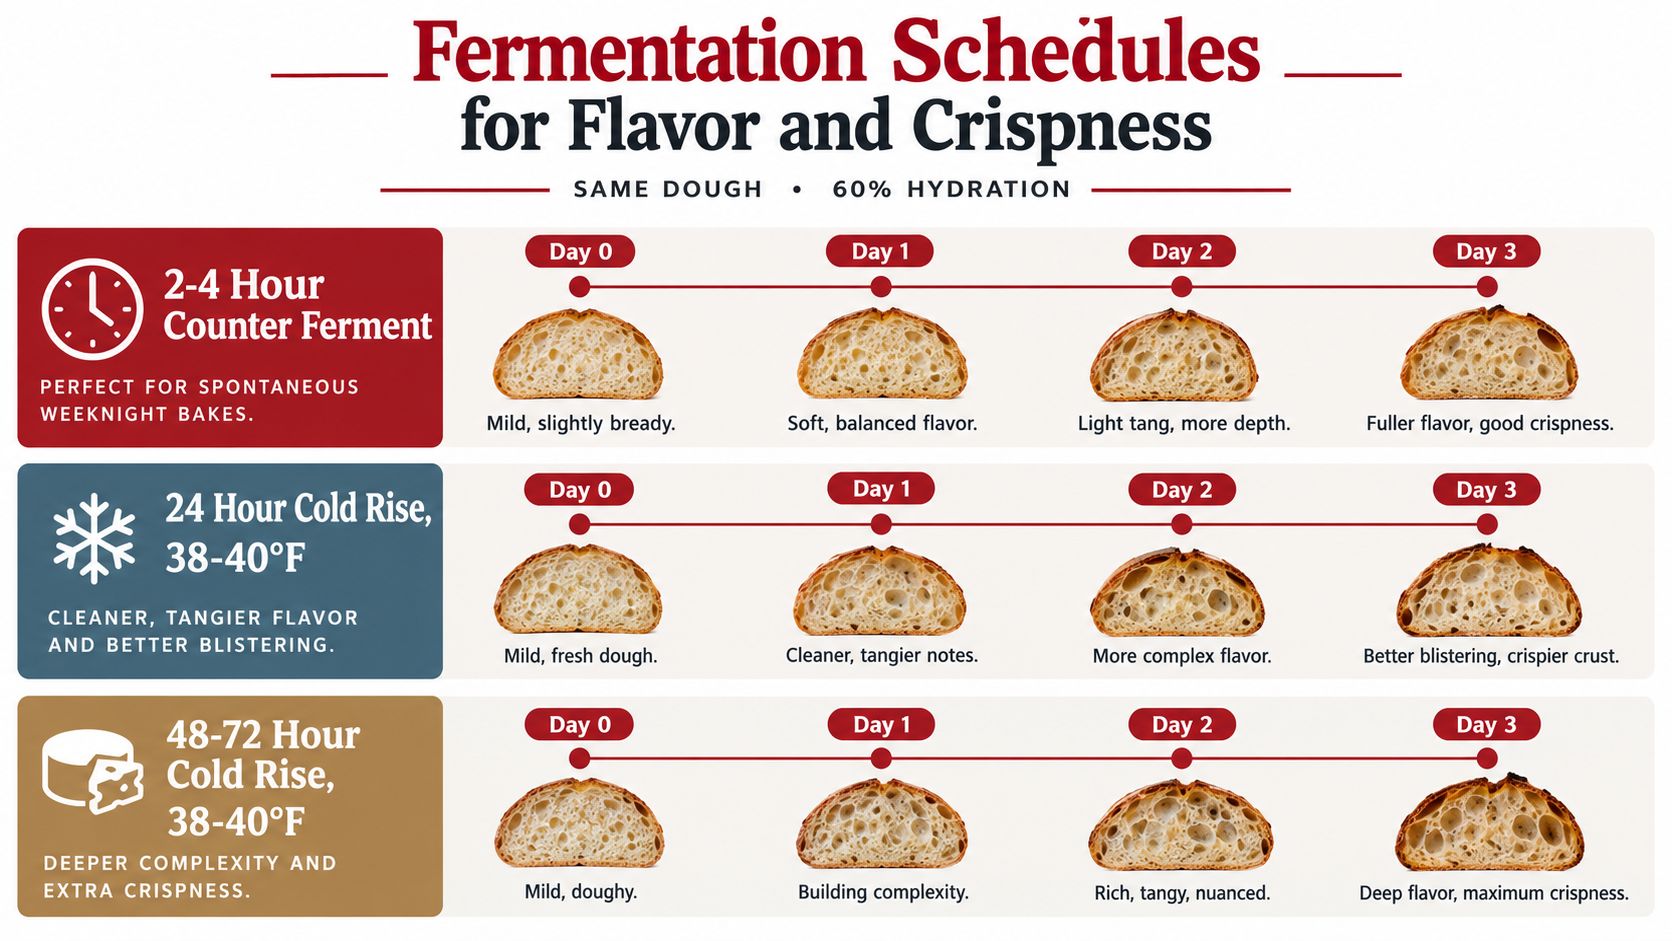
Cold fermentation also gives you a useful planning advantage. Ball the portions, cover them so the surface doesn't dry, and check them before shaping rather than relying only on the clock. If a ball has doubled early, bake it sooner or chill it again. If it still feels dense and tight, give it more time at room temperature.
For a deeper practical discussion of temperature, yeast quantity, and timing, use this cold-ferment pizza dough guide.
Shaping Without Shrink Back
Divide the rested dough and round each portion with a smooth outer skin. Cover the balls and let them sit for 30–45 minutes before opening. Cold, freshly divided dough often springs back because the gluten is still tense. A longer rest is usually more effective than pressing harder.
Dust the counter lightly with flour or semolina. Press from the center outward, turning the dough as you work, and leave a modest raised rim. For a thin base, move the gas toward the edge without crushing every bubble. The center should become even before the dough reaches the final size.
Stretch with gravity, not force
Once the dough is broad enough to lift, drape it over semolina-dusted knuckles and rotate it. Let gravity thin the center instead of pulling at one spot. A rolling pin is useful for a uniformly flat, cracker-like base, but it can remove the edge structure and often makes a hand-stretched pizza feel mechanically thin.
Aim for about 10–12 inches for a personal pizza or 14–16 inches for a larger one. The exact size matters less than consistency. If the middle is visibly thicker than the area near the rim, it will be the first place to turn soft or gummy.
Place the stretched dough on the peel or pan and dock the center with a fork or dough docker. Don't perforate the rim. Docking gives trapped steam an escape route, limiting the large bubbles that can leave the center underbaked while the edges become hard.
Let the docked skin sit for about 5 minutes before saucing. If it pulls inward during that pause, press it back out gently and wait again rather than forcing it to size. This short rest is a simple way to identify shrink-back before toppings make the dough difficult to handle.
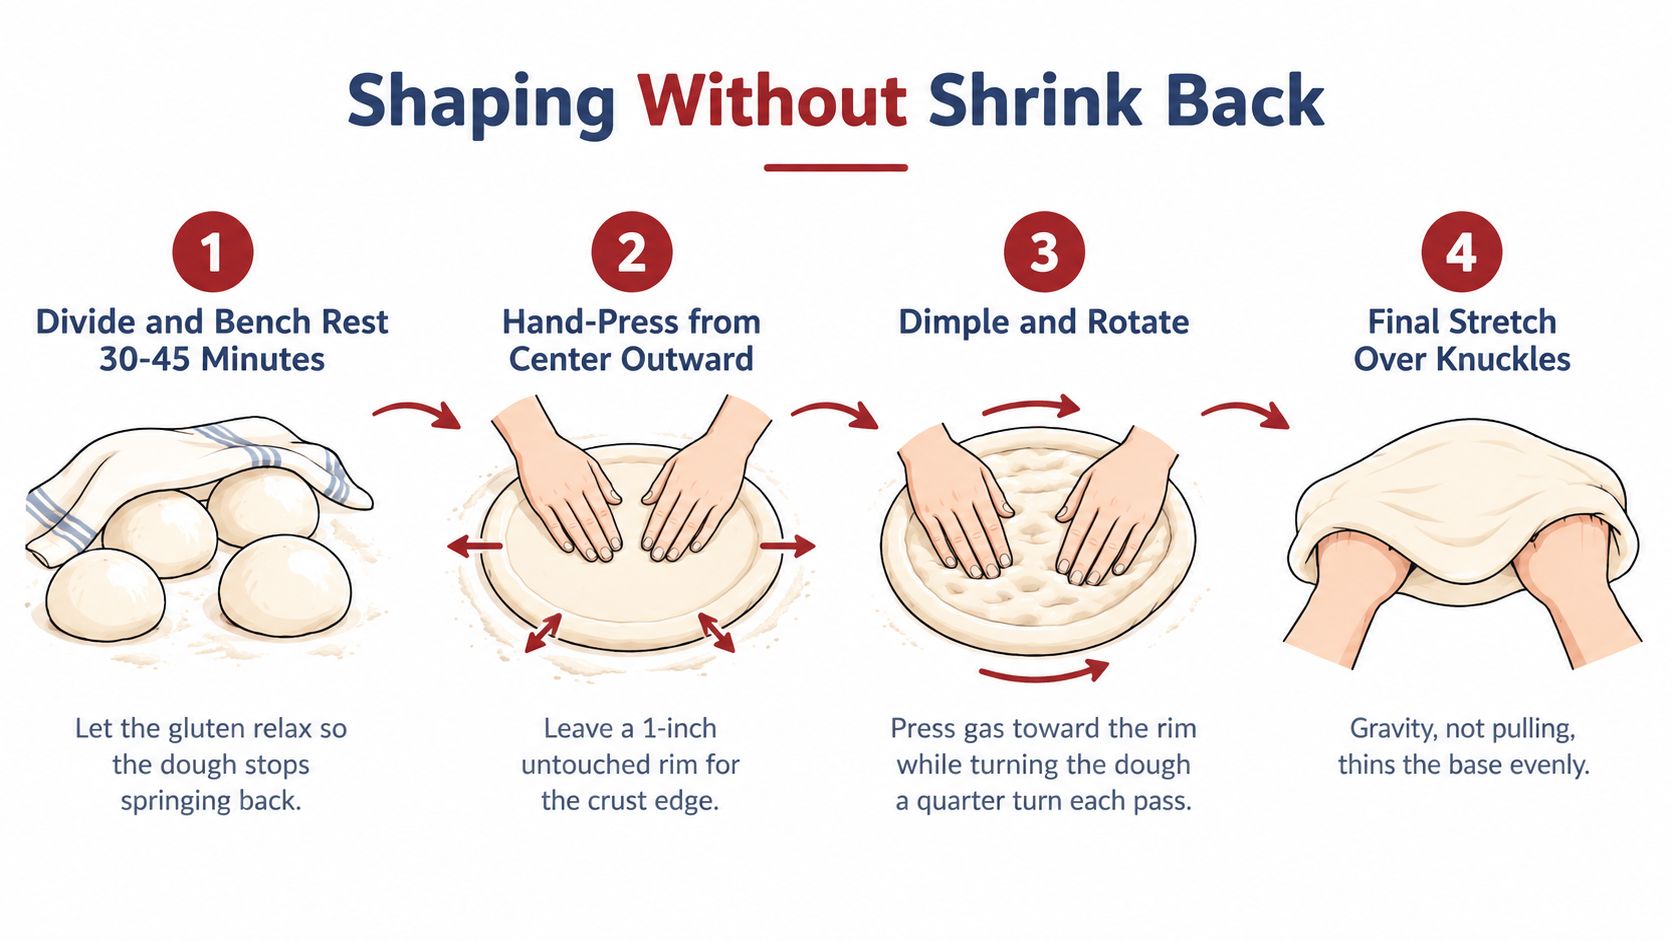
If you want to compare portioning and resting methods, this guide to pizza dough balls is useful. The key result is an even skin, not the largest possible diameter.
Baking on Stone, Steel, or Grill
The same dough can produce very different crusts depending on the surface beneath it. A stone releases heat steadily and is forgiving. A steel transfers heat more aggressively and shortens the bake. A covered grill adds strong top heat and a light char, but it demands faster handling.
Use an infrared thermometer if you have one. Oven air temperature alone doesn't tell you whether the baking surface has recovered from preheating, and a cool surface is a common reason for a pale or soft underside.
| Surface | Preheat Time | Target Surface Temp | Bake Window | Best For |
|---|---|---|---|---|
| 3/4-inch cordierite stone | 45–60 minutes at 500–550°F | 480–520°F | 5–7 minutes | Steady heat and forgiving bakes |
| 3/8-inch steel | 30–45 minutes at 500–550°F | 530–580°F | 4–6 minutes | Fast, forceful bottom browning |
| Two-zone grill | Until grates and chamber are hot | Medium-high grill heat | 3–5 minutes | Light char and strong top heat |
Stone and steel technique
Place the stone or steel high enough to balance bottom heat with browning on top, then preheat fully. Launch with a lightly semolina-dusted peel and keep the topping load modest. Excess sauce and wet cheese can overwhelm even a properly heated surface.
With a stone, look for a firm underside and browned contact points before rotating. With a steel, check earlier because the base colors faster. A practical rotation cue is around the 3-minute mark, but the crust should decide. If the leading edge is already dark, rotate immediately and move the pizza away from the hottest zone.
This pizza steel usage guide covers the handling details that matter when a steel transfers heat quickly. Keep the peel level during launch, and don't shake repeatedly. A hesitant launch can fold the dough or leave a thick ridge where the pizza stuck.
Grill technique
Set up two zones over medium-high heat. Oil the grates lightly, place the pizza over the hotter area long enough to firm the underside, then move it toward the indirect side if the base is coloring faster than the top. Close the lid so the grill traps heat around the cheese rather than acting like an open frying surface.
A grill can finish a thin pizza quickly, so prepare the peel, sauce, cheese, and turning tool before launching. The crust is ready when the bottom has distinct browned marks, the rim has set, and the cheese has melted without a wet pool in the center. If the underside scorches first, shift the pie indirect and keep the lid closed.
Troubleshooting Common Thin Crust Problems
Thin pizza exposes mistakes quickly, but the fix usually isn't a complete restart. Change one variable at a time so you know what corrected the bake.
A gummy center usually points to an underbaked base, excess sauce moisture, or a center that was left too thick. Reduce the sauce quantity first and bake the next pie on a lower rack so the underside receives more direct heat. If the same problem remains, dock more thoroughly and press the center thinner.
Burnt bubbles before the base has set often mean sweet sauce has scorched against intense top heat. Test a lower oven temperature, or replace the sugary sauce with plain crushed tomato on the next pie. Don't change the dough at the same time, or you won't know which adjustment helped.
Change one thing: Thin-crust troubleshooting works fastest when each bake answers one question.
When the dough snaps back during stretching, suspect gluten that hasn't relaxed or dough that is still cold and tight. Cover the skin for 10 minutes, then try again with lighter pressure. If it keeps retracting, the issue may have started during mixing, especially if the dough was kneaded past smooth elasticity into a tight, resistant mass.
A pale top with a crisp bottom means the underside is receiving enough heat while the toppings need more time. Delay adding the cheese until later in the bake, or use less lower-moisture mozzarella. The goal is to let the crust set without asking the cheese to remain in the oven long enough to dry and brown excessively.
A soggy underside after a long bake points toward a surface that wasn't fully heated. Give a stone its full preheat period and allow a steel enough time to store heat before launching the next pizza. If the first pie is crisp but the second is soft, allow the surface to recover between bakes rather than assuming the dough changed.
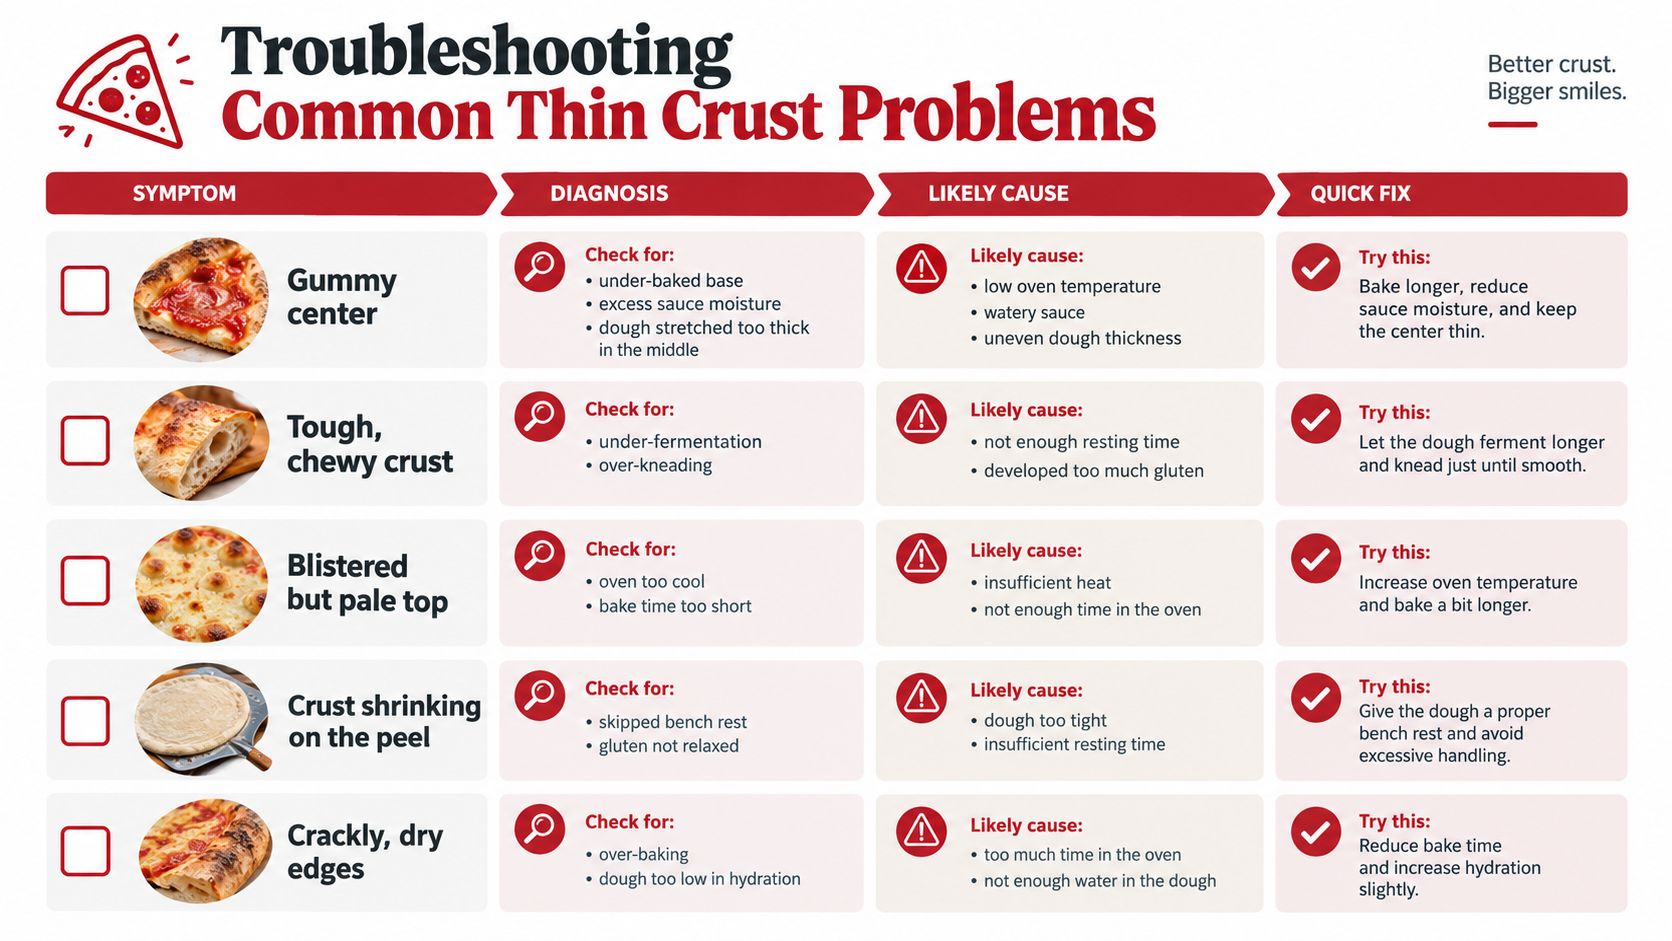
Finally, distinguish tough chew from crispness. Under-fermented dough can bake dense, while over-kneaded dough can resist shaping and produce a tight bite. A crust that turns dry and crackly at the edges has likely been baked too long or pushed below the hydration level your chosen style can tolerate.
Hans Grill offers cordierite pizza stones, pizza steels, proofing boxes, and grill-compatible pizza tools for home cooks working toward a crisper, more even base. Visit Hans Grill to compare the equipment and use the tested pizza techniques before your next bake.


