

Baking Stone Recipe Guide for Crispy Crusts at Home
You pull a pizza or loaf out of the oven and the bottom is still soft, pale, or oddly damp while the top already looks done. That's the moment you start hunting for a baking stone recipe, because the problem isn't just the dough, it's the surface beneath it. A stone changes how heat enters the food, and once you understand that, the whole game gets easier.
Table of Contents
- Why a Baking Stone Changes the Way Your Food Cooks
- Setting Up Your Stone the Right Way Every Time
- Four Baking Stone Recipes Worth Mastering
- Stone, Steel, or Pan, Which Surface Fits the Job
- Running Your Stone on a Backyard Grill
- Troubleshooting the Problems Beginners Actually Hit
- Caring for Your Stone So It Lasts for Years
Why a Baking Stone Changes the Way Your Food Cooks
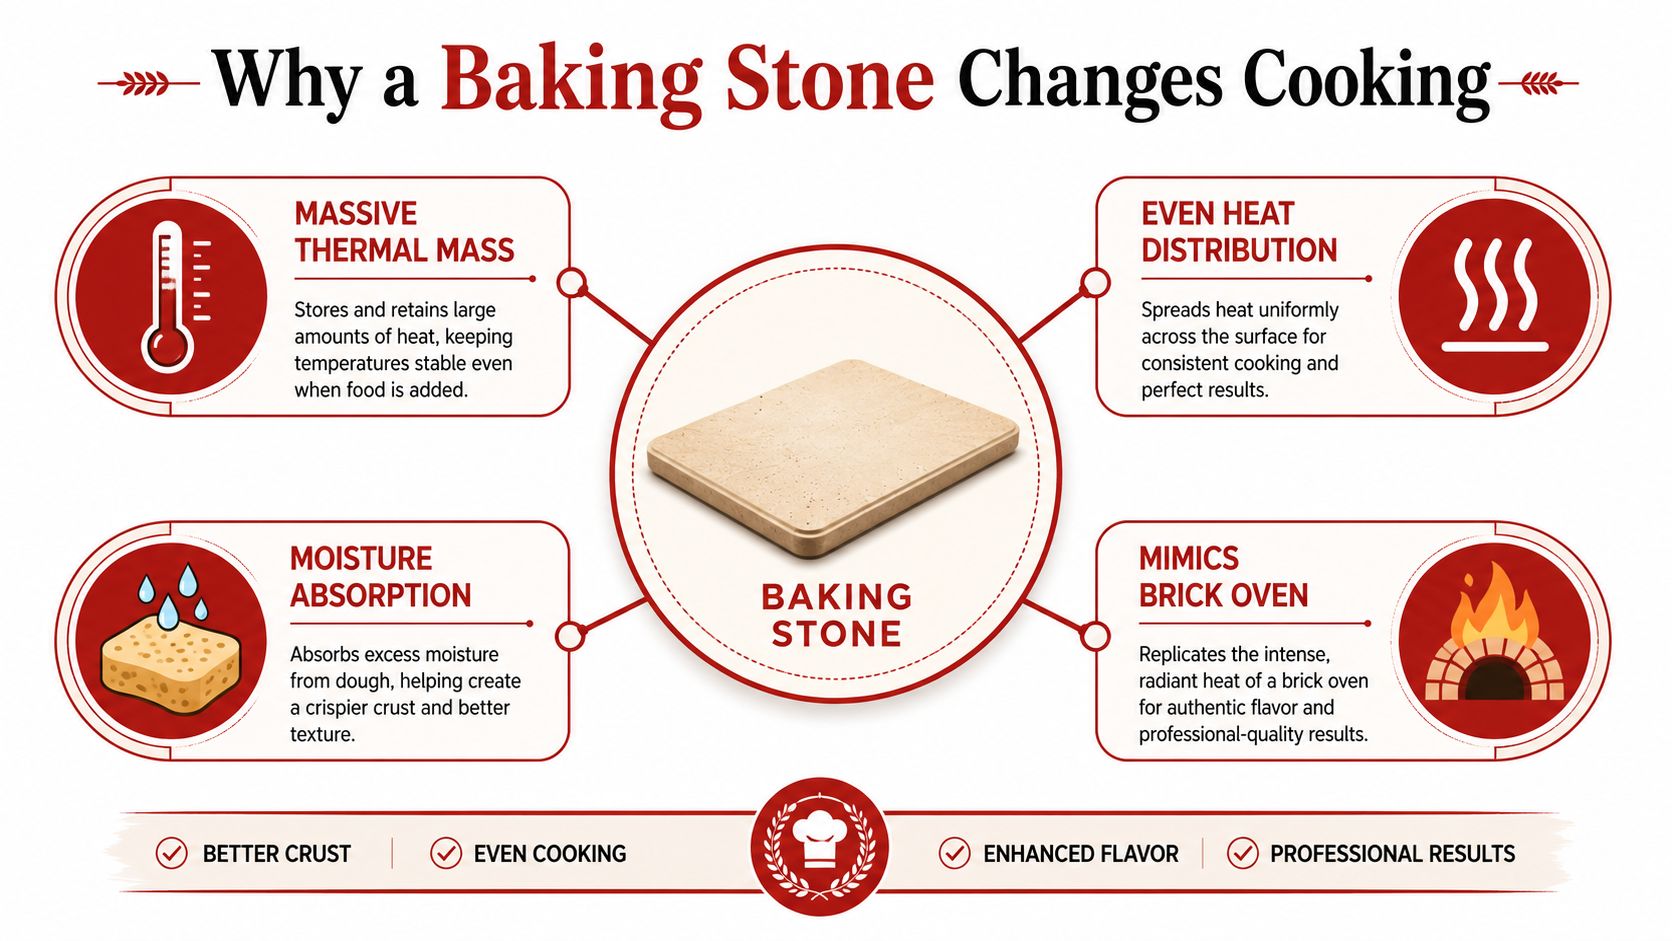
A thin tray heats the air around your dough, but a baking stone gives the dough direct contact with a hot, heavy surface. That matters because the stone stores heat, then dumps it into the bottom of the crust fast enough to set structure before the top has time to dry out or overbrown. That's why a good stone can turn a floppy base into a crisp one without turning the whole bake into a race against the broiler.
What the stone is really doing
The old Welsh bakestone shows that this isn't a trendy pizza trick. Historical accounts describe bakestones as portable griddles used for cakes and breads, including oatmeal-based hearth bakes cooked slowly on the stone with simple grains, dairy, and low-tech heat as recorded in this history of baking. The modern stone is just a refined version of that same idea, a preheated thermal mass that gives you direct bottom heat and a drier, crisper finish.
That's also why cordierite shows up so often in home kitchens. It's built for repeated hot-and-cool cycles, which matters if you bake once a week and leave the stone in the oven, or if you drag it from an oven to a grill and back again. The material choice isn't about hype, it's about surviving thermal stress while staying flat and useful.
Practical rule: if the bottom of your bread is pale, your surface isn't hot enough, or it isn't holding enough heat to matter.
For dough, that heat transfer changes the whole shape of the bake. Pizza crust sets faster, flatbreads puff more cleanly, and rustic loaves get better oven spring because the bottom firms before the dough spreads. In other words, the stone doesn't just brown the base, it helps the dough behave like it's going into a more serious oven.
Setting Up Your Stone the Right Way Every Time
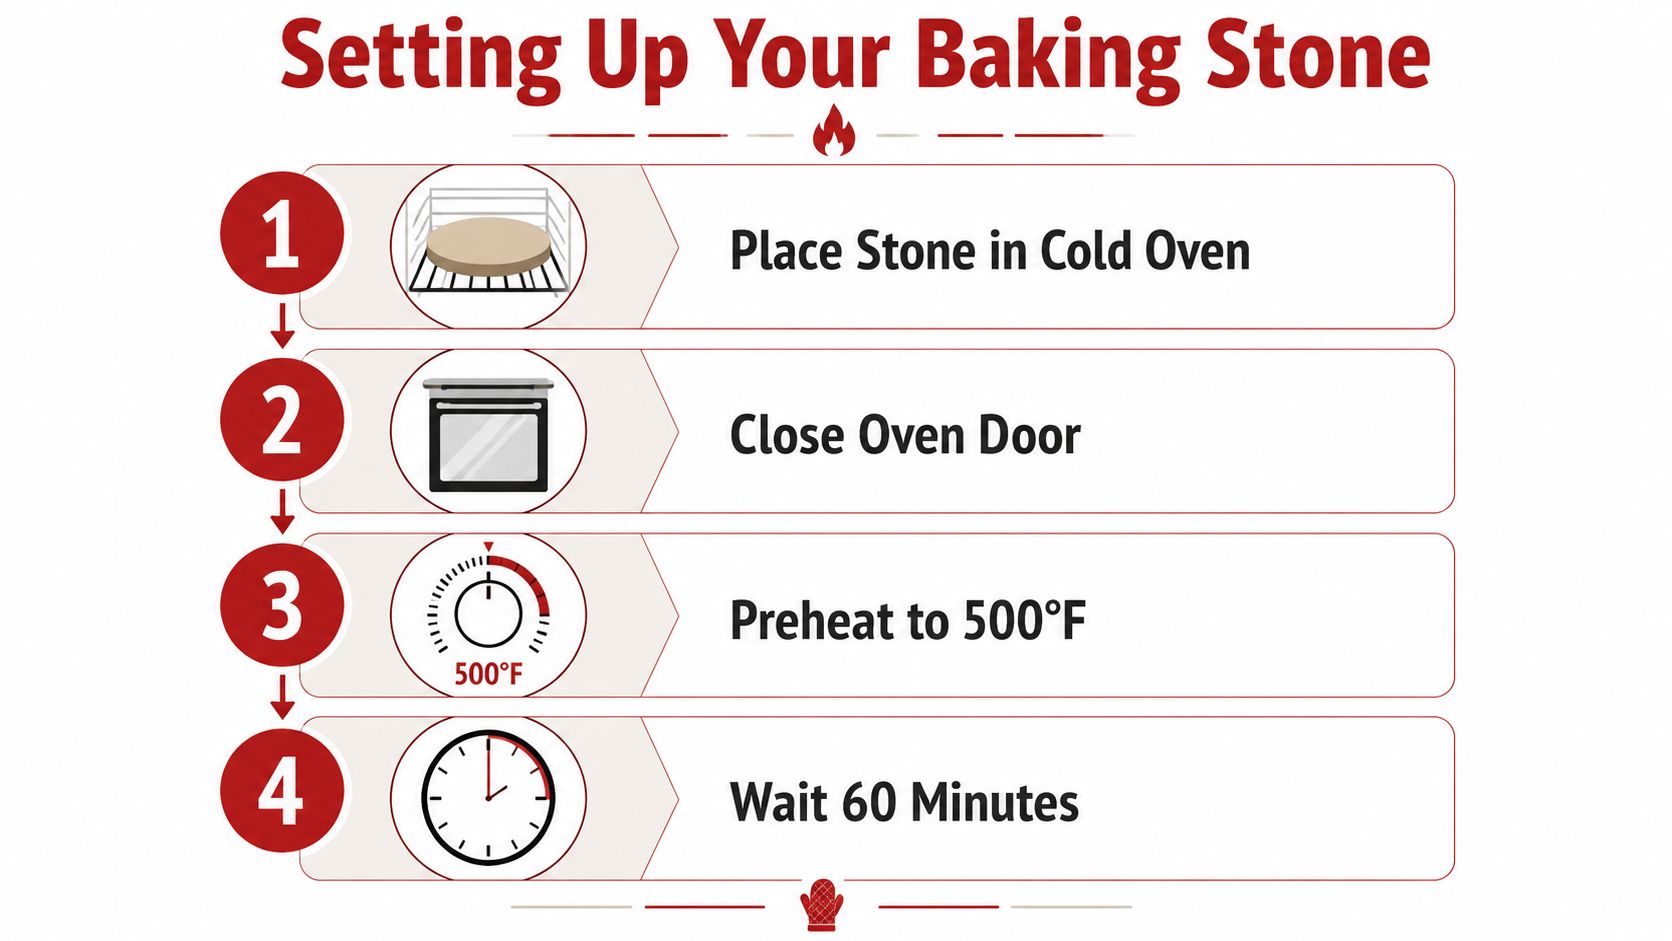
Start with a cold oven, then place the stone inside before you turn anything on. That slow rise matters because a sudden temperature swing is one of the easiest ways to crack a stone, especially if it has already lived through a few hard bakes. Set it on the middle or lower-middle rack, shut the door, and let the oven heat the stone gradually, as outlined in RM PBS's pizza stone guide.
Heat target, not guesswork
For a reliable home setup, aim for about 500°F to 525°F and give the stone 45 to 75 minutes to come fully up to temperature. A thinner stone in a strong oven may be ready sooner. A thicker stone, or an oven that runs weak, usually needs the full stretch. The point is not to chase a number on the display, it is to saturate the stone so the dough meets a hot surface the instant it lands.
That preheat window should also match what you are baking. A thin pizza skin can tolerate a hotter stone because it sets fast, while a thicker dough needs enough stored heat to cook the base before the top runs away from it. If you like to preheat by habit, the Hans Grill preheating guide is a useful comparison point, but your own oven still tells the final story.
You do not need an infrared gun to know the stone is ready. If the oven has been fully preheated for the right window, the stone has usually done its job. If a loaf or pizza comes out with a pale underside after a normal bake, the usual fix is more preheat time, not more sauce, more cheese, or more topping drama.
Leave the stone in the oven between bakes if you can. It is easier, and a hot stone helps smooth out oven hot spots during normal cooking.
A common beginner question is whether to season the stone. For typical cordierite baking stones, the answer is no. Use it dry, let it darken naturally, and do not try to make it behave like cast iron. Before loading, check three things, dry hands, oven mitts, and a stable rack position. Those sound basic because they are, but the stone is awkward, hot, and unforgiving when you rush it.
Stone care matters too. If you keep heating it evenly, avoid thermal shock, and resist the urge to scrub it like a skillet, it will stay flat and useful for a long time. That is the engineering trade-off with a baking stone: it gives you direct bottom heat, but it asks for patience every time you bring it up to temperature.
Four Baking Stone Recipes Worth Mastering
A baking stone recipe works best when the dough and the surface are matched on purpose. Too wet, and the base sticks. Too thick, and the top finishes before the center catches up. Too thin, and the whole thing burns before you get the blistering you wanted.
Thin-crust Margherita
Use a dough ball around a personal-pizza size, then stretch it thin enough that you can almost see light through the center when it's held up. A moderate hydration dough behaves well here because it wants to spread without tearing, and the stone gives the bottom a clean jump start. Bake hot until the rim blisters and the underside is golden, not pale.
New York-style slice
This style wants a little more chew and a little more backbone, so don't stretch it as aggressively as the thin-crust version. A larger dough round makes sense here because you want a wider slice with a firmer bite and enough structure to hold sauce and cheese. Watch for the bottom to turn crisp while the edge still stays flexible enough for folding.
Artisan round loaf
Rustic loaf dough benefits from the stone's ability to deliver fast bottom heat, which supports oven spring before the crust sets too early. Shape the loaf with enough tension that it holds its form, then score it so the expansion goes where you want it. The right cue is not just color, it's lift, the loaf should rise rather than spread.
Soft flatbreads like naan or pita
Flatbreads want intense contact heat and a short, decisive bake. Keep the dough supple, roll or stretch it evenly, and let the stone do the quick puffing job. A rectangular stone is especially handy here because it can take more than one small piece at once, or give you a larger landing zone for sheet-style flatbreads.
Visual cue matters more than the clock. If the base is golden and the crust has structure, pull it. If the top is done but the bottom is still blond, the stone wasn't hot enough.
Stone, Steel, or Pan, Which Surface Fits the Job
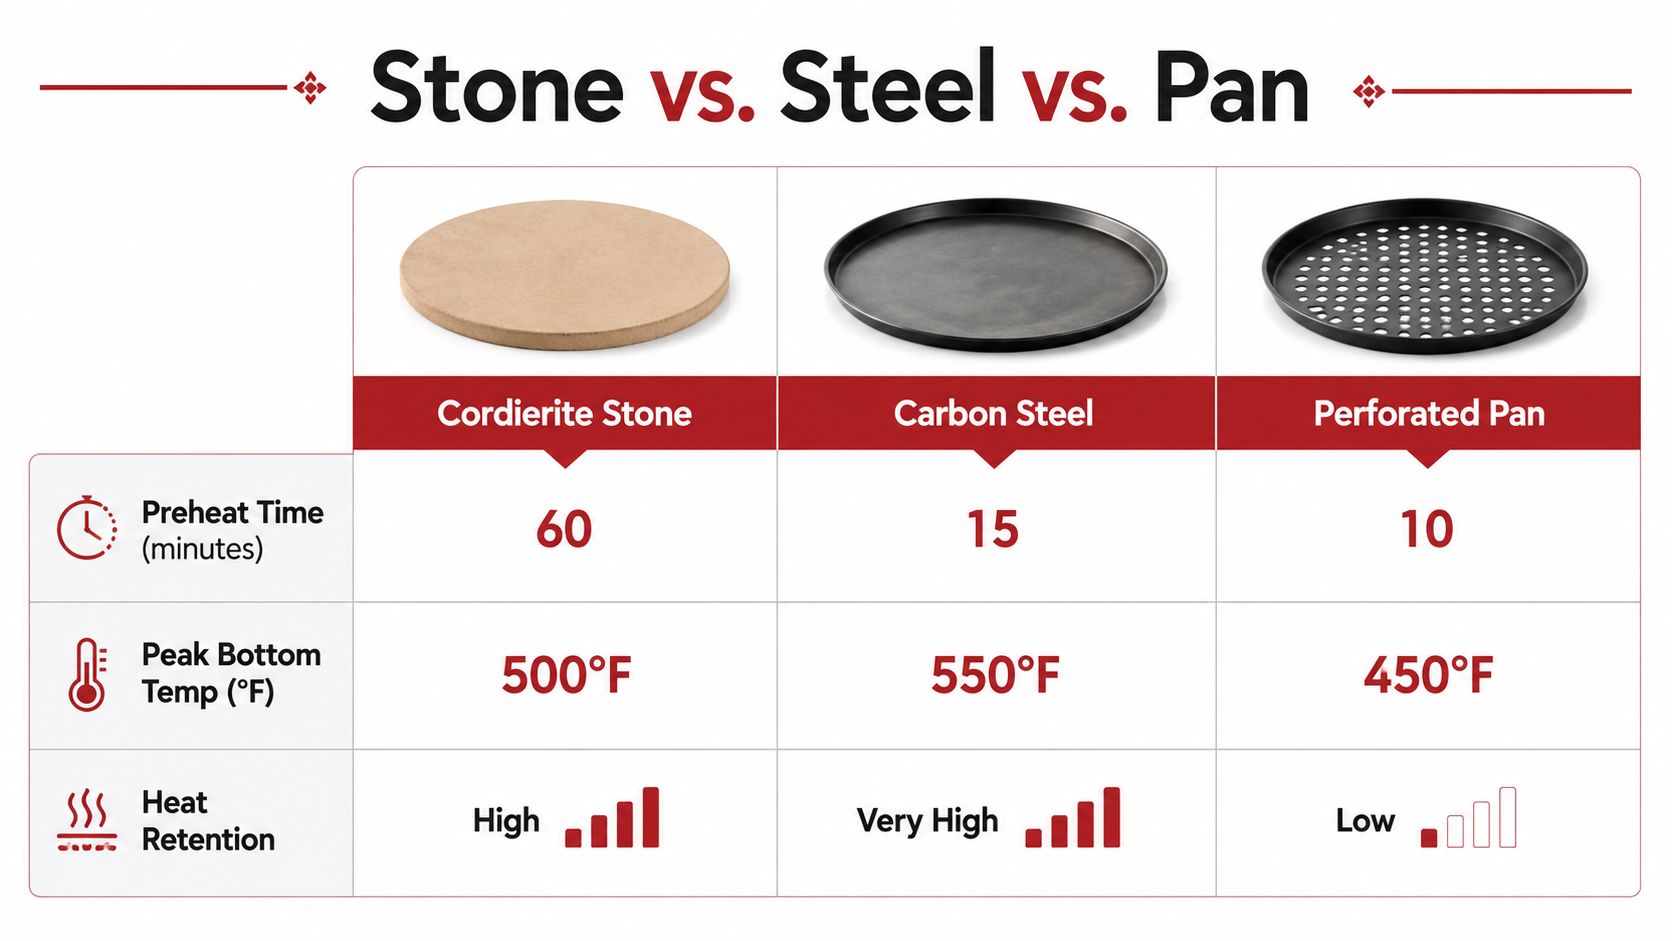
A stone isn't automatically the answer for every bake. It's the right call when you want a forgiving, steady surface for pizza nights, rustic bread, and flatbreads. For very thin crusts, a steel often wins because it stores and transfers heat faster, while a standard perforated pan is easier for quick frozen pizza or reheating slices without a long preheat.
Match the tool to the task
The stone's strength is balance. It gives you enough thermal mass to support browning and oven spring without being so aggressive that you scorch the underside instantly. That makes it a good fit for weekend cooks who want repeatable results and don't mind waiting for a full preheat.
Steel is more direct. It can push bottom heat harder and faster, which is useful if you're chasing a very crisp base and don't want to give the oven as much time to bleed heat away when the door opens. A pan, by contrast, is the convenience choice, especially if you're working with food that's already partially baked or just needs a quick finish.
The simplest way to choose is this, if the bake rewards thermal mass, use a stone. If the bake rewards speed and aggressive bottom heat, use steel. If the bake rewards easy handling, use a pan. The wrong surface usually shows up as either pale bottoms, overdone toppings, or a bake that takes longer than the dough can tolerate.
For a straightforward side-by-side look at stone and pan use, the Hans Grill comparison guide is useful if you're deciding what to buy first.
Running Your Stone on a Backyard Grill
A grill changes the equation because the heat moves, the lid opens, and the temperature swings faster than most home ovens. That's where thermal mass earns its keep. On a kamado or kettle, set the stone over indirect heat, not directly above flame, so the bottom gets fierce heat without turning black before the top has a chance to catch up. On gas, keep the burners arranged so the stone isn't sitting in a flare-up zone.
Two grill bakes that actually work
For a charred Neapolitan-style pizza, use a very hot grill, keep the lid down as much as possible, and watch the crust rather than the clock. The dough should puff, blister, and show live-fire spotting on the rim while the base firms quickly. If the grill opens often, a heavier surface helps the temperature recover faster.
For grilled flatbreads, the stone is more forgiving. Roll the dough thin, get the grill hot, and let the bread puff in spots while the bottom picks up a clean char. The result should feel supple, not dry, with enough browning to make it interesting.
A high-mass option like the Hans Grill BBQ baking stone setup suits grills well because it stays steadier when you check the pie or lift the lid. That steadiness matters outdoors more than indoors because wind, lid openings, and flame behavior all pull temperature around.
Use the same safety discipline you'd use in the kitchen. Preheat fully, don't splash water on a hot stone, and don't move it until it has cooled down. Outdoor cooking is more forgiving of char, but it's not forgiving of shortcuts.
Troubleshooting the Problems Beginners Actually Hit
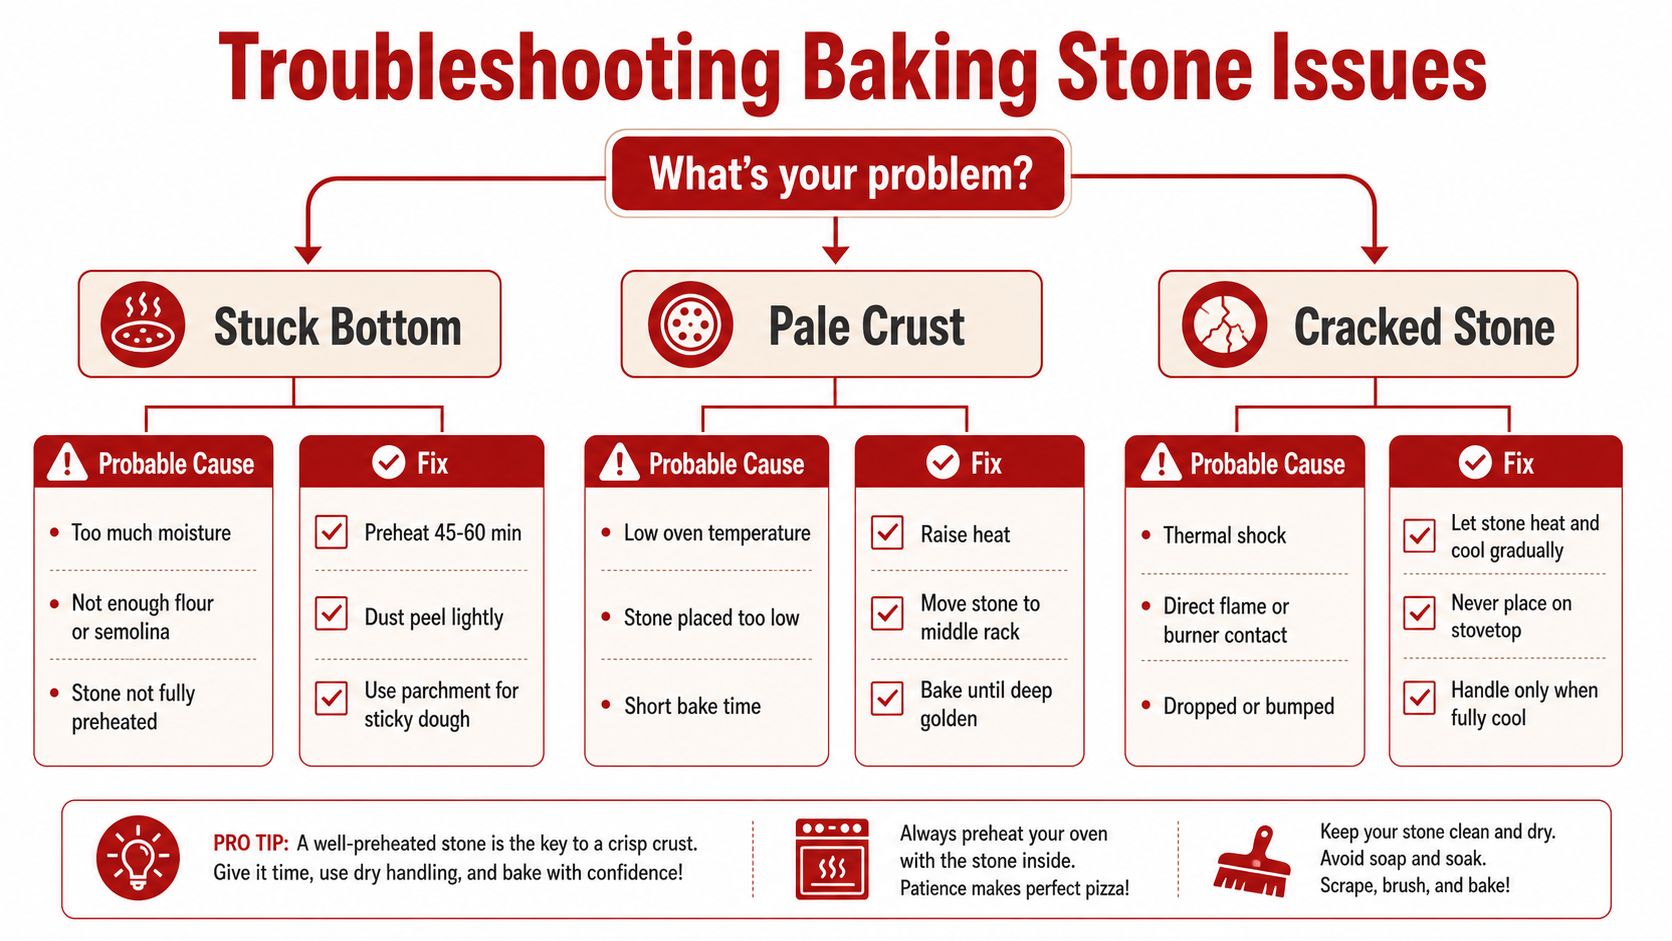
Most baking-stone failures come from a short list of causes. If the dough sticks, the surface usually wasn't prepared well enough, or the dough was wetter than the bake could handle. If the crust stays pale, the stone probably wasn't hot long enough. If the bake is uneven, the stone is sitting too close to the wrong heat source, or the oven is being opened too often.
Fast diagnosis
- Stuck bottom: Dust the peel more carefully, use a light layer of flour or semolina, and keep sticky dough from sitting too long before launch.
- Pale crust: Give the stone more preheat time and stop opening the door to peek every few minutes.
- Uneven bake: Move the stone to a more stable rack position, away from the most aggressive direct heat.
- Cracked stone: Treat that as thermal shock until proven otherwise, especially if the stone went from cold to hot too abruptly or got splashed with liquid.
King Arthur Baking's testing showed that a stone helps reduce hot spots and supports better browning when it's fully preheated, which matches what you see in a real kitchen, the fully heated stone gives a more even, more useful bake according to their test kitchen write-up. That doesn't mean the stone fixes every oven problem, but it does make the base of the bake more predictable.
If the crust is consistently pale and the top is done, the stone is underheated. If the stone is visibly cracked, replace it. A hairline crack that doesn't move may stay usable, but a deep crack is done.
User error causes most of the frustration. A stone that rocks on a flat surface, smells persistently of grease, or has a split that grows under heat is no longer worth trusting.
Caring for Your Stone So It Lasts for Years
Let the stone cool completely on the rack before you touch it. Scrape off dry residue, brush away burnt crumbs, and skip soap soaks, because a porous stone doesn't need that kind of treatment. Dark stains are normal, grease buildup is the problem, and heavy buildup is what starts smoking the next time you preheat.
A simple care rhythm
- After each bake: Cool fully, then scrape dry.
- Once a week if you bake often: Do a deeper scrape and check for grease spots.
- Once a month: Inspect for hairline cracks, chips, or rocking on a flat counter.
- Before storage: Wrap it in a dry towel or keep it in a stable cabinet if you're not leaving it in the oven.
Leaving the stone in the oven between uses is usually fine if you have the space and don't need the rack for something else. That also keeps the stone ready for impromptu pizza or bread. Discoloration doesn't hurt performance, it just means the stone has been doing its job.
Replacement rule: deep cracks, persistent odor after cleaning, or warping that makes the stone rock are all reasons to retire it.
A well-cared-for cordierite stone can take a lot of abuse, and a real warranty helps if the material fails early. Hans Grill backs purchases with 1-year coverage on qualifying sales, which is the kind of support that matters when you're using a stone regularly and want it to last through years of weekend pies.
If you want a stone setup that's built for repeat baking, compare your oven or grill routine with the tools and recipes at Hans Grill. Pick the surface that matches how you cook, then run one consistent preheat routine until the crust tells you you've got it right.


