

Crunchy Thin Crust Pizza Recipe for the Home Oven
“Bake it hotter” is the advice behind many thin-crust pizza recipes. It's also incomplete. A pizza can bake at 500°F and still come out soft if the center is too thick, the sauce is watery, the toppings release steam, or the baking surface hasn't stored enough heat.
A reliable crunchy thin crust pizza recipe treats crispness as a moisture-management problem. Dough thickness, surface moisture, and bottom heat must work together. Change one without adjusting the others and you can get a browned top over a floppy base, or a brittle cracker that tastes more like a snack than pizza.
Table of Contents
- Why Most Thin Crust Pizzas End Up Soft
- Building a Dough That Bakes Up Crisp
- Shaping, Docking, and Sealing Out Moisture
- Choosing Your Baking Surface
- Oven and Grill Bake Times That Work
- Fixing Common Thin Crust Failures
- Your Repeatable Crunchy Thin Crust Baseline
Why Most Thin Crust Pizzas End Up Soft
A thin pizza becomes crunchy by managing moisture, not by chasing maximum oven heat. A base can brown quickly and still bend if the center is uneven, the sauce is wet, or toppings trap steam against the dough. The usual result is a brittle rim, a flexible underside, and a soft patch beneath the cheese.
Thickness sets the first limit. The traditional Neapolitan benchmark uses a dough disk around 3 mm thick, baked at approximately 380–430°C for only 60–90 seconds in a wood-fired oven, according to the Associazione Verace Pizza Napoletana rules and traditional descriptions. That combination gives the underside intense heat while limiting the time moisture has to move through the crumb. A thicker center needs a longer bake, which can over-dry the rim before the middle firms.
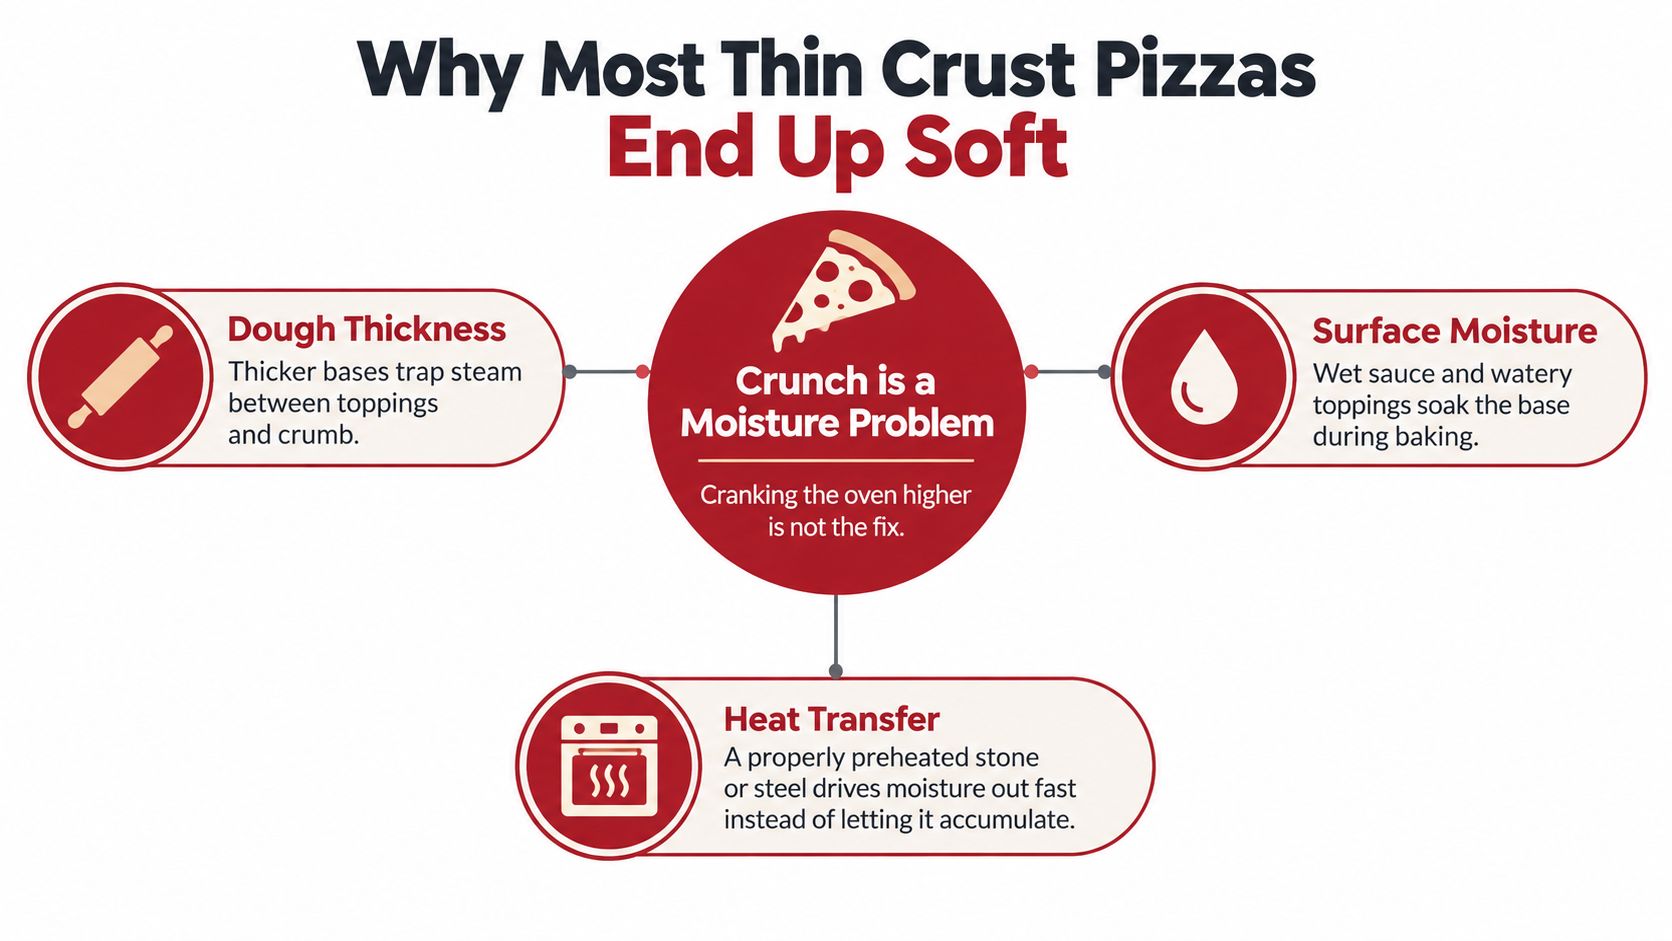
The three variables that decide the result
Dough thickness determines how far moisture must travel before the base dries. Keep the center even. An especially thin section may turn brittle, while a thick section stays chewy or soft.
Surface moisture comes from sauce, cheese, vegetables, and meat. Heavy sauce and wet toppings release steam under the cheese, so the center can remain soft even after the underside has browned. The BBC's guidance on thin pizza preparation also points toward resting the dough, limiting toppings, and preheating the baking surface.
Heat transfer controls how quickly the base drives off moisture. Air temperature alone cannot do that job. A thoroughly heated stone, steel, dark pan, or similar surface transfers heat directly into the dough.
Use the failure as a diagnosis. If the pizza is brittle, increase hydration slightly or shorten the bake rather than adding more heat. If it is soft, reduce topping load or dough thickness first, then extend the bake only if the rim can tolerate it. If it is chewy, reduce thickness or moisture, while avoiding an excessively dry dough that turns hard instead of crisp.
The target is an evenly thin base, restrained toppings, and a fully heated surface. As the thin-crust pizza preparation infographic illustrates, thickness, moisture, and heat transfer determine whether the crust snaps or sags.
Building a Dough That Bakes Up Crisp
Crunchy thin crust starts with moisture control, not an especially hot oven. The dough must stretch thin without tearing, then dry at a pace that leaves a crisp bite instead of a leathery center. Flour choice matters, but hydration, thickness, oil, and handling usually matter more than the label on the bag.
Bread flour and 00 flour can both produce a good thin base. Stronger flour gives the dough more chew and handling strength, while a less aggressive dough tends to break with a sharper snap. More water can make the crust pleasantly chewy, but it also makes shaping and drying harder. Less water dries more easily. Push hydration too low, though, and the result becomes hard and brittle rather than crisp.
Salt seasons the dough and helps regulate its structure. A modest amount of olive oil adds tenderness and can soften the bite of a crust baked for longer. Neither ingredient can correct a wet center created by excess sauce, heavy toppings, or weak heat transfer.
A practical dough process
Mix flour, water, salt, yeast, and a modest amount of oil until the dough becomes cohesive. Knead until it feels smoother and stretches without tearing immediately. Do not aim for an extremely soft dough just because it feels refined. Dough that clings aggressively to the bench is harder to spread evenly and tends to collect too much flour during shaping.
For a repeatable portion, use approximately 200 g of dough for a 25 cm, or 10-inch, pizza. Round it into a tight ball, cover it, and let it rest for about 15 minutes before shaping. This short rest gives the dough enough relaxation to spread without forcing it thin. If the dough has been chilled, bring it closer to room temperature first. Cold dough resists expansion, springs back, and often tears when pressed too firmly.
Shape the center to roughly 3 mm. That thickness gives the base enough substance to crisp without becoming fragile. If it keeps shrinking, stop pressing and allow about 10 minutes of relaxation before the final pass. A short pause works better than adding bench flour or forcing the gluten into submission.
| Flour Type | Hydration | Resulting Texture | Best Use |
|---|---|---|---|
| Strong bread flour | Lower to moderate | More chew and a firmer bite | Dough that must hold a thin shape |
| 00 flour | Moderate | Tender, crisp, and less aggressively chewy | Thin home-oven pizzas |
| Strong flour with more water | Higher | More open chew, greater moisture risk | Experienced handling and restrained toppings |
| Either flour with a little oil | Moderate | Crisp edges with a less brittle bite | Home ovens and longer bakes |
Cold fermentation improves flavor and helps with scheduling, but it does not replace even shaping. Keep the dough covered so the surface does not dry out, and do not shape it straight from the refrigerator. The cold-fermented pizza dough technique is useful when dough must be prepared ahead and finished later.
Use the finished crust to choose the next adjustment. A crust that shatters may be too dry, too thin, or overbaked. A crust that bends like leather points more often to retained moisture, an overloaded center, or insufficient bottom heat. Change one variable at a time. Increase hydration slightly for excessive brittleness, reduce it or the topping load for softness, and alter thickness before radically changing the bake.
Shaping, Docking, and Sealing Out Moisture
Crunch is mainly a moisture-management problem. A very hot oven cannot rescue a thick, wet center or toppings that release water faster than the base can shed it. Shape the dough evenly, control the sauce, and keep the topping load modest.
Make the center even
Flour the bench lightly, set down the rested dough, and press from the center outward while preserving a small rim. Stretch from several points instead of pulling hard in one place. Thin dough tears easily when the gluten is still tight.
Once the dough is close to size, use a rolling pin for the final pass if you want consistent thickness. Aim for approximately 3 mm through the center. A thick patch retains moisture while a paper-thin patch turns hard, so visual thinness is not a reliable guide.
If the dough springs back, stop pressing and leave it for 10 minutes. Relaxed gluten rolls farther with less tearing, and adding more bench flour only makes the finished crust drier.
Dock the center with a fork or dough docker. The holes release trapped gas and reduce large bubbles that can lift toppings away from the base. Leave the rim undocked if you want it to retain some lift.
Build a barrier before adding toppings
Brush the shaped dough with a very thin film of olive oil before the sauce goes on. The fat layer helps limit sauce moisture moving directly into the dough, as described in the BBC's thin-crust preparation guidance, though it will not waterproof the base.
Use reduced or strained sauce and spread it thinly. Tear low-moisture mozzarella into small pieces rather than piling wet cheese in the center. Drain or pre-cook mushrooms, vegetables, and other watery ingredients. Distribute toppings evenly, with the center looking deliberately under-topped before baking.
Work quickly after saucing. A dressed thin base absorbs moisture while it waits, especially under a heavy topping load. Launch it as soon as the toppings are arranged.
Use the result to choose one adjustment. If the crust shatters, increase hydration slightly or make the center marginally thicker before shortening the bake. If it bends and stays soft, reduce sauce or toppings, then give the base more time to dry. If it is chewy rather than crisp, reduce thickness or retained moisture. Change one variable at a time so the trade-off between crispness and chew remains clear.
Choosing Your Baking Surface
The baking surface controls how quickly heat enters the underside. A household oven may display a high air temperature, but a stone or steel that hasn't absorbed enough heat won't deliver the same crisp base.
A cordierite stone is forgiving and spreads heat evenly. It takes patience to saturate, but it suits cooks who want steady browning rather than an aggressive sear. A steel transfers heat more forcefully and can produce a darker, faster-crisping underside, though it demands closer attention.
A dark steel pan is a practical middle ground. Its dark finish absorbs heat, and its shallow surface makes launching easy. An inverted heavy sheet pan is the budget option. It works, but its heat delivery is less consistent and may leave pale areas if the oven cycles frequently.
| Surface | Preheat Time | Heat Capacity | Best Bake Window | Cost Tier |
|---|---|---|---|---|
| Cordierite stone | Long, about 45–60 minutes | Steady and forgiving | Moderate home-oven bake | Moderate |
| Pizza steel | Thorough preheat required | Strong bottom heat | Shorter, more aggressive bake | Higher |
| Dark steel pan | Moderate to long | Good direct contact | Moderate bake with easy launch | Low to moderate |
| Inverted heavy sheet pan | Thorough preheat required | Useful but less even | Moderate bake with close monitoring | Low |
The pizza steel versus stone comparison comes down to how much bottom heat your dough and toppings can handle. A wet, heavily topped pizza can scorch underneath on steel before the cheese finishes. A sparse, evenly rolled pizza may stay pale on a stone if the surface hasn't fully heated.
Place the surface where it can brown both the crust and the toppings. A stone near the upper part of the oven helps the top finish sooner, while steel often needs more careful rack placement because it drives heat into the bottom quickly.
Oven and Grill Bake Times That Work
Crunchy thin crust is a moisture-management problem, not just a race to the highest temperature. A hot surface sets the underside, but sauce, cheese, dough thickness, and trapped steam determine whether the finished pizza stays crisp. The target is a browned base with a firm center, while the rim retains enough moisture to avoid tasting like a cracker.
For a conventional home oven, heat the oven and baking surface to about 500°F. A stone needs at least 30 minutes of preheating, while 45–60 minutes gives a heavier surface more time to store heat, according to the BBC's guidance on preheating pizza surfaces. A stone near the upper part of the oven gives the rim and cheese more radiant heat. With steel, avoid a low rack if the base darkens before the toppings finish.
Use this workflow:
- Heat fully: Preheat the oven and surface at the hottest stable setting your equipment safely supports.
- Control moisture: Use a restrained layer of sauce and cheese, especially on very thin dough. Wet toppings can keep the center soft even when the rim is brown.
- Launch cleanly: Slide the topped pizza onto the hot surface promptly. A raw base left on the peel can absorb moisture and stick.
- Bake without peeking: Keep the door closed except when necessary so the oven can recover its heat.
- Judge the finish: Look for a browned underside, a firm center, and cheese that has melted and begun to bubble.
- Rest briefly: Move the pizza off the hot surface for one to two minutes before slicing, allowing steam to escape instead of softening the base.
The Pizza Today thin-crust workflow places properly dried and docked dough in a 500–600°F baking environment, with about 10–12 minutes as a useful home-oven reference. Treat that time as a starting point, not a guarantee. A thinner, lightly topped pizza may finish sooner. A wetter pizza may need more time, but extending the bake can make a dry center brittle.
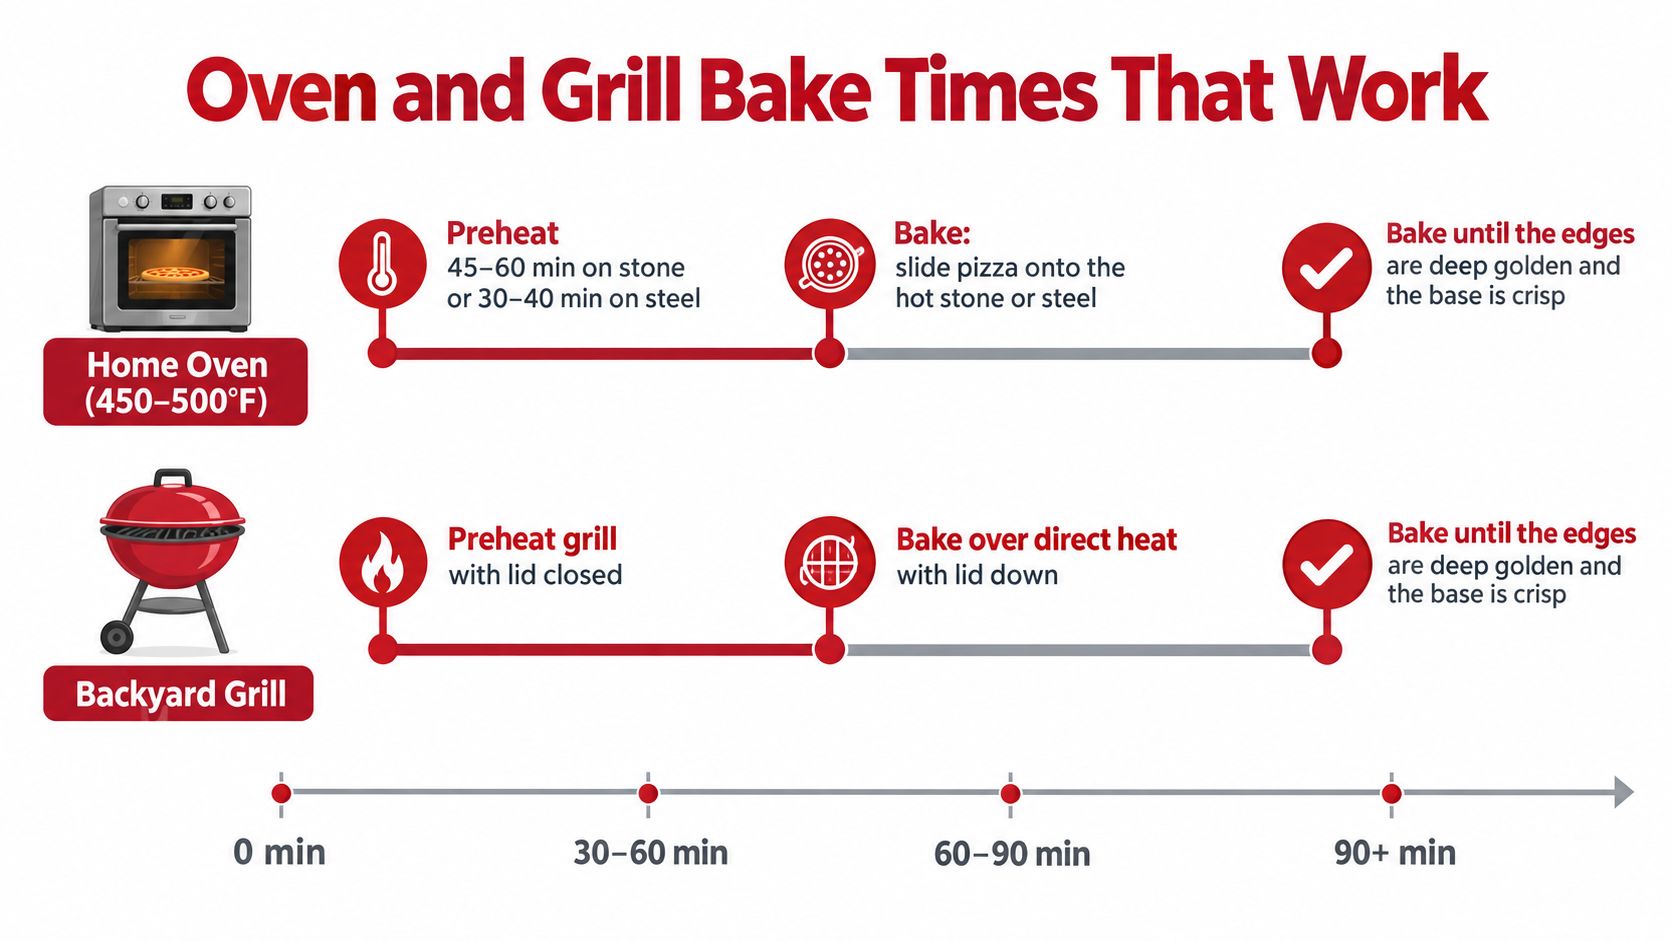
Grilling thin crust
A grill supplies strong bottom heat and more variable top heat. Preheat with the lid closed, then use direct heat for underside browning and an indirect zone if the base colors too quickly. A surface temperature around 575–650°F supports an aggressive bake, but a wet topping load can still burn before the cheese catches up.
Keep the lid down to hold heat around the toppings. Rotate or reposition the pizza once the underside has enough structure to lift cleanly. If the base is ready first, move it toward indirect heat and finish briefly with the lid closed. The pizza stone preheating guide helps prevent launching onto a surface that feels hot but has not stored enough heat.
Fixing Common Thin Crust Failures
Thin-crust failures usually come from moisture balance, not oven temperature alone. Change the variable closest to the symptom, then bake again before touching anything else. Altering flour, hydration, thickness, heat, and toppings together hides the cause.
| Failure | Likely Cause | First Fix | Second Fix | Third Fix |
|---|---|---|---|---|
| Cracker-dry or brittle | Base is too thin, too dry, or baked too long | Make the center slightly thicker | Shorten the bake | Add a small amount of oil for tenderness |
| Soft center | Excess sauce, cheese, or topping moisture | Reduce the wet topping load | Dock the center and use strained sauce | Extend the bake on a fully heated surface |
| Scorched bottom, pale top | Too much direct bottom heat or low rack position | Move the pizza higher | Lower the oven setting slightly | Shorten the preheat or use a gentler surface |
| Pale rim, raw center | Uneven top heat or thick center | Roll more evenly | Move the pizza higher | Rotate once during baking |
| Chewy or leathery base | Moisture remains trapped in the crumb | Reduce topping moisture | Bake longer at stable heat | Use a thinner center next time |
A soft center calls for less surface moisture before it calls for a different yeast quantity. Reduce wet sauce, cheese, or toppings first. Strained sauce and a docked center give steam fewer places to collect, while a fully heated baking surface helps the base set before the toppings overcook. The Pizza Today analysis of thin-crust baking also identifies excessive moisture, thick dough, and inadequate preheating as common causes of a soft base.
Use the bake result to choose the next adjustment. A dark underside with a pale rim means bottom heat is arriving too aggressively, so move the pizza higher or use a gentler surface. A pale rim with a cooked middle points to limited top exposure. Raise the pizza or rotate it once rather than only extending the bake.
Change thickness before changing everything else. A difference of a few millimeters can alter the entire moisture path through a thin base.
The target is controlled crunch, not maximum dryness. A good crust has a firm underside and a clean snap at the edge, while the center retains enough tenderness to taste like bread. If it breaks into shards, increase thickness slightly, add a little oil, or shorten the bake. If it folds without resistance, reduce topping moisture, thin the center, or bake longer at stable heat.
Treat each result as a controlled swap: thickness first, then bake time, hydration through topping load, and finally the baking surface. That sequence makes the cause visible instead of turning every failed pizza into a new recipe.
Your Repeatable Crunchy Thin Crust Baseline
Crunchy thin crust is a moisture-control problem before it is a temperature problem. Start with a fixed baseline, then change one variable per bake so you can identify whether softness comes from the dough, toppings, surface, or timing.
Portion the dough at approximately 200 g per 25 cm pizza. Cover and rest it for 15 minutes, then roll or stretch the center to about 3 mm. If the dough pulls back, wait another 10 minutes rather than forcing it thinner. That small pause helps you reach the target thickness without tearing the dough or creating uneven spots.
Brush lightly with oil, dock the center, and use strained sauce with a restrained, even topping layer. Bake on a fully preheated dark pan, stone, or steel at the appliance's hottest safe setting. A home-oven benchmark is 450°F with at least 30 minutes of surface preheating. Allowing 45–60 minutes gives the baking surface more time to heat through, consistent with the BBC's pizza baking guidance.
| Variable | Baseline | If too soft | If too brittle or chewy |
|---|---|---|---|
| Dough weight | About 200 g per 25 cm pizza | Use a slightly smaller portion | Use a slightly larger portion |
| Center thickness | About 3 mm | Thin the center slightly | Roll slightly thicker |
| Surface moisture | Light oil, strained sauce, sparse toppings | Reduce wet ingredients | Add moisture carefully |
| Baking surface | Fully preheated stone, steel, or dark pan | Increase heat saturation | Use a gentler surface |
| Bake duration | Until the base is browned and firm | Extend slightly | Remove sooner |
A good result has an evenly browned underside, a crisp center, and a lifted rim that still tastes like bread. Shards indicate excessive dryness. A foldable center usually means excess moisture, insufficient bake time, or a surface that was not heated through.
Use this adjustment order: topping moisture, dough thickness, baking-surface heat, and bake time. Change hydration through the topping load before changing the dough recipe. Record the portion, thickness, surface, toppings, and finish after every bake. The notes expose patterns that memory misses.
Hans Grill sells cordierite pizza stones, pizza steel, proofing boxes, and BBQ-ready baking tools for home ovens and grills. Visit Hans Grill to choose a baking surface.


