

Large Rectangular Pizza Stone: How to Choose and Use One
It's Friday, the dough's proved beautifully, and you've finally got everyone in the kitchen. Then you lift the first slice and it flops. The cheese looks great, but the base is pale, soft in the middle and clings to the tray. You've probably already blamed the dough, the sauce or your oven.
More often, the problem is simpler. Your base never got a hot, dry surface with enough stored heat to set it quickly. That's exactly what a large rectangular pizza stone is for, provided it fits your cooker properly and you heat the whole slab, not just the air around it. For most UK home ovens and BBQs, I'd start by looking at the Hans Grill Rectangular Pizza Stone, then measure before you buy anything.
Table of Contents
- Why a Large Rectangle Changes Your Pizza Night
- Sizes That Fit Your Oven or Grill
- Why Cordierite Suits Repeated High Heat
- Thickness, Heat Storage and Warm-Up Time
- How to Preheat and Launch Your First Pizza
- Care Habits That Prevent Cracks and Stains
- Choosing Your Stone and Starting Tonight
Why a Large Rectangle Changes Your Pizza Night
Say you bake the same dough twice. On a small round stone, the pizza barely fits, one edge hangs near the cooler rim, and you're nervous launching it because there's no spare room. The underside comes out patchy. On a large rectangle, you've got a forgiving landing zone, corners for calzone or a second small bake, and space to slide the peel without clipping the edge. The base sets evenly and comes out firm and golden.
That difference comes from how a pizzeria deck works. According to the Encyclopedia.com entry on pizza, commercial pizza ovens ideally reach at least 700°F, while home pizza is commonly baked around 450°F (230°C) for approximately 15 minutes, and porous stone absorbs moisture from dough while radiating heat evenly into the crust. Your domestic oven can't match a commercial deck for raw temperature, so stored heat has to do the heavy lifting.
Round or rectangular? Both shapes store heat the same way; the difference is how much of that heat sits where you can use it. A round stone gives you hot surface mainly under the pizza. A rectangle matches the shape of a standard rack, so it leaves usable hot corners and edges around the pie. The Hans Grill Rectangular Pizza Stone uses cordierite stone technology and works in a kitchen oven or on a BBQ.
Here's how that Friday night comparison usually looks in practice.
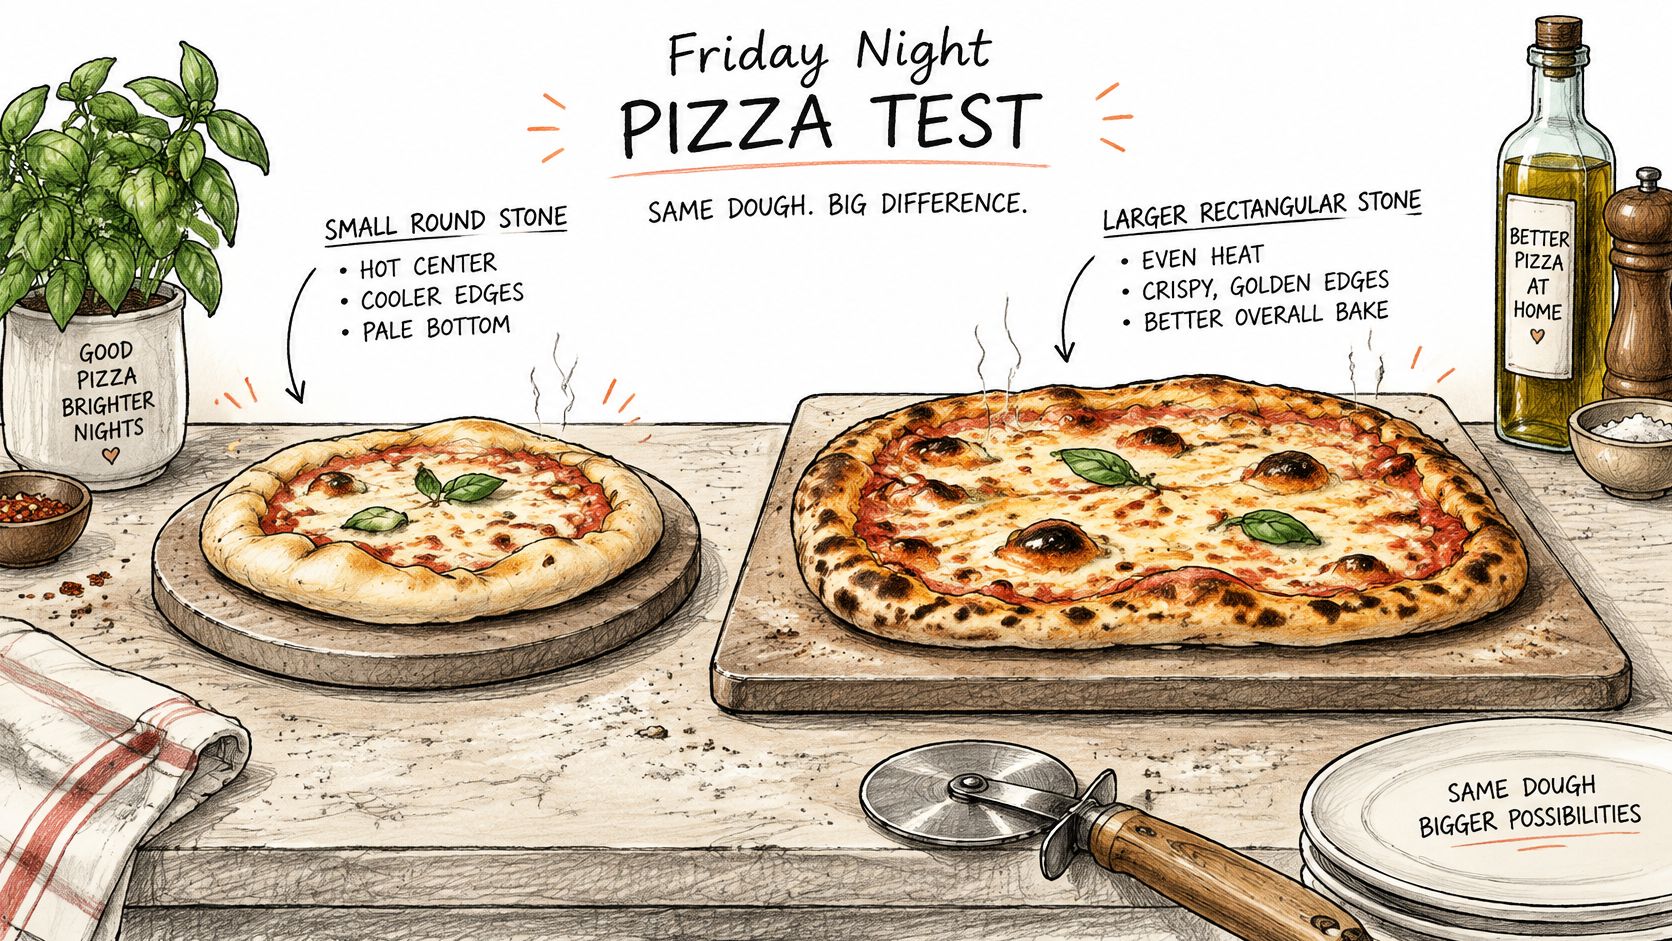
More than a bigger pizza
A rectangle uses more of your rack than a round stone of similar width, and that spare surface earns its keep. You can bake a long baguette beside mini pizzas, slide a calzone to one side while garlic flatbread cooks on the other, or reheat two slices without crowding them.
The shape also forgives an imperfect launch. If your pizza lands slightly off centre, there's usually still hot stone underneath it. That matters for beginners, because hesitation with the peel is normal for the first few bakes.
Bigger only helps if the stone still leaves an air gap on every side. A slab that blocks airflow or touches the walls can bake worse than a smaller one, because the oven can't move heat around it. Fit, material, a full preheat and gentle handling decide whether you get that crisp base every week or just once in a while.
Sizes That Fit Your Oven or Grill
The right stone is the largest rectangle that still leaves breathing room on every side. Rack space decides that, not appetite. Use these typical ranges as your starting point.
| Stone size | Where it usually fits | Clearance to plan for | Watch out for |
|---|---|---|---|
| 12 × 15 in | Standard domestic ovens | 1 to 2 in each side | Easiest fit for first-time buyers |
| 14 × 16 in | Many full-size ovens | 1 to 2 in each side | Measure rack width and depth before buying |
| Up to about 16 in across | Large home ovens only | 1 to 2 in each side | Little room for airflow in smaller cookers |
| Full-size gas grill | Rectangular stone uses grate space well | About 1 in around the stone | Check lid clearance above the stone |
| Compact kettle or kamado | Round stones usually fit better | About 1 in or more around the stone | Rectangle can crowd the lid and restrict airflow |
Size the stone against your rack or grate, never against the diameter of pizza you want to bake. A stone needs a clear gap around its edges so hot air can rise past it; block that path and the base bakes unevenly however good the material is. In practice, a 15 × 12-inch rectangle suits most standard domestic ovens, while a 14 × 16-inch stone fits many full-size models once you have measured properly.
What to measure before you order
Get a tape measure and write down four numbers. The capacity printed on the front panel tells you nothing about usable rack space.
- Interior width: Measure wall to wall at rack height, then subtract the gap you plan to leave on each side.
- Depth front to back: Check that the door closes fully without pressing on the stone.
- Height above the stone: Leave room for a risen crust and for sliding a peel in at a shallow angle.
- Lid or element position: On a BBQ, confirm the closed lid clears both the stone and the pizza sitting on it.
A 12 × 15 in stone is the low-risk starting point for most standard ovens. A 14 × 16 in stone gives you more room to launch and turn, which beginners appreciate, but only when the gap around it survives. Once a stone approaches 16 in across, smaller cookers often lose the airflow that keeps heating even.
BBQs follow the same logic with a shape twist. Full-size gas grills have rectangular cooking areas, so a rectangle uses that space well and keeps burner zones easy to manage. Compact kettle and kamado cookers are round and domed, and a rectangle tends to crowd the edges and lid. In those, a round stone is usually the honest answer.
Here is my rule of thumb: a slightly smaller stone with a clean gap all round will outbake the largest slab you can physically wedge in, because hot air needs a path past the edges. Finish with three questions. Does it sit level? Does it clear every wall? Does the door or lid close without touching it? If any answer is no, size down.
Why Cordierite Suits Repeated High Heat
Most cracked pizza stones die at the sink. A cook rinses a still-warm slab under the tap, the surface contracts while the core stays expanded, and the stress opens a clean split across the middle. Steel bakeware and ordinary stoneware both grow as they heat and shrink as they cool, and that movement is what tears a slab apart when it happens unevenly. Cordierite barely changes size at all, which is why it's used for large-format stones that cycle between fierce oven heat and cool room air every week.
A 2025 study from Queen Mary University of London found that cordierite combines low positive expansion along two crystal axes with negative expansion along the third, while elastic effects largely offset these movements. In kitchen terms, one direction wants to grow while another shrinks, and the movements nearly cancel. The stone doesn't fight itself as it heats.
Thermal shock, in plain terms
Thermal shock happens when one part of a ceramic changes temperature much faster than another. The hot surface tries to expand while the cooler core hasn't moved yet. That mismatch pulls the material apart from the inside, and cracks follow the stress.
Cordierite's near-cancelling expansion keeps that internal tug-of-war small. That pays off exactly where home bakes hit hardest: cold, wet dough landing on a fully heated slab, then a long cool-down on the rack afterwards. A larger stone also has more surface area across which temperature can vary, so the material choice carries more weight as size goes up.
Cordierite handles the routine swings of weekly baking. Cold water on a hot slab still ends it.
No ceramic is crack-proof. A knock on a worktop edge, a drop onto tiles, or a sudden plunge from hot to cold can still split cordierite. Treat its shock resistance as a margin for the normal cycle of preheat, bake and cool-down, and the margin holds.
When you're comparing large stones, check the material as carefully as the dimensions. A slab that fits your oven perfectly still fails you if it can't survive years of heating and cooling. For the deeper material background, our guide to the cordierite pizza stone covers how it behaves in everyday use.
Thickness, Heat Storage and Warm-Up Time
A thick stone works like a heavy cast-iron pan. It takes longer to get hot, but when cold dough lands on it, it barely flinches. A thin stone heats quickly and then gives up that heat just as fast, so the base steams instead of browning.
Published porous-cordierite data in a peer-reviewed materials study on PMC report thermal conductivity of approximately 0.41 to 2.29 W/(m·K), thermal diffusivity of about 1.20 to 1.85 mm²/s, and heat capacity of roughly 629 to 841 J/(kg·K), with porosity strongly influencing conductivity. You don't need to memorise those figures. The practical translation is this. Lower conductivity moderates how aggressively heat flows into the base, while greater thickness and mass store more energy, so cold dough causes a smaller temperature drop.
Why the centre stays pale
Oven air reaches temperature long before the middle of a thick slab does. If you launch on the beep, the surface might feel hot but the stone has no reserve. The dough drains what's there, the centre lags, and you get a soft, pale middle under cooked toppings.
A fully equalised slab behaves differently. It keeps feeding heat into the first pizza, recovers faster, and gives you repeatable browning on the second and third. That's why back-to-back family bakes expose an underheated stone so quickly.
Expect three trade-offs. Thicker stones need a longer first preheat. Every pizza still needs a few minutes of recovery time before the next one. Airflow, burner position and how fully the dough contacts the stone all change the result. Judge readiness by time at temperature, not by the oven display alone.
How to Preheat and Launch Your First Pizza
This sequence shows the four stages that matter most, from placement to launch.
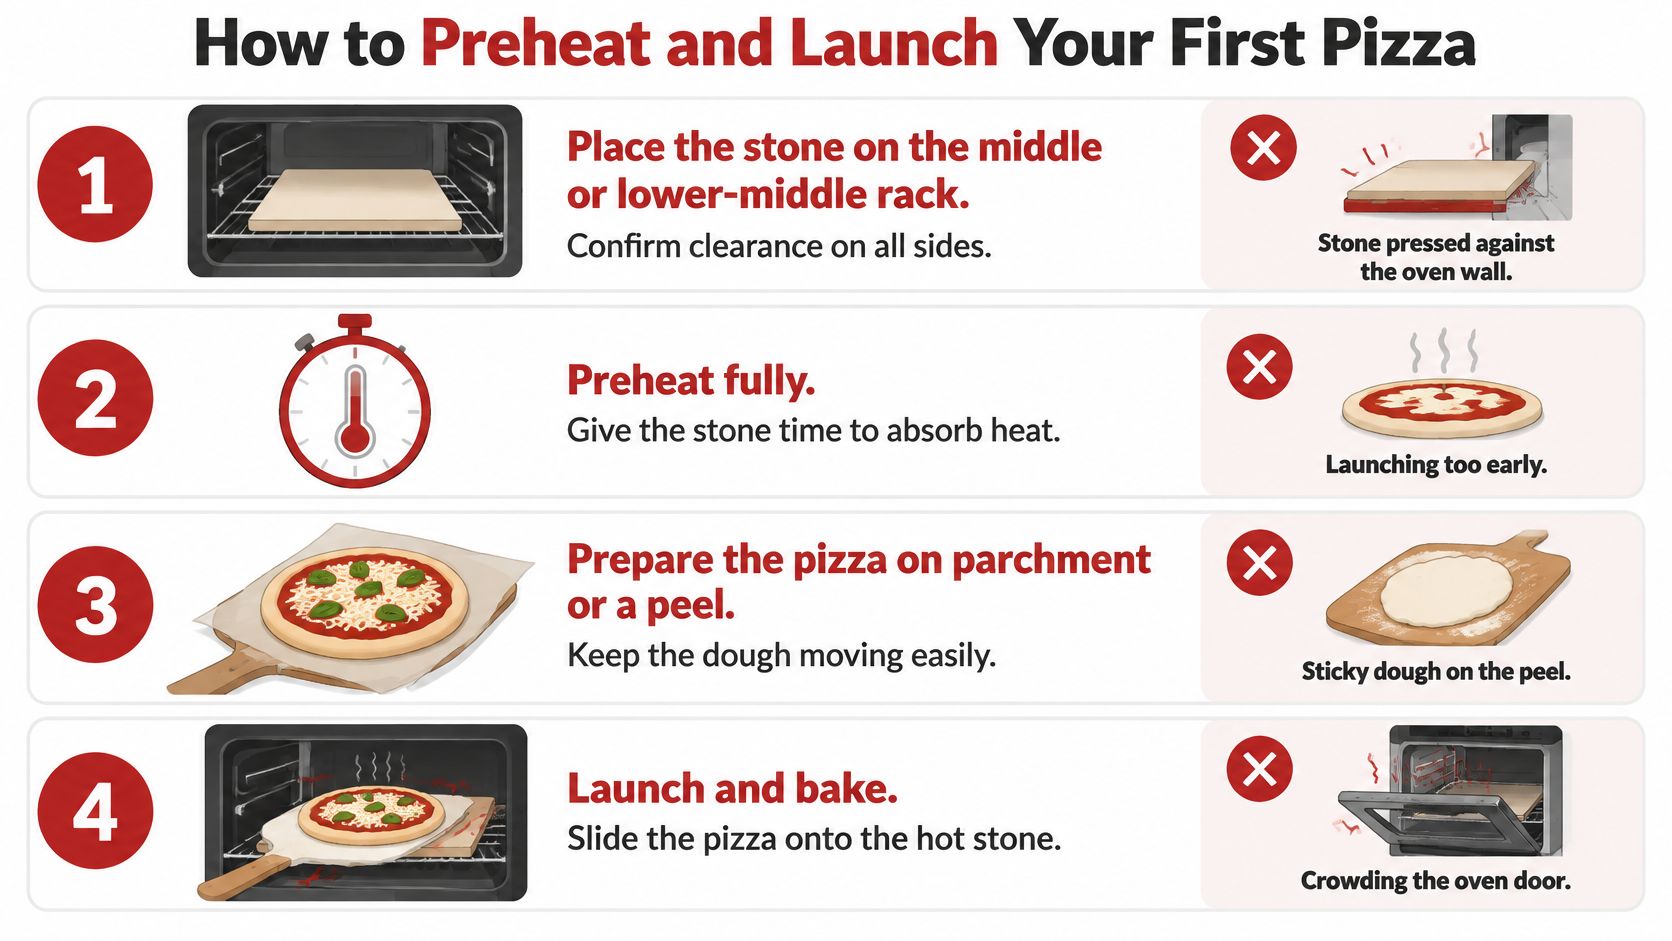
- Place the stone in a cold oven. Put it on the middle or lower-middle rack and confirm clearance on all sides before you switch anything on. The common slip is letting the stone rest against the oven wall, which creates a hot stripe and uneven baking.
- Preheat properly and wait. Our cordierite stone should be preheated to 500°F (260°C) for at least 30 to 45 minutes before launching, so the whole slab equalises. Cutting that wait short is the fastest route to a pale centre, whatever the oven display says.
- Set up the BBQ differently. On a grill, place the stone before lighting, close the lid and build a strong, steady heat zone so the stone heats gradually with everything else. Don't judge readiness by grill air temperature alone, because the slab lags behind the hood thermometer.
- Dust the peel, lightly. A thin scatter of semolina or fine flour lets the dough slide. Too much flour burns on the stone, tastes bitter and leaves gritty patches under the crust, so shake off the excess.
- Build on the peel, quickly and lightly. Sauce and top the stretched dough on the peel, keeping the centre modest so the base can set. If you linger, moisture soaks through and the dough glues itself down, so give the peel a small shake between toppings to confirm it still moves.
- Launch with one short, confident slide. Aim for the centre of the rectangle, tilt the peel slightly and pull it back in a smooth jerk. Because the stone spreads heat evenly, you don't need to rotate the pie halfway through.
- Bake and check the underside. Bake at your recipe temperature and lift an edge with the peel partway through to check colour. You're looking for steady browning, not dark spots racing ahead of the toppings.
- Let the stone recover. Give it a few minutes with the door or lid closed before launching the next pizza. Skipping recovery is why the first pizza often beats the second.
If you're unsure whether the wait in step two really matters, our explainer on whether you should preheat a pizza stone walks through the reasoning. This short demonstration shows the launch motion at normal speed.
A good result is easy to recognise. The slice holds its shape when lifted, the underside is firm and golden, and there's no pale, doughy ring in the middle. If the top finishes first next time, don't change the dough straight away. Extend the preheat and lighten the centre.
Care Habits That Prevent Cracks and Stains
Your instinct after baking is probably to tidy up fast. Resist it. Most stones don't die from heat. They die from being rushed from heat to cold, or scrubbed like a roasting tin.
| Habit or mistake | What it causes | Better habit |
|---|---|---|
| Placing a cold stone into a blazing oven | Thermal shock and cracks | Heat the stone with the oven from cold |
| Rinsing a hot stone under cold water | Sudden cooling stress and cracks | Let it cool fully, then scrape and brush |
| Using detergent on the porous surface | Retained smells and flavour carry-over | Scrape and brush; use water only if needed |
| Setting a hot stone on a cold or wet counter | Rapid temperature drop | Cool on a heatproof rack or inside the oven |
| Dropping a peel or knocking the stone | Chips and cracks from impact | Handle and store with care |
| Letting the stone touch oven walls or the lid | Uneven heat and stress points | Keep 1 to 2 inches of clearance |
Independent buying guidance summarised by Food & Wine in its pizza stone recommendations identifies abrupt temperature change as the main failure mechanism rather than ordinary high-temperature baking, and notes that stones around 0.6 inch thick are commonly specified for large rectangular formats. That matches the table above. Nearly every row is the same mistake wearing different clothes, a sudden temperature jump or a sharp knock.
Cleaning without damaging the surface
Let the stone cool completely in the oven or on the grill. Then scrape off crumbs and burnt flour with a bench scraper or stiff brush. Skip detergent, because the porous surface absorbs it and can hand the flavour back to your next bake.
Dark patches from oil and cheese aren't damage. A used stone develops a seasoned, blotchy surface, and that's normal. Chasing a pale, showroom finish with soaking and scrubbing does more harm than the stains ever will. For a full routine, see our guide on how to clean a baking stone.
Store the stone flat, dry and protected from knocks, ideally on a low oven rack or a sturdy shelf rather than upright where it can topple. Learn to read marks, too. A faint hairline surface mark that doesn't open or catch a fingernail is usually cosmetic. A crack running through the thickness of the stone, or pieces that shift when pressed, means stop using it.
Choosing Your Stone and Starting Tonight
Three questions settle this decision: what fits, where it lives, and how often it works. Answer them in that order, because a crowded stone bakes worse than a smaller one with room to breathe.
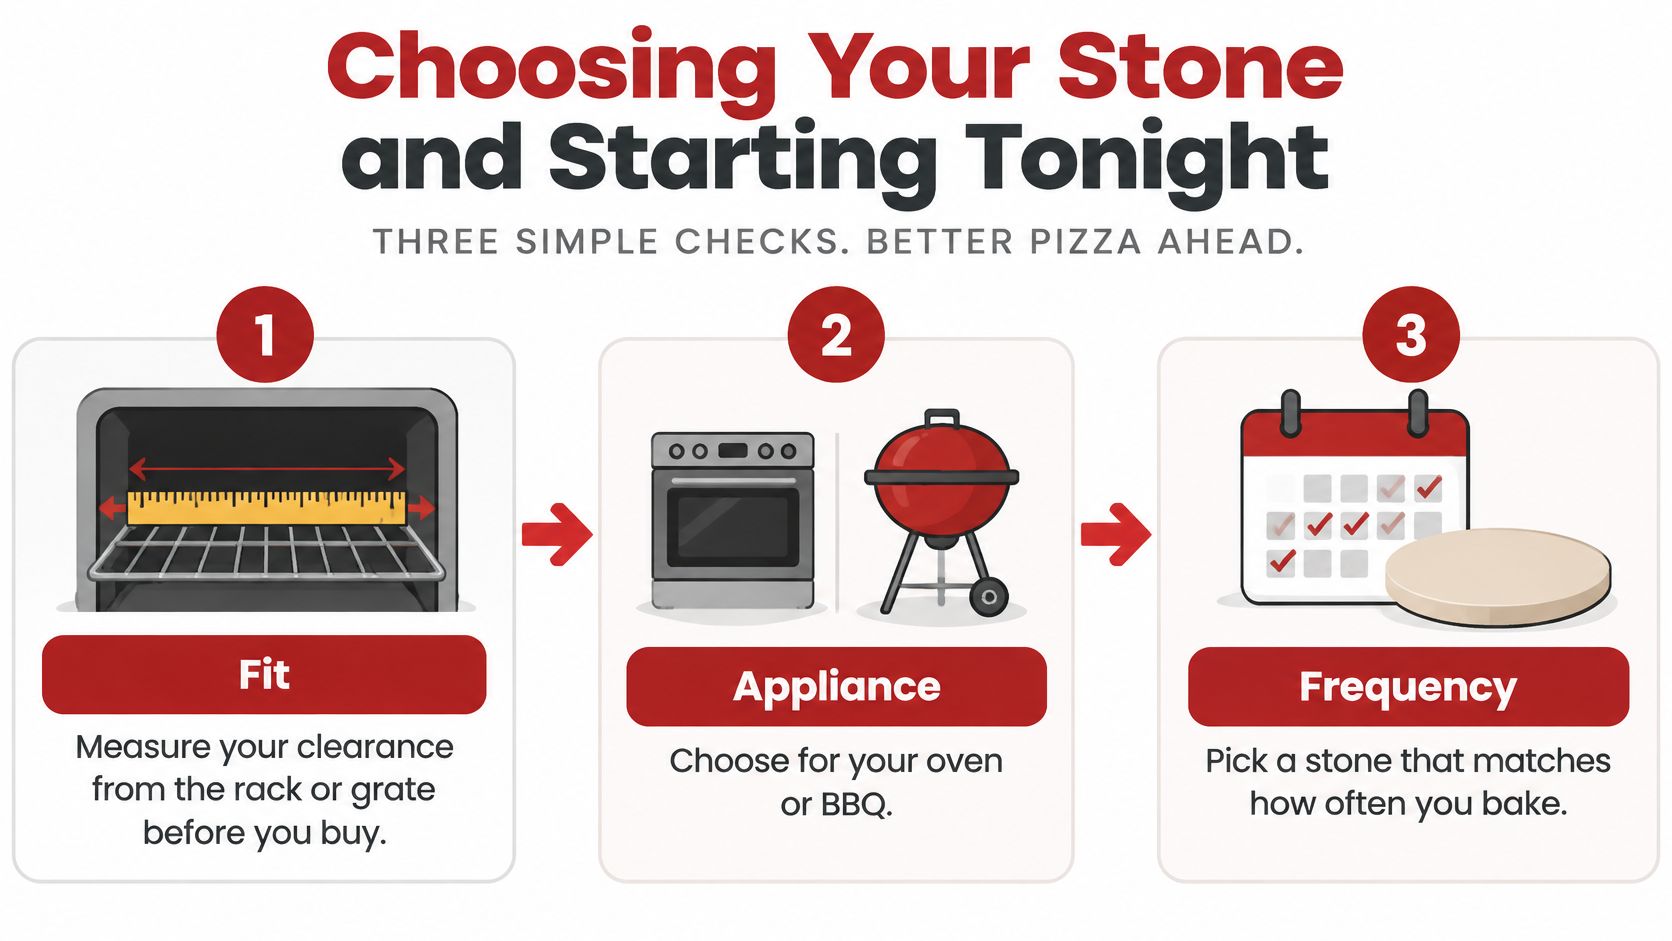
The three checks, in order
Check one is fit. Pull out the rack or grate measurements you wrote down during the sizing step and hold the clearance gap on every side. If your numbers only work with the smaller rectangle, buy the smaller rectangle. It'll bake better than a crowded larger one.
Check two is your appliance. A standard kitchen oven and a full-size gas BBQ both give a rectangular slab room to breathe. A compact kettle or kamado rarely does, and squeezing a rectangle into one costs the airflow that cooks the rim evenly.
Check three is frequency. If you bake several pizzas in a row most weeks, a heavier stone's stored heat earns its longer warm-up. If you bake one pizza on a weeknight, a lighter stone that's ready sooner suits your routine better.
Our pick: The Hans Grill Rectangular Pizza Stone costs $59.99 and is built from durable cordierite, so it holds steady heat through the bake and turns out thin, crispy, golden bases without you turning the pizza halfway through. Every order carries a 1-year official warranty.
Once the stone is chosen, tonight's job is four lines long:
- Write down your rack or grate measurements.
- Confirm the clearance from the sizing check, then pick the largest rectangle that keeps it.
- Run the preheat routine covered earlier, giving the slab its full time at full temperature.
- Keep the first pizza lightly topped and judge the bake by the underside.
Do that, and pizza night stops depending on luck. You get a repeatable, golden base baked on your schedule, in the oven or on the BBQ you already own.
Take the tape measure to your oven tonight, order the size that fits from Hans Grill, and put the first pizza on this week.


