

Neapolitan Pizza Dough Made Simple at Home
You've got flour on the counter, a hot oven preheating, and a dough ball that either feels too tight to stretch or spreads into a sticky puddle. That's the point where most home pizza makers discover that Neapolitan pizza dough isn't just a four-ingredient recipe. It's a relationship between flour strength, water, yeast, fermentation, handling, and the heat your equipment can deliver.
The good news is that you don't need a wood-fired oven to make a soft, airy, thin-crust pizza with a puffy rim. You do need to stop treating the dough as a fixed formula. Start with the AVPN proportions, choose a fermentation schedule you can control, then adjust the bake to suit a stone, steel, home oven, or grill.
Table of Contents
- What Authentic Neapolitan Pizza Dough Really Is
- The Four Ingredients and Their Ratios
- Choosing Your Fermentation Window
- Mixing, Kneading, and Shaping Into Balls
- Opening the Dough by Hand
- Baking in a Home Oven, on a Stone or Steel, and on the Grill
- Troubleshooting the Most Common Dough Problems
What Authentic Neapolitan Pizza Dough Really Is
Authentic Neapolitan dough is built from a small set of ratios and one major decision, how long and at what temperature to ferment it. The traditional formula contains only flour, water, salt, and yeast, with no oil or sugar added. The style was formally codified in 1984, when Antonio Pace and Lello Surace brought leading pizzaioli together to distinguish Vera Pizza Napoletana from other pizza styles, as documented by the Associazione Verace Pizza Napoletana recipe standards.
The AVPN framework specifies Tipo 0 or Tipo 00 flour, water, salt, and brewer's yeast or a natural starter. It also defines dough balls of 200 to 280 grams, producing pizzas approximately 22 to 35 centimeters in diameter, according to the official AVPN disciplinary document. Those details matter because portion size affects how thinly you can open the center while preserving a raised rim.
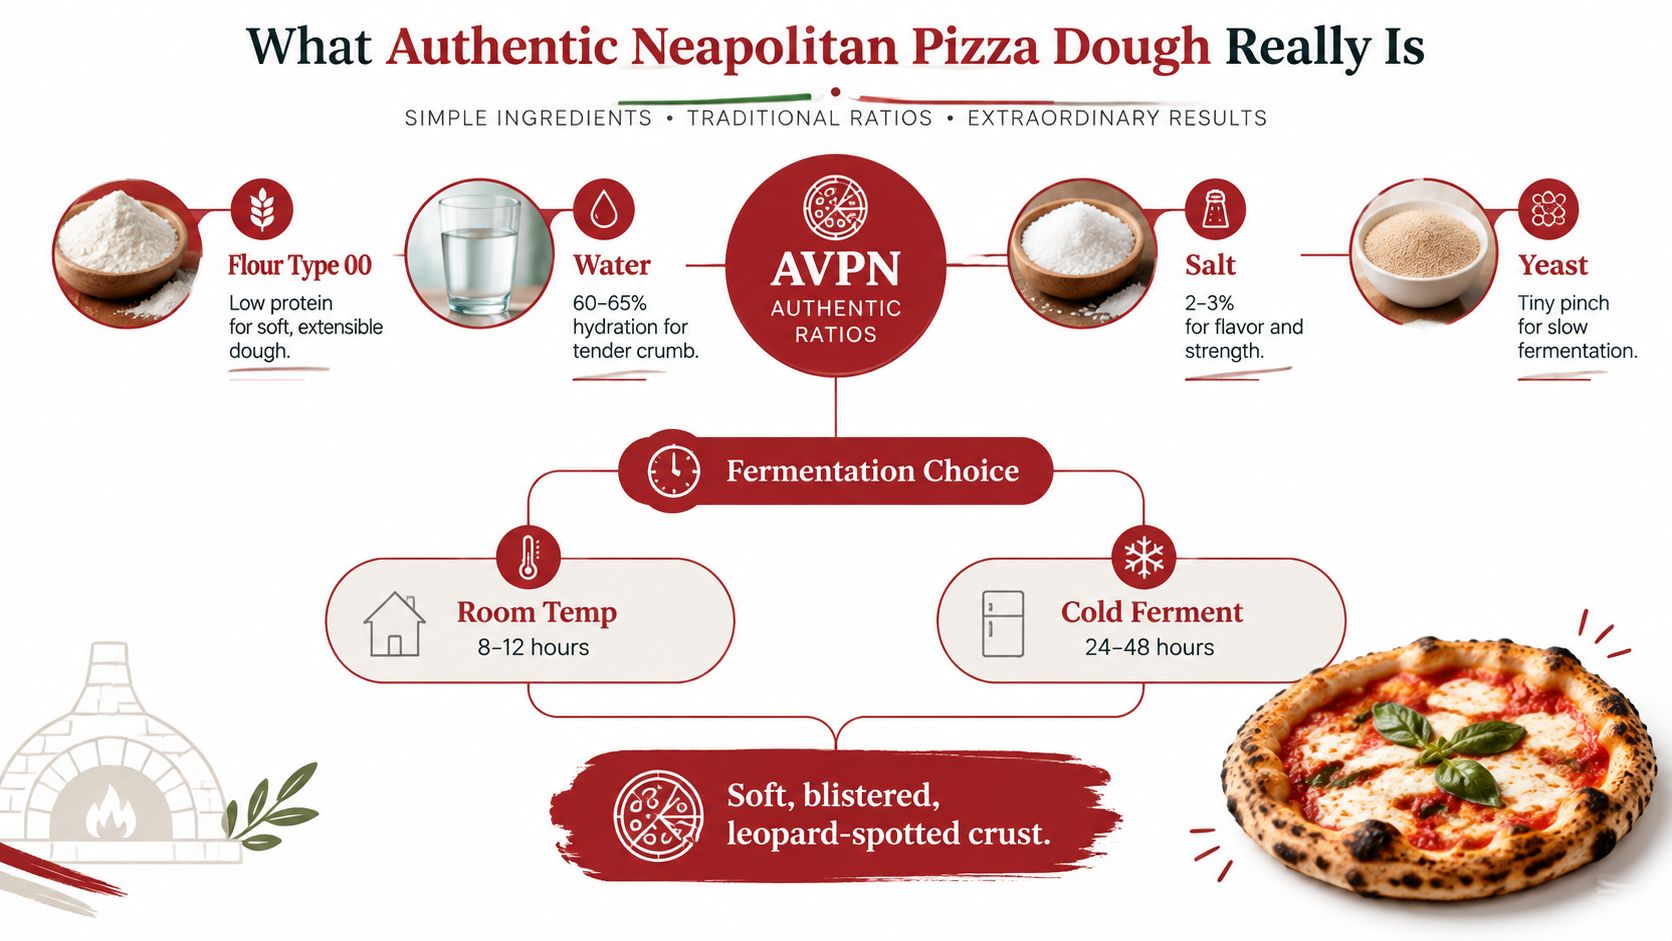
The texture you're aiming for
A good dough ball should open easily without tearing, retain a defined edge, and expand rapidly when it hits intense heat. The finished pizza should have a soft, extensible center, a tender crumb, and a cornicione that puffs around the perimeter. Light blistering and leopard-like spotting are welcome, but they're consequences of heat and fermentation, not proof that the dough followed every traditional rule.
AVPN-style dough generally ferments for 8 to 24 hours at room temperature, with an initial bulk rest of about 2 hours and the remainder as individual balls, according to technical guidance on the Neapolitan disciplinary limits. Traditional baking happens at roughly 430 to 485°C for 60 to 90 seconds, conditions that a normal kitchen oven can't reproduce.
That difference changes the result. At home, the crust may need longer to bake, so the center can dry before the rim develops the same dramatic char. A steel, strong top heat, restrained toppings, and dough warmed properly before shaping will get you much closer than adding more yeast or flour.
You'll learn the practical workflow here: calculate the dough, choose warm or cold fermentation, mix without overworking it, shape the balls, open them by hand, and match the bake to your equipment.
The Four Ingredients and Their Ratios
Use a scale. Measuring flour by cups makes it difficult to distinguish a flour problem from a hydration problem, especially when different Tipo 00 flours absorb water differently.
The AVPN specification gives a narrow range. For every 1 liter of water, it allows approximately 1,600 to 1,800 grams of Tipo 00 or Tipo 0 flour, 40 to 60 grams of salt, and 0.1 to 3 grams of fresh yeast, as stated in the 2024 AVPN regulations. That corresponds roughly to 55 to 62% hydration, depending on the flour and the exact formula.
How to read the formula
Baker's percentages make scaling straightforward:
- Flour is 100%, and it provides the reference point.
- Water controls hydration, extensibility, stickiness, and crumb tenderness.
- Salt adds flavor and strengthens the dough, while also moderating fermentation.
- Yeast drives fermentation, and traditional formulas use very little when the dough has enough time.
A flour's W value indicates its strength and ability to tolerate fermentation. The AVPN range commonly places suitable soft wheat flour around W 250 to 320, according to Neapolitan dough flour guidance. A flour toward the lower end may feel easier at moderate hydration, while a stronger flour can usually absorb more water and retain structure during a longer process.
For a home starting point, choose 60% hydration. It's wet enough to produce a tender crust but manageable while you learn. Move higher only after you can consistently mix, ball, warm, and open the dough without adding excessive bench flour.
Neapolitan dough ratios and scaling
| Ingredient | % of Flour | 4 Balls (1 kg flour) | 6 Balls (1.5 kg flour) | 8 Balls (2 kg flour) |
|---|---|---|---|---|
| Tipo 00 or Tipo 0 flour | 100% | 1,000 g | 1,500 g | 2,000 g |
| Water | 60% | 600 g | 900 g | 1,200 g |
| Fine sea salt | 2.5% | 25 g | 37.5 g | 50 g |
| Fresh yeast | Low quantity, schedule-dependent | Use a measured small amount within AVPN limits | Scale proportionally | Scale proportionally |
| Approximate dough total | Varies by yeast amount | About 1,625 g | About 2,438 g | About 3,250 g |
The table's flour quantities align with four dough balls of roughly 250 grams, six balls of roughly 250 grams, or eight balls of roughly 250 grams. That portion size sits comfortably inside the AVPN range, but the final dough weight changes slightly with the yeast quantity.
For predictable home scheduling, brewer's yeast is simpler than maintaining a natural starter. Keep the ingredient list traditional, but choose the process that you can repeat.
Choosing Your Fermentation Window
Fermentation controls more than rise. It affects stretch, flavor, crumb, and how much resistance you feel when opening each dough ball.
Choose the schedule around your kitchen, not an idealized timetable. Same-day dough works when dinner is already planned. A longer cold process gives flour and yeast more time to develop, but it requires steady refrigerator temperature and enough warm-up time before shaping. AVPN room-temperature fermentation allows 8 to 24 hours total. Many home formulas use 24 to 72 hours in the refrigerator followed by a warm-up period. For a closer look at that approach, read our guide to cold ferment pizza dough.
| Method | Total Time | Temperature | Flavor | Crumb |
|---|---|---|---|---|
| Same-day warm fermentation | 8 to 24 hours within the AVPN room-temperature framework | Room temperature | Mild, fresh, bready | More uniform and potentially tighter |
| Cold fermentation | 24 to 72 hours in many home formulations | Refrigerator temperature | Deeper and more developed | More irregular, relaxed, and open |
| Hybrid process | Bulk rest, then refrigerated balls | Room temperature followed by cold storage | Balanced | Easier handling with developed texture |
A warm ferment suits a straightforward bake without advance planning. The dough may feel less relaxed and produce a more even crumb, which can be useful rather than flawed. It is also a sensible starting point when your flour is unfamiliar or your refrigerator temperature varies.
Cold fermentation takes more planning, yet it often gives the dough a broader handling window after warming. Use a small amount of yeast, cover the containers, and judge the dough by feel instead of obeying the clock. Dough at higher hydration can ferment 10 to 15% faster than dough at 60% hydration at the same temperature, so raising the water level also means adjusting the schedule.
Practical rule: If the dough snaps back or still feels cold and rubbery, it is not ready to open. Let it warm longer rather than forcing it.
Digestibility can also influence the schedule. A 2025 study reported that extended fermentation, especially with lactic acid bacteria sourdough, significantly reduced fructans and FODMAPs in wheat dough, as described in the PubMed study on fermentation and FODMAP reduction. That result does not guarantee that every long-fermented pizza will suit every sensitive eater. Sourdough also brings a different flavor and workflow, so treat the finding as useful context rather than a promise.
For many home kitchens, the hybrid method offers the best compromise. Mix and bulk the dough, divide it into balls, refrigerate them, then warm the balls before dinner. You get a schedule that fits ordinary household planning while retaining the relaxed handling of a longer fermentation. For your first cold-fermented batch, keep the process conservative and change one variable at a time.
Mixing, Kneading, and Shaping Into Balls
The dough should become smooth and elastic without being beaten into submission. Neapolitan dough benefits from gluten development, but aggressive kneading can make it feel tight and resistant when you're ready to shape.
Start by dissolving the salt in most of the water. Add the flour gradually, mixing until no dry patches remain. If you're using a hand method, a short rest before kneading can help the flour hydrate and make the dough easier to work.
Three reliable mixing methods
By hand in a bowl: Mix until shaggy, rest briefly if desired, then knead with folds and presses until the dough feels cohesive and begins to clear the bowl. The practical hand-kneading window is about 8 to 10 minutes, with a smooth surface and enough strength to pass a gentle windowpane check.
Stand mixer: Use a dough hook on low speed for approximately 6 to 8 minutes, stopping if the dough climbs the hook or the bowl becomes warm. You're looking for elasticity, not a perfectly polished commercial dough.
Food processor: Use short pulses rather than a continuous high-speed run. A processing time of approximately 45 to 60 seconds can bring the dough together, but the blade creates heat quickly, so stop as soon as the dough forms a cohesive mass.
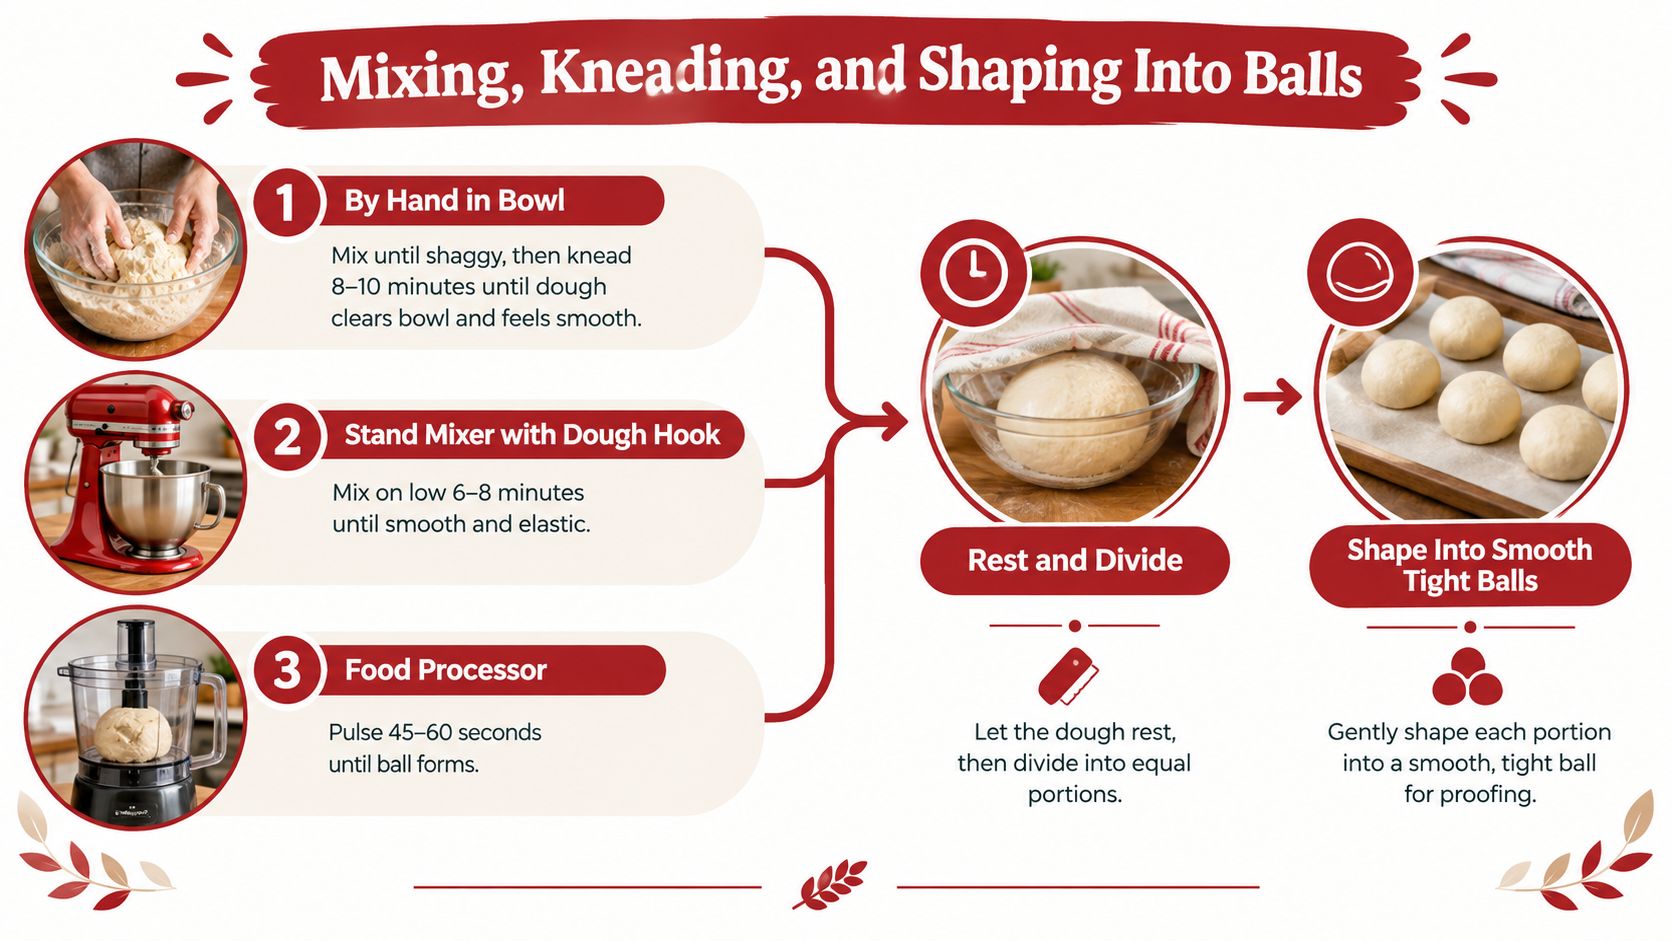
Bulk rest and balling
Place the mixed dough in a covered container. For a warm process, look for a visibly expanded, smooth, puffy mass rather than relying only on time. For a cold process, refrigerate the covered dough or balls according to your chosen schedule, then allow enough time for the dough to relax before opening.
If you're dividing from bulk, turn the dough onto a lightly floured surface and cut portions with a bench scraper. Weigh each piece, then tuck the edges underneath while rotating the dough against the counter to create surface tension. The ball should be smooth on top with a sealed underside.
Don't drown the dough in oil. A lightly oiled container can help prevent sticking, but excess oil changes the surface and makes later handling messy. A straight-sided dough box lets you see whether the dough is expanding and makes release easier. Hans Grill's pizza dough proofing boxes are designed for dividing, balling, and proofing individual portions, but any covered container with enough room can work.
The dough ball should hold its shape while remaining soft enough to relax. If it tears while you're tightening it, stop pulling and let it rest before trying again.
Avoid pressing the gas pedal with yeast when the problem is temperature. A dough that rises too quickly can look impressive in the bowl but lose strength by bake time. Use a covered container, keep the surface from drying, and judge readiness by volume, softness, and elasticity.
Opening the Dough by Hand
Take the dough from the refrigerator early enough for it to lose its chill. A cold ball usually feels tight and springs back, while a properly warmed ball dents slowly under a lightly floured finger and stretches without tearing.
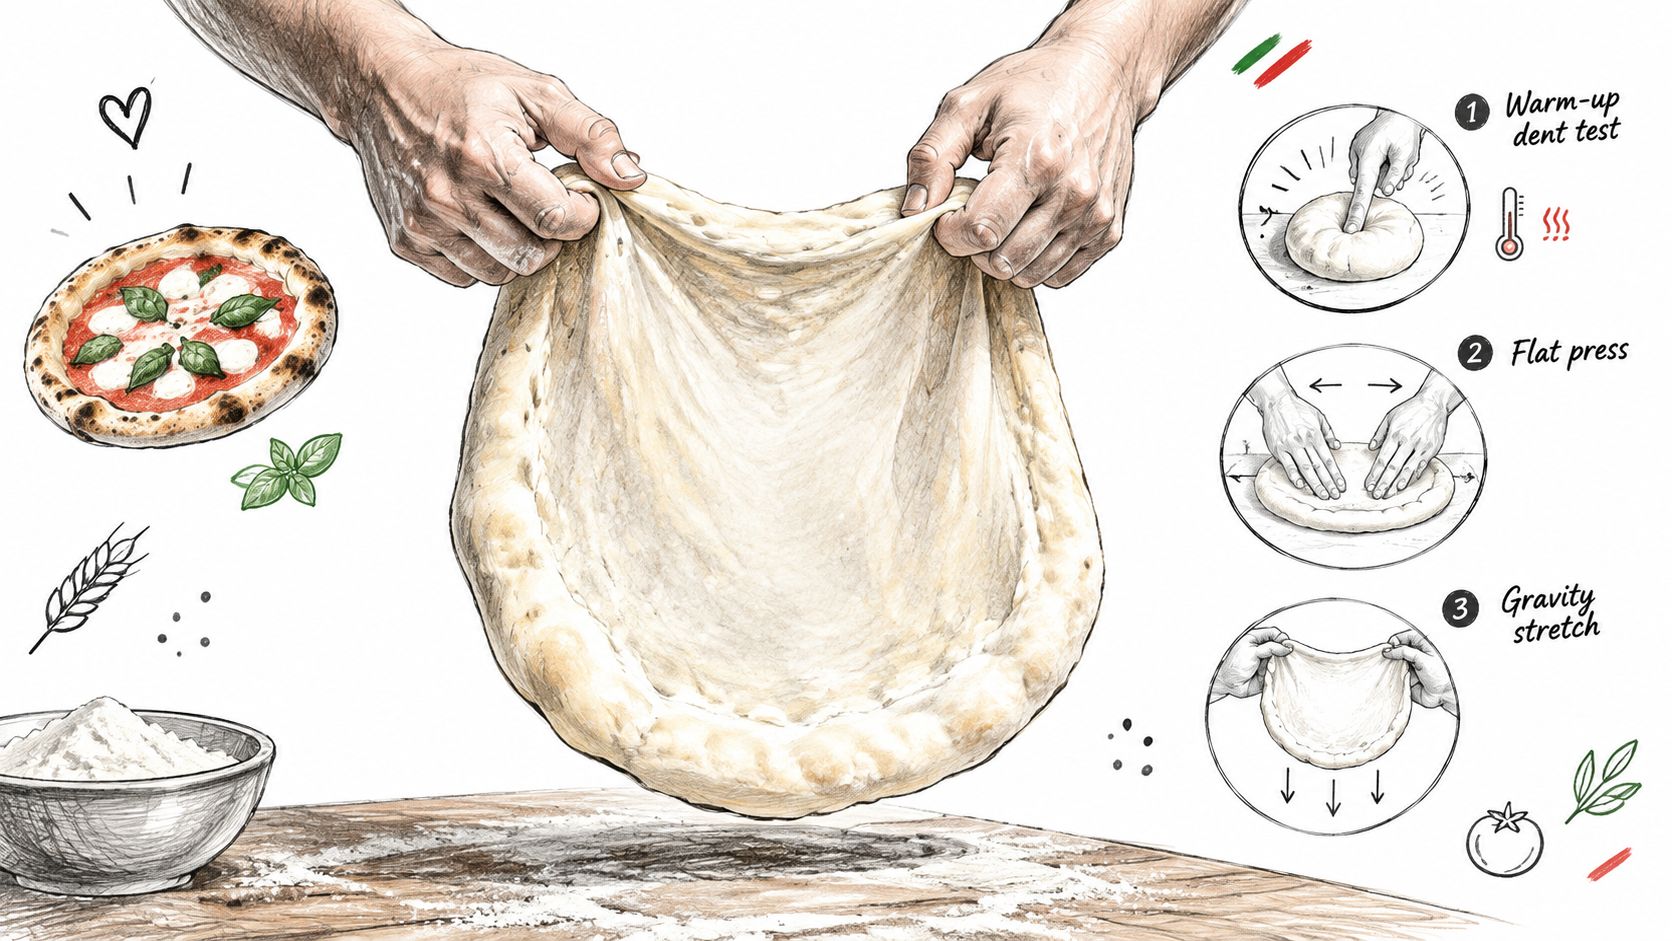
Dust the counter lightly, then turn the ball out with the smooth side facing upward. Use your fingertips to press from the center outward, stopping before you reach the edge. This pushes the gas toward the rim and creates the cornicione instead of flattening it.
Leave approximately 1.5 to 2 centimeters of untouched rim, as described in the practical hand-stretching guidance. The center should become thin while the edge remains visibly thicker and aerated.
The three-part stretch
- Warm the dough. Let it sit covered until it feels relaxed and yields slowly to a finger.
- Press the center. Work outward with flat fingertips, never stabbing through the dough or crushing the perimeter.
- Stretch over your knuckles. Lift the disc onto the backs of both hands and rotate it gently, letting gravity lengthen the center.
The base should become thin enough that you can almost see a hand through it, but it still needs enough strength to carry sauce and cheese. If the dough resists, place it back on the counter and give it a short bench rest. Forcing it usually produces a thick, uneven base or a torn center.
Don't toss the dough until you can control the shape. Tossing too early knocks out the very air you want in the rim. Pressing from the edges produces a flat, dense border, while shaping dough straight from the refrigerator encourages tearing and snapback.
Pause for a quick peel check before topping. If the disc sticks, lift one side and add a very small amount of flour underneath. Too much flour burns on the baking surface and can make the crust taste dry.
A few toppings go a long way with this style. Heavy sauce, wet cheese, and a crowded center slow the bake and can leave the middle soft. Keep the middle light enough that the dough still cooks through.
Baking in a Home Oven, on a Stone or Steel, and on the Grill
Your equipment decides how closely the bake resembles a traditional Neapolitan pizza. A wood-fired oven can deliver the high heat and rapid bake that produce a soft center and dramatic rim. A domestic oven needs help from a preheated surface and strong top heat.
A steel transfers heat aggressively and usually gives the base more immediate color. A cordierite stone provides a gentler bake and can be more forgiving if your dough is delicate, but it may need longer to recharge between pizzas. For either surface, preheat fully rather than trusting the oven's air temperature alone.
Matching the surface to the bake
In a home oven, place a steel high enough to benefit from the broiler while leaving room to launch safely. Preheat at the oven's highest setting for a thorough heat soak, then use the broiler near the end to color the rim. A stone can work well too, but expect a slightly longer bake and less aggressive bottom heat.
On a grill, create a two-zone fire and place the steel over the hotter side for preheating. Use an infrared thermometer to check the cooking surface rather than guessing from the lid thermometer. Launch onto the hot zone, rotate frequently, and move the pizza away from direct heat if the underside races ahead of the top.
| Gear Setup | Preheat Time | Target Surface Temp | Bake Time | Key Tip |
|---|---|---|---|---|
| Home oven with steel | 45 to 60 minutes | 550 to 580°F | 4 to 6 minutes | Use the broiler for the final 60 to 90 seconds |
| Home oven with stone | Thorough full preheat | 500 to 525°F | 5 to 7 minutes | Give the stone time to recover between pizzas |
| Backyard grill with steel | 10 to 15 minutes over coals | 700 to 800°F | 2 to 4 minutes | Rotate every 20 to 30 seconds and manage flare-ups |
These targets come from the practical bake guidance in the brief, while the traditional AVPN bake remains far hotter and shorter. Don't copy a wood-fired timing into a home oven. At lower heat, the crust needs more time, so hydration, topping load, and surface heat must work together.
For a detailed look at using a stone for this style, see the Hans Grill guide to Neapolitan pizza stone baking. The most useful principle is simple: launch on the hottest stable surface, then shift away from direct heat if the bottom darkens before the rim finishes.
A steel can char the base quickly, especially on a grill. If the top remains pale, move the pizza where reflected heat can reach the rim, close the lid, and keep the vents partially restricted without starving the fire. If the base burns, reduce direct exposure rather than lowering the dough quality with extra flour.
Troubleshooting the Most Common Dough Problems
Most failed pizzas are telling you exactly what went wrong. A tough crust, gummy middle, pale rim, or collapsed edge usually reflects a mismatch between fermentation, handling, flour, and heat.
Diagnose the symptom first
| Symptom | Likely Cause | Quick Fix |
|---|---|---|
| Tough, chewy crust | Underdeveloped fermentation or excess flour during shaping | Extend fermentation, use damp hands, and dust the counter sparingly |
| Dense, gummy crumb | Underfermentation or insufficient bottom heat | Give the dough more fermentation time and use a thoroughly heated steel |
| Burnt bottom with pale top | Surface heat is too aggressive or top heat is weak | Raise the rack, reduce direct grill heat, or finish under the broiler |
| Deflated center | Rim was pressed flat or the dough was overworked | Reshape gently, preserve the edge, and allow a proper warm-up |
A tough crust isn't always caused by too little water. If you keep adding hydration but the dough still bakes chewy, inspect the process first. Excess bench flour can dry the surface, and a cold ball can force you to overwork the dough while trying to make it stretch.
A dense center often starts before the oven. Underfermented dough has less internal gas and less extensibility, so it resists opening and stays compact in the bake. A preheated steel helps transfer heat quickly, but it can't replace a dough that has had enough time to develop.
Burning the underside while the top stays pale means the heat is unbalanced. On a home oven, move the surface higher and use the broiler toward the finish. On a grill, shift the pizza away from direct coals and rotate it before a flare-up blackens one section.
A deflated rim usually comes from handling rather than ingredients. Pressing all the way to the edge removes the gas you want to preserve, while repeated reshaping weakens the structure. If the disc snaps back, stop and let it rest instead of stretching harder.
One-bake adjustment: Change only one major variable next time. If the base burned, alter the surface position or fire. If the dough tore, alter the warm-up and handling before changing hydration.
A repeatable workflow
- Mix and rest. Combine the four ingredients, allow the flour to hydrate, and knead only until the dough feels cohesive.
- Bulk ferment. Keep the dough covered and follow either a controlled room-temperature process or a cold schedule.
- Divide and ball. Weigh portions, tighten the surface gently, and seal each ball in a covered container.
- Proof and warm. Bring the balls out with enough lead time for the dough to relax before shaping.
- Stretch and bake. Preserve the rim, top lightly, launch onto the hottest suitable surface, and manage the top and bottom heat separately.
Questions home bakers ask
How do I scale the recipe for four or eight balls?
Use flour as your 100% reference and multiply every ingredient by the same factor. The scaling table above gives a 1-kilogram flour batch for four portions and a 2-kilogram flour batch for eight portions, with water and salt adjusted proportionally.
Can I freeze dough after balling?
You can freeze dough after balling, but freezing changes the fermentation and handling process. Seal each ball well to prevent drying, thaw it gradually in the refrigerator, then allow it to warm and relax before opening. Expect the texture to be less predictable than a freshly refrigerated ball.
How long do cold-fermented balls keep in the fridge?
Many expert home formulations use a 24 to 72 hour cold-fermentation window, with a warm-up before shaping, as described in the fermentation guidance for Neapolitan dough. After that window, judge the dough by smell, surface condition, strength, and whether it still holds a rounded shape rather than relying on time alone.
Tools that solve specific problems
A digital scale accurate to 1 gram keeps hydration, salt, and yeast repeatable. A half-inch pizza steel provides strong bottom heat in a home oven, while a cordierite stone offers a more gradual transfer and can also suit a grill setup.
Use a rimmed sheet pan as a staging surface for shaped dough and toppings, especially if you're still learning to launch. For backyard baking, an infrared thermometer helps distinguish a properly heated deck from a grill that feels hot only at the lid.
Finally, choose a covered dough container with straight walls. It makes release easier and lets you see expansion without disturbing the balls. Keep the equipment matched to the problem, because better tools won't rescue dough that's cold, overfermented, or overloaded with toppings.
Hans Grill offers pizza stones, pizza steels, and dough proofing boxes suited to home ovens and backyard grills, including equipment for managing the surface heat and ball-proofing stages covered here. Visit Hans Grill to compare the available baking surfaces and proofing tools, then choose the setup that matches your oven, grill, and fermentation routine.


