

Pizza Stone for Weber Gas Grill: The Complete Guide
You've got the Weber hot, the dough stretched, and the toppings ready. The first pizza slides onto the stone, then the familiar disappointment arrives: a dark, almost burnt underside while the cheese is still pale and the crust edge hasn't properly lifted. A pizza stone for Weber gas grill cooking can produce crisp, well-browned pizza, but it doesn't behave like a stone in an indoor oven.
Gas grills need deliberate heat management. The burners heat the grates and air, the lid provides limited reflected heat, and the stone must store enough energy to cook the base before the top falls behind. The practical target for thin-crust pizza is a stone surface around 500–550°F, with a thorough heat soak before the first launch, as described in independent grilling guidance from BBQGuys. Once the setup is right, a thin pie can cook in about 3–5 minutes, while thicker dough needs longer.
Table of Contents
- Why a Weber Gas Grill Needs a Different Approach
- Matching the Stone to Your Weber Setup
- The Cold-Start Preheat That Actually Works
- Reading Temperature the Right Way
- Managing Hotspots and Burner Layout
- Avoiding Thermal Shock and Choosing the Right Material
- Your Repeatable Pizza-Night Routine
Why a Weber Gas Grill Needs a Different Approach
The first Weber-grill pizza can look ready from above while the underside is already burnt. Bubbling toppings and a browned rim do not prove the stone is ready. Uneven heating, repeated lid opening, or launching before the stone has absorbed enough energy can ruin the base before the top catches up.
A kitchen oven surrounds the pizza with heat. A gas grill delivers much of its heat from below, and the lid must reflect enough energy back onto the toppings and crust. That imbalance explains the familiar result: a scorched base with pale cheese, or a hot grill interior sitting above a stone that is still too cool.
A stone works as a thermal reservoir. It stores burner heat and transfers it directly into the dough, supporting bottom browning and a better rise at launch. The stone's stored energy matters more than a high reading on the Weber lid gauge alone.
Practical rule: Heat the stone as seriously as an oven. The grill thermometer shows air temperature, not the complete cooking surface.
Independent grilling guides place lower-temperature stone baking in the 350–425°F range, where pizza may take 10–12 minutes, as outlined in BBQGuys' pizza grilling guidance. Hotter stone baking around 500–550°F shortens the bake considerably, but demands better timing and burner control. A hot stone can produce a crisper thin crust, yet it exposes rushed preheating, heavy toppings, and poor burner placement quickly.
Weber's cold-start instructions provide a controlled baseline, with the grill and stone warming together rather than placing a cold stone over an already blazing burner. Backyard cooks often preheat more aggressively to shorten the wait. The right choice depends on the Weber model, grate system, stone position, and burner layout. For a practical comparison of gas-grill pizza setups, use this guide to pizza on a gas grill.
Matching the Stone to Your Weber Setup
Before choosing a stone, identify how the cooking grate supports accessories. Weber grills don't all present the same surface, and a stone that fits one grate system can sit awkwardly, block heat, or fail to sit securely on another.
Start with the grate system
Standard rod grates, common on Spirit models and older Genesis grills, usually suit a standalone round or rectangular stone that sits directly on the cooking grate. Leave enough room around the stone for heat to circulate and make sure the lid closes without touching the accessory.
GBS-compatible Genesis II grills use a slotted center frame. A compatible insert can sit neatly in that opening and place the stone in a stable position within the grill's hotter working area. This arrangement is convenient, but the stone still needs gradual heating and sensible burner control.
CRAFTED Genesis Smart grills use a frame-and-rail system. Choose a stone specifically sized for that platform rather than assuming a GBS accessory will fit. Weber continues to offer different stone formats for different grill systems, so compatibility remains a buying decision, not a detail to check after delivery.
| Weber Grate System | Typical Models | Recommended Stone Shape | Suggested Size |
|---|---|---|---|
| Standard rod grates | Spirit, older Genesis | Round for easy turning, rectangular for more working area | Fit the grate and lid clearance first |
| GBS frame | Genesis II and compatible models | GBS-compatible round insert or supported rectangular stone | Match the opening and usable cooking area |
| CRAFTED rails | Genesis Smart models | CRAFTED-compatible stone | Match the frame and rail dimensions |
| Q-style compact grate | Weber Q models | Compact round stone | Choose the largest size that leaves airflow and lid clearance |
A round stone is easier to rotate and forgiving when launching a smaller pie. A rectangular stone gives more usable surface and can better suit a long peel, but it demands closer attention to grate width and lid clearance. For many full-size Weber grills, a 14–16 inch format is a practical starting point, provided the exact model can accommodate it.
Check the material and footprint
Look for cordierite and meaningful thickness rather than a very thin ceramic tile. A thicker stone takes longer to heat, but it holds heat more steadily between launches. Thin, porous terra-cotta-style products are a poor match for repeated grill use because they can heat unevenly and offer less thermal mass.
Before checkout, measure the grate opening, the distance between the grates and lid, and the position of the burners. Then compare those measurements with the stone's published dimensions and your Weber accessory system. Compatibility is more important than an extra inch of baking area.
The Cold-Start Preheat That Actually Works
Weber's official approach removes the most common thermal-shock mistake: place the stone on a cold grate, then heat the grill and stone together. The Weber pizza stone instructions also warn against using the sear burner with the stone in place on gas models.
Use this sequence
- Set the stone on the cold grate. Make sure it sits level, with the lid able to close completely. Keep all burners off while you position it.
- Light the main burners. Bring the grill up steadily rather than placing a cold stone over an already blazing surface.
- Close the lid and let the system heat together. Weber guidance supports at least 15 minutes of stone preheating, while its broader pizza material and independent grilling guides point to longer heat-soak periods when the stone needs to reach a hotter working surface. For reliable thin-crust baking, allow roughly 20–30 minutes minimum, and expect a thicker stone to need more time. The independent benchmark for more dependable results is often 30–60 minutes. See the practical workflow in this pizza stone preheat guide.
- Keep the sear burner off. Don't put a stone directly over an intense infrared or sear-burner output. That concentrated heat can create a severe temperature gradient, scorching the bottom or stressing the stone.
- Verify the surface. Aim an infrared thermometer at the bare center of the stone. For thin-crust pizza, look for a stable reading around 500–550°F, consistent with the independent grilling benchmarks cited earlier.
The lid thermometer tells you about the air near the lid, not the stored energy in the stone. A grill can report a promising air temperature while the stone remains too cool to brown the base. Launching at that point produces a soft underside, sticking, and a pale top because the grill hasn't reached thermal equilibrium.
Keep the lid closed during the soak. Every opening releases the hot air that must cook the toppings and slows recovery after launch. If you're baking several pies, check the stone again before each one rather than relying on the elapsed time alone.
Reading Temperature the Right Way
A Weber lid thermometer shows the grill's general heat, not the temperature of the pizza's cooking surface. Wind, burner position, stone thickness, and the length of the closed-lid preheat can leave the stone substantially cooler or hotter than the air near the lid.
An infrared thermometer gives the more useful reading. Open the lid briefly and scan a bare section of stone, checking the center and several points near the edge. Avoid the dough, sauce, and cheese. Food surfaces can give misleading readings, while a probe placed against the rim may measure a cooler spot outside the main baking area.
Stone thickness changes how quickly the surface catches up with the lid gauge. A thin stone responds faster, but its surface temperature can swing sharply when a cold pizza lands. A thicker stone may show a slower rise and a larger gap between the lid reading and the baking surface during preheat, then hold its heat more steadily between pies. Give the reading time to settle instead of reacting to one quick scan.
For a thin crust, aim for roughly 500–550°F on the stone, with a pie taking about 3–5 minutes. Lower temperatures suit thicker dough, but the bake becomes slower and the crust and toppings develop differently. The practical gas-grill method is outlined in BBQGuys' gas-grill pizza guidance.
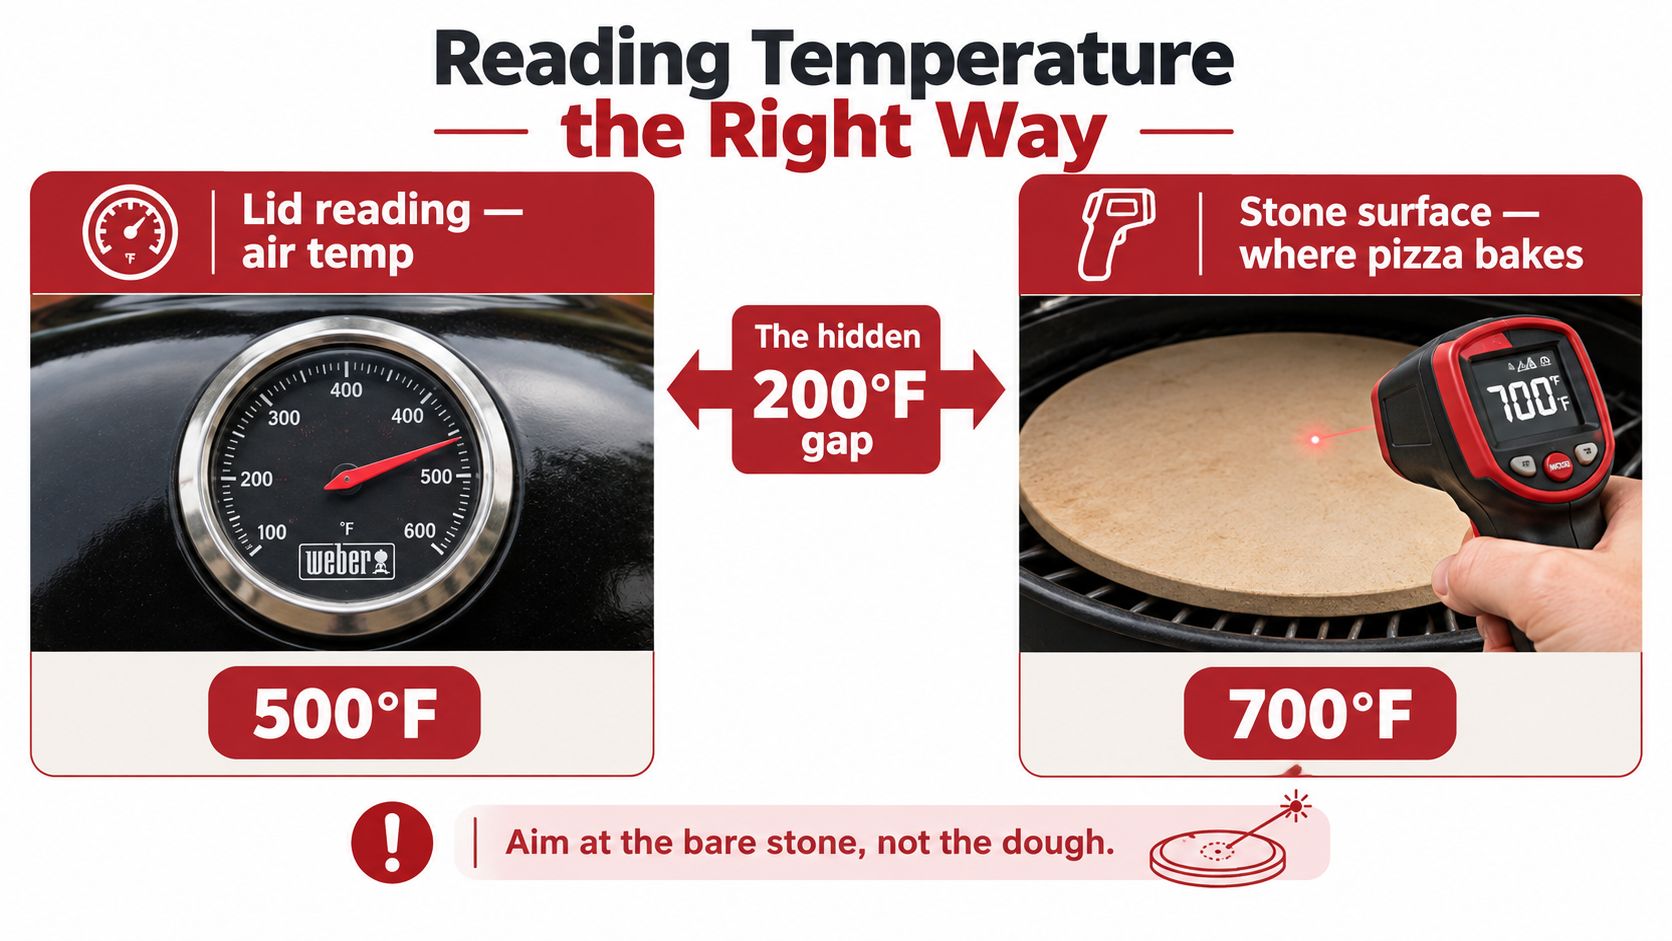
Check for an even baking surface
Scan across the stone rather than trusting one measurement. If the center is ready but an edge remains cooler, wait longer or adjust the burner setting before launching. Wind can chill one side, while a stone over a single burner can develop a narrow hot strip.
Spirit, Genesis, and Q grills use different grate sizes and burner layouts, so their lid gauges will not translate perfectly. Use the gauge as a rough reference, trust the stone reading, then verify with the pizza. The base should release cleanly, the rim should color, and the toppings should finish before the underside tastes bitter.
Managing Hotspots and Burner Layout
Burner layout decides whether your stone behaves like an even baking deck or a hot plate. The simplest reliable approach is to avoid placing the stone directly over the strongest concentrated flame and to create enough indirect space for the pizza to finish without burning underneath.
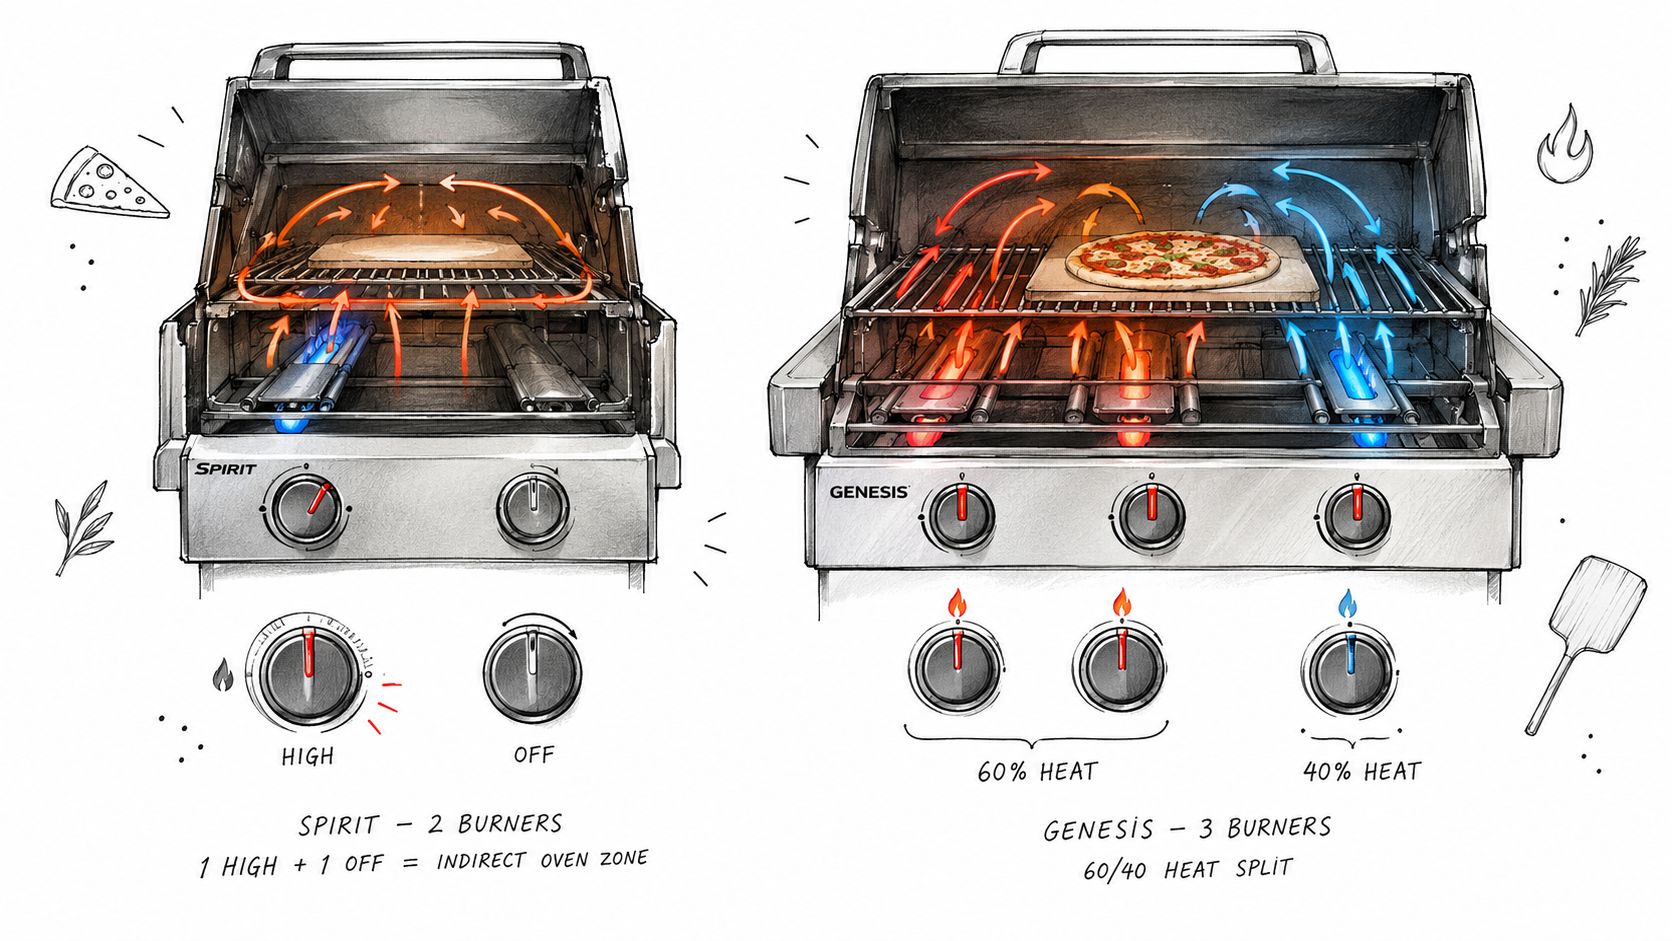
On a two-burner Spirit, start with both burners heating the grill during the stone soak. Once the stone is hot, use a balanced setup with both burners at a moderate setting, or reduce the burner under the hottest part of the stone while keeping the opposite side active. The aim is to preserve lid heat without feeding one narrow hotspot.
A three-burner Genesis gives you more control. Try heating the outer zones while leaving the center burner off or low, then place the stone so it receives indirect support rather than a direct blast from one burner. This keeps the stone hot while creating a gentler area for the pie's underside.
Keep the lid shut: Opening the grill repeatedly costs more useful top heat than a small adjustment in burner temperature.
Rotate with purpose
Launch toward the cooler side of the stone if you know one area runs hotter. After the base sets, rotate the pizza by 90 degrees every 90 seconds so the rim and underside move through the uneven zones. Finish it over the warmer area only when the bottom has enough color and the top needs help.
Avoid the sear station when the stone is installed. Weber specifically warns against using that burner with the stone in place, and the concentrated infrared output can create a severe hotspot close to the stone. Wind also matters. If one side of the grill faces the wind, position the cooler side there and keep the lid closed between checks.
This short demonstration is useful for seeing how stone placement and grill heat interact:
Avoiding Thermal Shock and Choosing the Right Material
Pizza stones don't usually fail because they were moved from a cold grill into a hot one when the stone was designed for that use and heated sensibly. The more common causes are trapped moisture, abrupt uneven heating, dropping the stone, or placing it where one burner creates an intense concentrated hotspot.
The practical response is still conservative. Start with the stone cold, avoid sudden temperature changes, and let it cool completely before moving it. Cordierite is widely preferred for grill work because it handles repeated heating more reliably than ordinary ceramic, but no stone is immune to impact or moisture damage.
| Material | Max Heat Tolerance | Thermal Shock Resistance | Best Weber Use Case |
|---|---|---|---|
| Cordierite | High grill-baking tolerance | Stronger choice for repeated heating cycles | Regular gas-grill pizza and gradual preheating |
| Ceramic | Suitable for controlled baking | More vulnerable to abrupt temperature changes | Careful indoor or moderate grill use |
| Marble | Not the first choice for direct high-heat pizza baking | Less suited to rapid thermal cycling | Occasional decorative or low-heat use |
| Pizza steel | Handles high heat and recovers quickly | Not a porous stone material | Fast recovery when a crisp base is the priority |
Steel transfers heat aggressively and recovers quickly after a pizza leaves the grill. It doesn't absorb moisture like a stone, so it creates a different crust texture and can brown the base faster than expected. Cordierite is a more forgiving option when you want stored heat and a traditional stone-baked bottom.
Follow a few essential care rules:
- Keep it dry: Don't soak a pizza stone. If it needs cleaning, use minimal water and dry it thoroughly.
- Avoid impact: A fall onto concrete can damage a stone even when its thermal performance is excellent.
- Heat gradually: Put the stone on the cold grate, then light the grill.
- Don't freeze the dough on the surface: Frozen dough creates a severe temperature change and can also cool the baking deck abruptly.
- Cool it in place: Leave the stone inside the closed grill until it has returned to room temperature.
For a Weber gas setup, a properly sized cordierite option such as a Hans Grill pizza stone fits the use case when the dimensions and grate system match your model. The material choice matters, but correct fit and patient preheating matter just as much.
Your Repeatable Pizza-Night Routine
A good pizza night shouldn't depend on guessing. Tape this routine inside the grill cabinet and adjust only after you understand how your particular Weber heats.
Start before the dough is ready
At T-60 minutes, put the stone on the cold cooking grate and begin the grill preheat with the main burners active. Keep the lid closed. The stone needs time to absorb heat, and a short warm-up creates the exact soft-bottom problem that makes many first attempts disappointing.
At T-45 minutes, take an infrared reading from the bare stone. The independent working range for thin-crust pizza is around 500–550°F, while Weber's general grill guidance for this method places the grill itself in the 350–450°F range. Those are different measurements, so don't treat the lid gauge as a substitute for the stone reading.
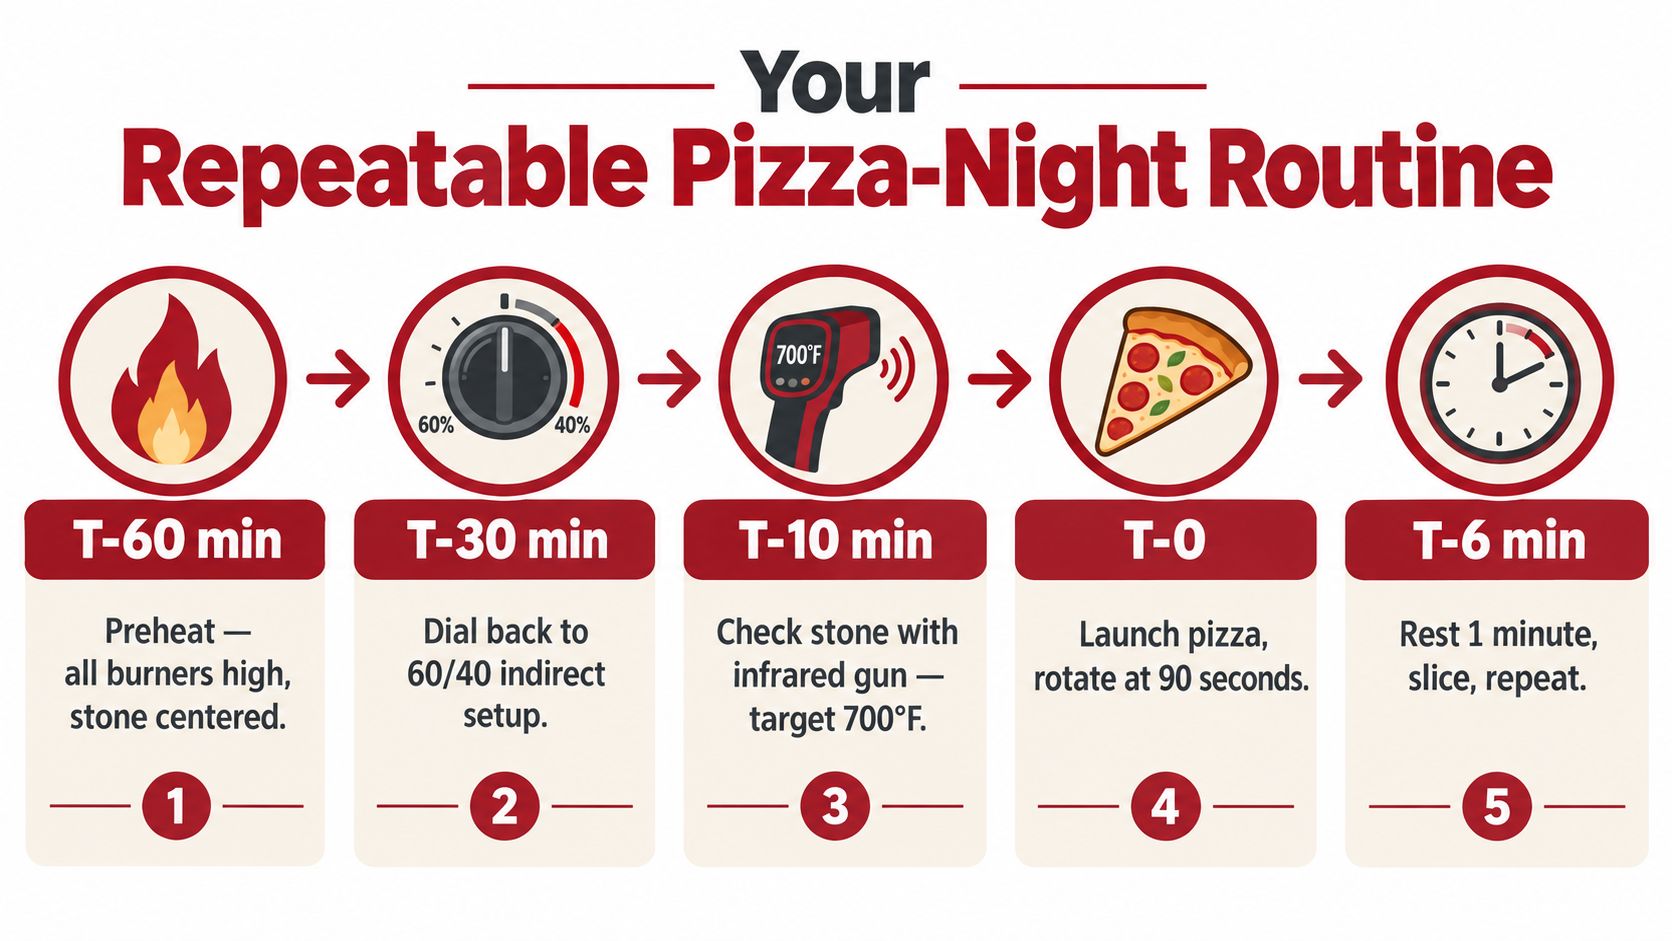
At T-30 minutes, move to your cooking layout. On a three-burner grill, keep the outer zones active and the center lower or off when that arrangement suits the stone position. On a two-burner grill, balance the heat rather than feeding one side at full power. Keep the sear burner off with the stone installed.
At T-15 minutes, stretch and top the pizzas. Keep the toppings restrained enough that the crust can bake through before the cheese overcooks. A metal peel dusted lightly with flour or another suitable release aid gives you a better launch than trying to lift a fully topped pie from a board at the last moment.
Launch, rotate, and judge the base
At T-0, launch onto the cooler half of the stone. Close the lid immediately. Rotate the pie by 90 degrees every 90 seconds, then move it toward the warmer area for the final finish if the top needs more color.
Thin-crust pies often take about 3–5 minutes in the hotter stone range, while New York-style guidance commonly places baking near 5–7 minutes when the stone is around 480–580°F, as summarized in independent pizza-stone testing guidance. Use those ranges as operating references, not a replacement for watching the crust. Pull the pizza when the rim has blistered, the toppings are set, and the bottom releases cleanly.
Reset safely for the next pie
After removing the pizza, close the lid and let the stone recover. Check the surface again before launching the next pie, especially if the first launch was large or heavily topped. A stone can show uneven recovery even when the grill air feels hot.
Remember three rules:
- Never move a hot stone. Let the grill cool with the stone in place.
- Keep the lid closed whenever possible. Top heat disappears quickly during repeated checks.
- Measure before each launch. The stone surface, not the lid dial, decides whether the next pizza is ready to bake.
A Weber gas grill can produce excellent pizza, but it rewards a repeatable process rather than improvisation. Match the stone to the grate, heat it gradually, verify the surface, manage the burners, and let the first pie teach you where your grill's hot and cool zones really are.
For a stone and pizza tools suited to backyard grilling, visit Hans Grill to compare cordierite stones, pizza steels, and dough-prep equipment. Choose the format that fits your Weber, then use the cold-start and surface-temperature routine above to make your next pizza night more consistent.


