

Pizza Stone Seasoning: What Actually Works in 2026
The most repeated advice about pizza stone seasoning is also the advice I'd ignore first: wipe the stone with oil, bake it in, and treat it like cast iron. That shortcut has cost me smoke-filled kitchens, gummy patches, and more than one ruined baking surface. A cordierite or ceramic pizza stone isn't a skillet, and it doesn't need a cast-iron ritual to bake crisp pizza.
Modern guidance is split. An independent barbecue reference describes oil conditioning for certain pale tan cordierite stones, including a process where the stone absorbs several ounces of oil before baking at about 350°F for 20 to 30 minutes, with the cycle repeated for deeper seasoning. AmazingRibs' pizza-stone conditioning guide treats that approach as a maintenance technique for porous stones, not a universal rule. More recent cooking and BBQ guidance says most pizza stones should remain dry, and some manufacturers explicitly warn against oiling them. Pizza Oven HQ's material-specific seasoning guidance reflects that newer position.
My recommendation is simple. Skip oil on cordierite and ceramic, prep them dry, and let normal baking darken the surface. Reserve deliberate seasoning for bare cast iron, where polymerized oil belongs.
Table of Contents
- Should You Season a Pizza Stone at All
- Cordierite vs Ceramic vs Cast Iron Stones
- Prepping a Brand New Pizza Stone the Right Way
- Safe Step by Step Pizza Stone Seasoning Method
- Cooking Habits That Beat Any Seasoning
- Troubleshooting Common Pizza Stone Problems
- Pizza Steel Alternatives and Final Takeaways
Should You Season a Pizza Stone at All
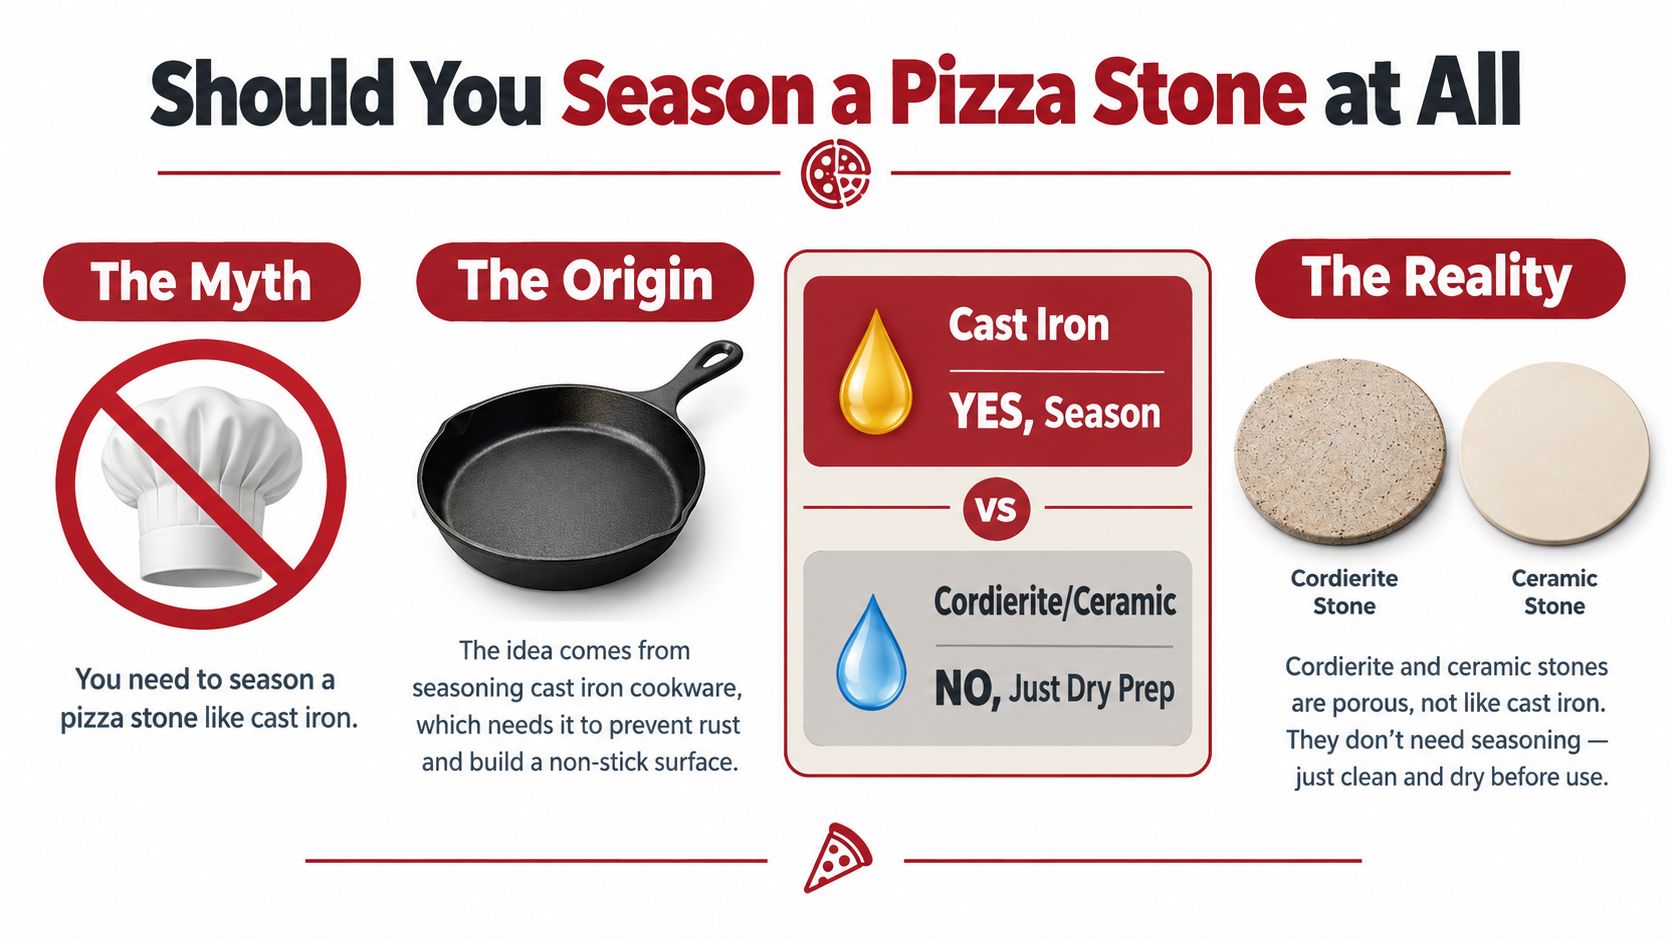
Seasoning means building a film of oil that bonds to a cooking surface under heat. That logic makes sense for cast iron, where the oil forms a protective, slick layer on metal. It doesn't automatically transfer to a porous stone whose job is to pull moisture away from dough.
Pizza stones are designed to work raw. Their pores help absorb moisture from the dough, which supports a dry, crisp base. Add oil to those pores and you may clog the very surface you bought the stone to use. The Pizza Heaven's explanation of why pizza stones generally don't need seasoning makes the material distinction clearly: a stone isn't a rust-prone iron pan, so cast-iron maintenance shouldn't be copied without question.
What people actually want from seasoning
Most cooks aren't chasing “seasoning” as a tradition. They want three practical outcomes:
- Easier release: A fully heated stone and a fast launch prevent dough from sitting long enough to weld itself to the surface.
- Better color: Strong bottom heat and controlled dough moisture produce browned crust more reliably than an oil film.
- Consistent baking: Correct preheating gives the stone the stored heat needed to set the base quickly.
Oil can also create the problems people were trying to solve. It may pool inside pores, smoke during a hot bake, leave an acrid smell, or create a sticky residue that attracts burnt flour and cheese. A thick or uneven layer is especially unhelpful on a porous material because the stone absorbs it rather than holding it neatly on top.
My rule: If the surface is cordierite or ceramic, keep it dry. If it's bare cast iron, season it according to cast-iron practice.
For thin-crust pizza, dry preparation is the clear choice. For deep-dish or oily toppings, oil on the stone is even less sensible because drips already provide plenty of residue. Occasional bakers should focus on a clean launch and full preheat. Daily bakers can let the stone develop its natural darkening through use. That change is normal, not a maintenance failure.
Cordierite vs Ceramic vs Cast Iron Stones
Material decides the seasoning verdict. Don't trust a generic instruction sheet until you know what your “stone” is made from. Cordierite, ceramic, and cast iron behave differently under heat, moisture, and oil.
| Property | Cordierite | Ceramic | Cast Iron |
|---|---|---|---|
| Surface behavior | Porous and moisture-absorbing | Dense, often smoother, with pores that can trap residue | Metal surface that accepts polymerized oil |
| Heat behavior | Handles high pizza-baking heat well when heated gradually | Requires more careful thermal changes | Holds substantial heat and responds well to controlled preheating |
| Oil risk | Can absorb oil and develop smoky or gummy buildup | Oil can collect unevenly and increase cleaning difficulty | Thin oil coats can form a useful protective layer |
| Daily care | Dry scrape and brush | Gentle handling and dry maintenance | Maintain the seasoning like cookware |
| Seasoning verdict | Skip | Skip | Appropriate when bare |
Cordierite is the core case against internet copy-and-paste advice. It's porous enough to help crisp dough, yet it isn't asking for a skillet-style oil coating. Oil may soak in unevenly and burn when the stone reaches pizza temperatures. Ceramic deserves even more restraint because sudden temperature changes can be less forgiving, and trapped residue is difficult to remove without aggressive cleaning.
Cast iron is the outlier. It's metal, it holds heat differently, and a bare surface can benefit from a thin, polymerized oil layer. That doesn't make every steel or metal baking surface identical, but it does explain why cast-iron seasoning instructions exist while cordierite seasoning instructions are disputed.
For a deeper material comparison, see this guide to the best pizza stone material. Then check the manufacturer's care instructions. They override generic advice, especially if the product is a ceramic blend, glazed surface, or specialty baking plate.
The practical buying and care decision
Choose cordierite if you want a porous surface for regular oven or grill baking and you're willing to handle it gently. Choose ceramic when weight, surface feel, or a particular design matters, but accept that careful heating is part of ownership. Choose cast iron when you want metal heat retention and are comfortable maintaining a seasoned cooking surface.
The most important contrast is cordierite versus cast iron. One should normally stay dry. The other can be deliberately conditioned with a very thin oil film. Confusing those rules is how a useful stone becomes smoky, sticky, and unpleasant.
Prepping a Brand New Pizza Stone the Right Way
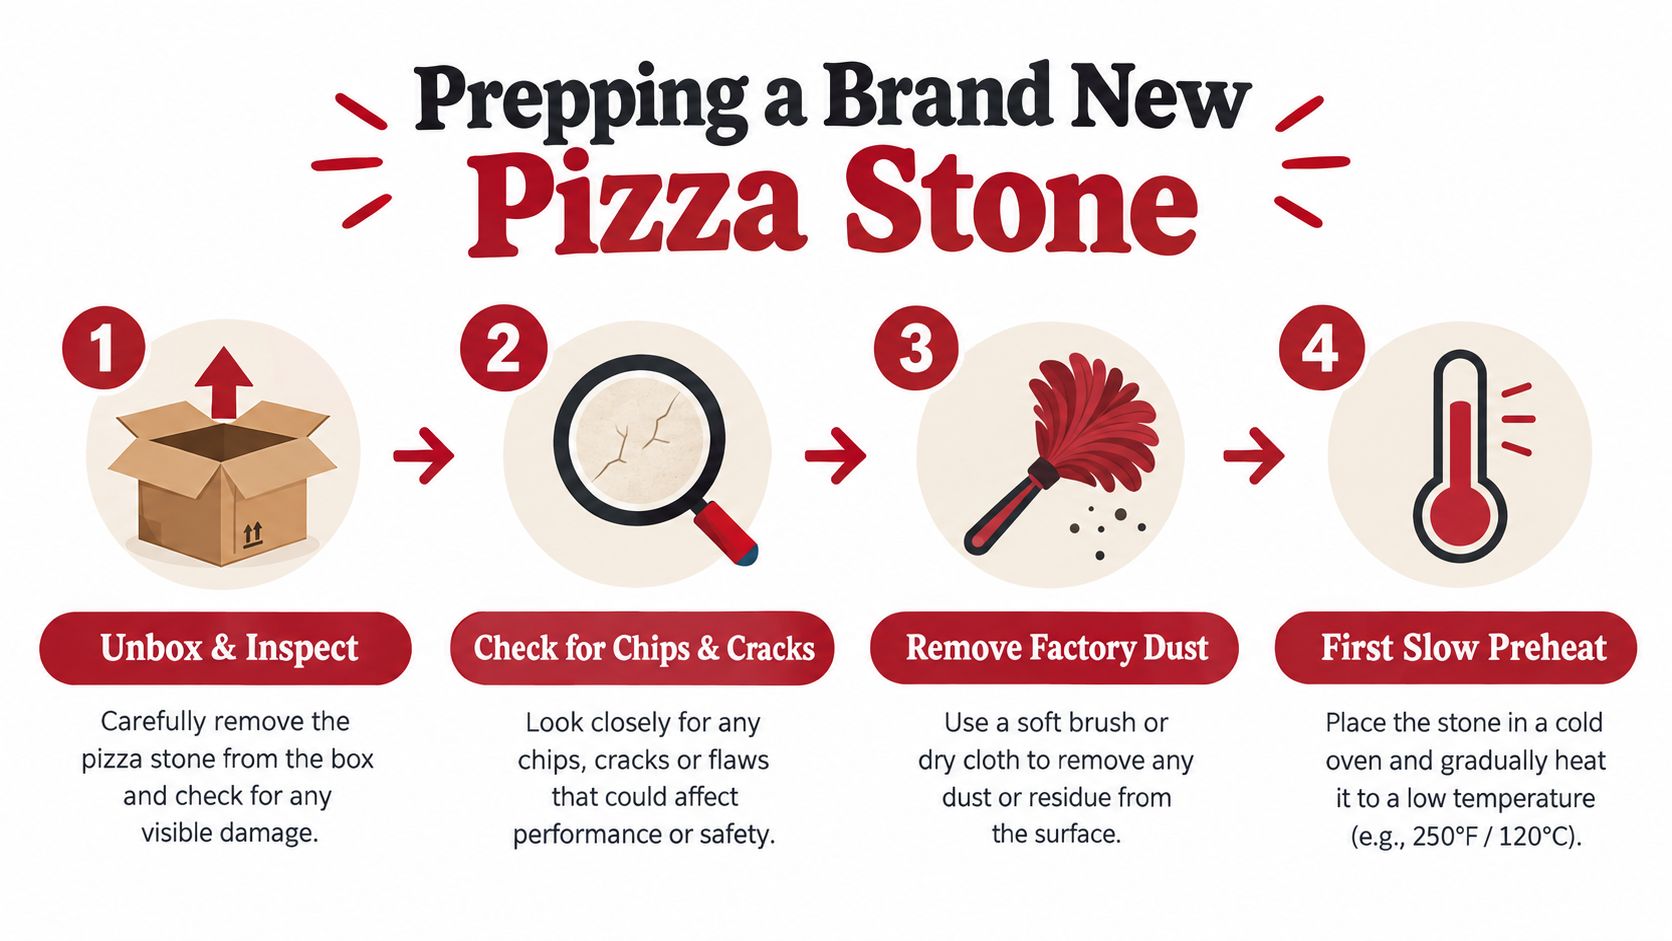
A new cordierite or ceramic stone doesn't need an oily welcome ceremony. It needs inspection, minimal cleaning, complete drying, and a controlled first heat cycle.
Start by removing all packaging and checking the entire surface. Look along the edges, corners, and underside for shipping cracks, chips, or a hairline fracture. A small cosmetic mark isn't automatically a problem, but a crack that runs across the baking area deserves attention before you put the stone under heat.
Remove dust without contaminating the pores
Manufacturing and packaging can leave a chalky residue on cordierite. Use plain warm water and a stiff brush to remove loose dust if the manufacturer permits a rinse. Do not use soap, detergent, oil, or flavored cleaning products. A porous stone can retain what you put into it.
Let the stone air-dry completely. If you're in a hurry, use a low oven only after the surface has dried thoroughly, and follow the manufacturer's instructions. The critical point is that no hidden moisture should remain inside the stone when the first high-heat cycle begins.
Use a calm first bake
Place the fully dry stone on a rack in a cold oven. Set the oven to 500°F, allowing it to ramp gradually over roughly 40 minutes, then hold the stone at that temperature for 30 minutes before switching the oven off. Leave the stone inside until it cools.
This first cycle helps the stone adjust to the oven environment and confirms that your setup is stable before you add dough. Don't place a cold stone into an already hot oven, and don't carry a hot stone onto a cold counter.
The exception is a bare cast-iron pizza pan or stone. That surface can follow a cast-iron seasoning process. For specific handling and preheating reminders, keep the pizza stone instructions beside your setup.
Before the first pizza, confirm:
- Fully dry: No dampness, cool moisture, or recently rinsed surface.
- Fully heated: The stone has completed its preheat, not merely reached the oven's air temperature.
- Clean launch path: Your peel, dough, and toppings are ready before the pizza touches the stone.
Safe Step by Step Pizza Stone Seasoning Method
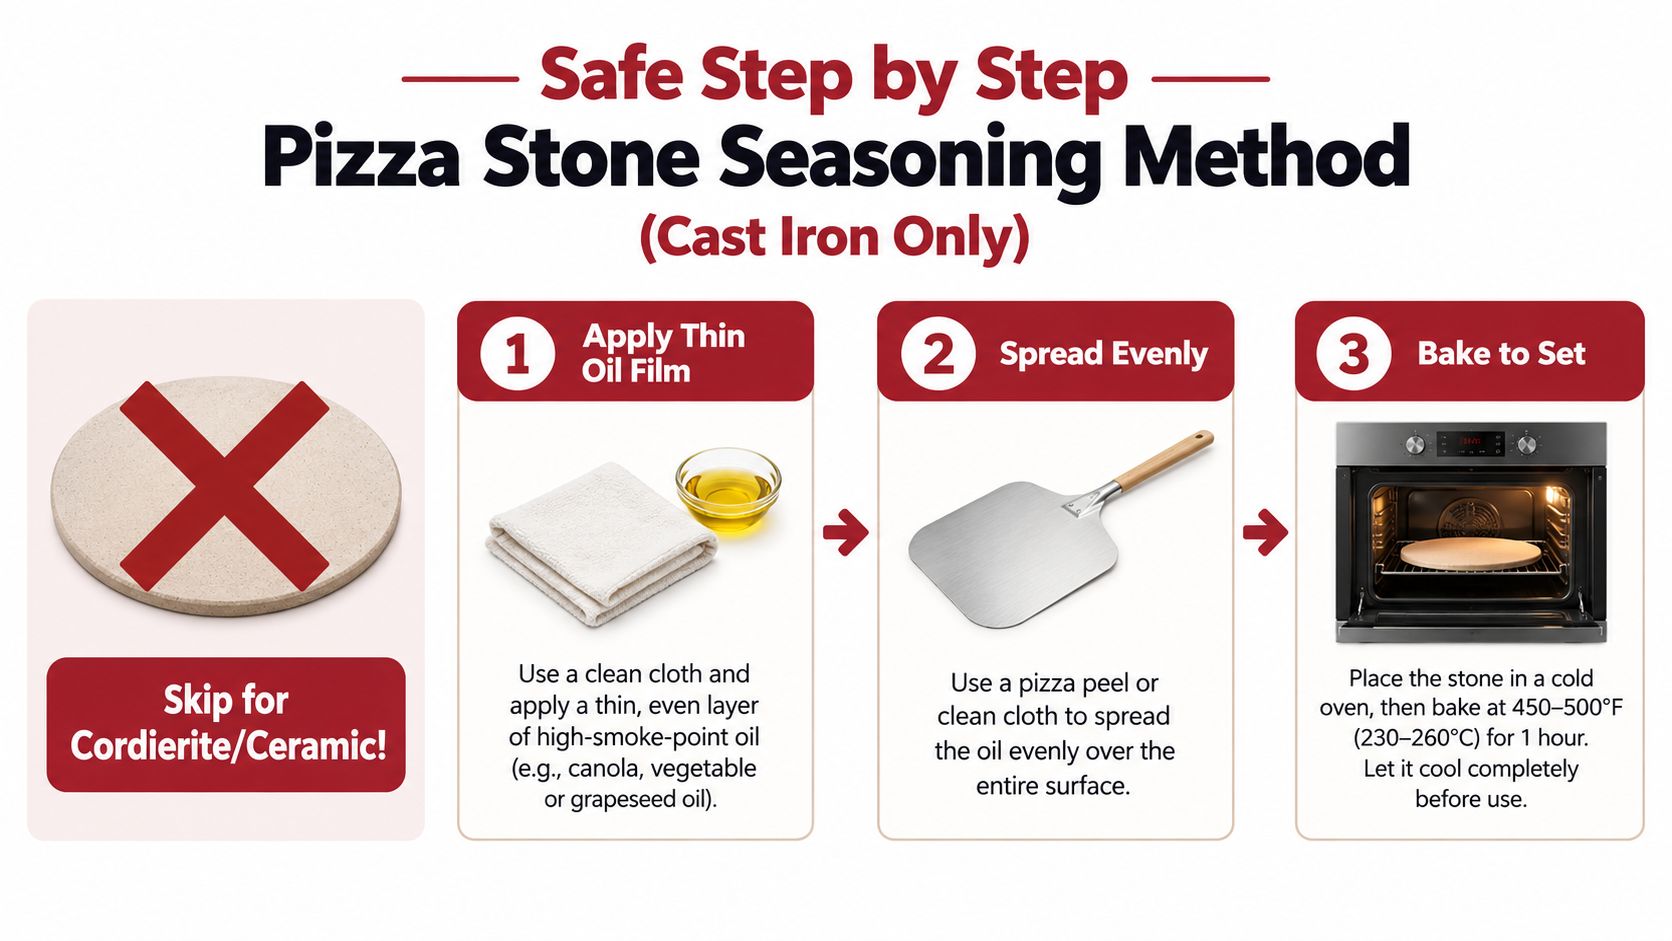
If you own a cordierite or ceramic stone, skip this section. Don't apply oil, don't build layers, and don't try to correct sticking with a cast-iron method. Use the dry routine above and improve your dough launch.
This method is for bare cast iron only. It follows the same basic principle as seasoning a cast-iron pan, with the extra challenge that a pizza surface can expose oil to intense heat and leave obvious residue if you apply too much.
Apply almost invisible oil
Use a lint-free cloth folded into a quarter. A cloth gives you control, unlike a brush or spray, which can leave puddles. High-smoke-point oils are the sensible choice for this job. Refined grapeseed or refined avocado oil can work; olive oil is a poor choice for a high-heat seasoning cycle.
Put the cast-iron surface in a cold oven. Set the oven to 450°F to 500°F for one hour, a range described in technical seasoning workflows for polymerizing a thin oil film. Chef's Resource's pizza-stone seasoning method also emphasizes that the surface should look nearly dry before heating.
Wipe the oil across the entire cooking surface, then remove the visible excess. You're not painting the pan. You're leaving behind a trace film that can bond under heat.
Bake, cool, and inspect
Bake the cast iron empty for one hour. Let it cool inside the closed oven before inspecting the surface. Repeat the thin-oil cycle one or two additional times if you want a stronger finish, as the technical guidance recommends.
Watch for failure signals:
- Smoke during the cycle: You used too much oil. The surface should have been wiped nearly dry.
- Sticky or tacky finish: The oil layer was too heavy or didn't polymerize evenly. Wipe away residue and burn it again with less oil.
- Uneven glossy patches: The oil pooled before heating. Remove excess before the next cycle.
Never season cordierite or ceramic with this method. If your manufacturer says a baking surface shouldn't be oiled, that instruction wins.
Cooking Habits That Beat Any Seasoning
A nonstick pizza stone is mostly a launch system, not an oil project. The strongest results come from managing heat, moisture, and timing together.
Build enough stored heat
Preheat the stone for at least 45 to 60 minutes at your target baking temperature. Thick stones may need longer because the surface has more thermal mass to heat through. The oven display tells you the air temperature. It doesn't guarantee that the stone is ready to set a wet dough base.
A properly heated surface starts cooking the underside as soon as the dough lands. That quick set is what helps prevent sticking and supports a crisp crust.
Reduce water before it reaches the stone
Wet toppings create weak pizza launches. Pat fresh mozzarella dry, drain canned vegetables, and pre-cook ingredients such as mushrooms or zucchini when they release a lot of water. Don't pile sauce or toppings onto the center while the dough is sitting on the peel.
The same principle applies to the dough. A soft, slack dough needs confident handling and a lightly floured surface. If the dough sits on the peel while you search for toppings, it can absorb the dust and begin adhering before launch.
Choose a release aid that burns cleanly
Semolina gives a light, nutty toast and works well under dough. Parchment can simplify launching for beginners, while a floured aluminum peel gives experienced bakers a fast transfer. A perforated metal peel can also reduce the amount of excess flour carried into the oven.
Cornmeal is popular, but I don't love it. Loose kernels can burn and smell harsh, especially during repeated bakes. Use a thin dusting of flour or semolina, not a thick blanket.
Practical launch test: Shake the peel before you approach the oven. If the dough moves freely, launch immediately. If it sticks, lift one edge and add a small amount of dust rather than waiting.
The “three silent seconds” rule is useful in practice. After launch, the dough should settle onto the stone without dragging or catching. That clean handoff, combined with a fully preheated surface, does more for release than an oil film ever did on my cordierite stones.
Troubleshooting Common Pizza Stone Problems
Diagnose the symptom before you reach for another product. Most pizza stone failures come from excess oil, excess moisture, rushed heating, or a poor launch.
| Symptom | Likely cause | Fix |
|---|---|---|
| Black smoke during baking | Oil, cheese, flour, or topping drippings burning | Cool the stone, scrape off debris, stop oiling porous stones, and ventilate the kitchen |
| Sticky pizza bottom | Stone wasn't fully preheated, or the dough sat too long on the peel | Extend the preheat, reduce dough waiting time, and launch promptly |
| Fishy or acrid odor | Residue, factory binder, or absorbed oil releasing under heat | Run an empty burn-in with ventilation, then stop adding oil |
| Crack after preheating | Thermal shock from rapid heating or cooling | Start the stone in a cold oven and let it cool in place |
| Grey cast-iron patches | Uneven polymerized oil buildup | Scrub the affected area with coarse salt and oil, then re-burn with a thinner film |
| White streaks on cordierite | Mineral deposits or surface residue | Dry-brush gently and avoid aggressive wet cleaning |
A smoky oven after an oiling experiment doesn't mean the stone needs more seasoning. It usually means the stone has absorbed more oil than the pores can tolerate cleanly at pizza temperature. Scrape away baked-on material once the stone is cold, and don't try to cover the smell with another coat.
Sticky bottoms have a different diagnosis. If the crust is pale and flexible underneath, the surface probably wasn't hot enough when the dough landed. If the top is cooked but the base remains soft, inspect the preheat and moisture before blaming the stone.
Thermal shock deserves the strictest response. Put the stone into a cold oven, never rinse it while warm, and don't move it directly from a hot grill into cool outdoor air. A crack is a warning to change the routine immediately.
Pizza Steel Alternatives and Final Takeaways
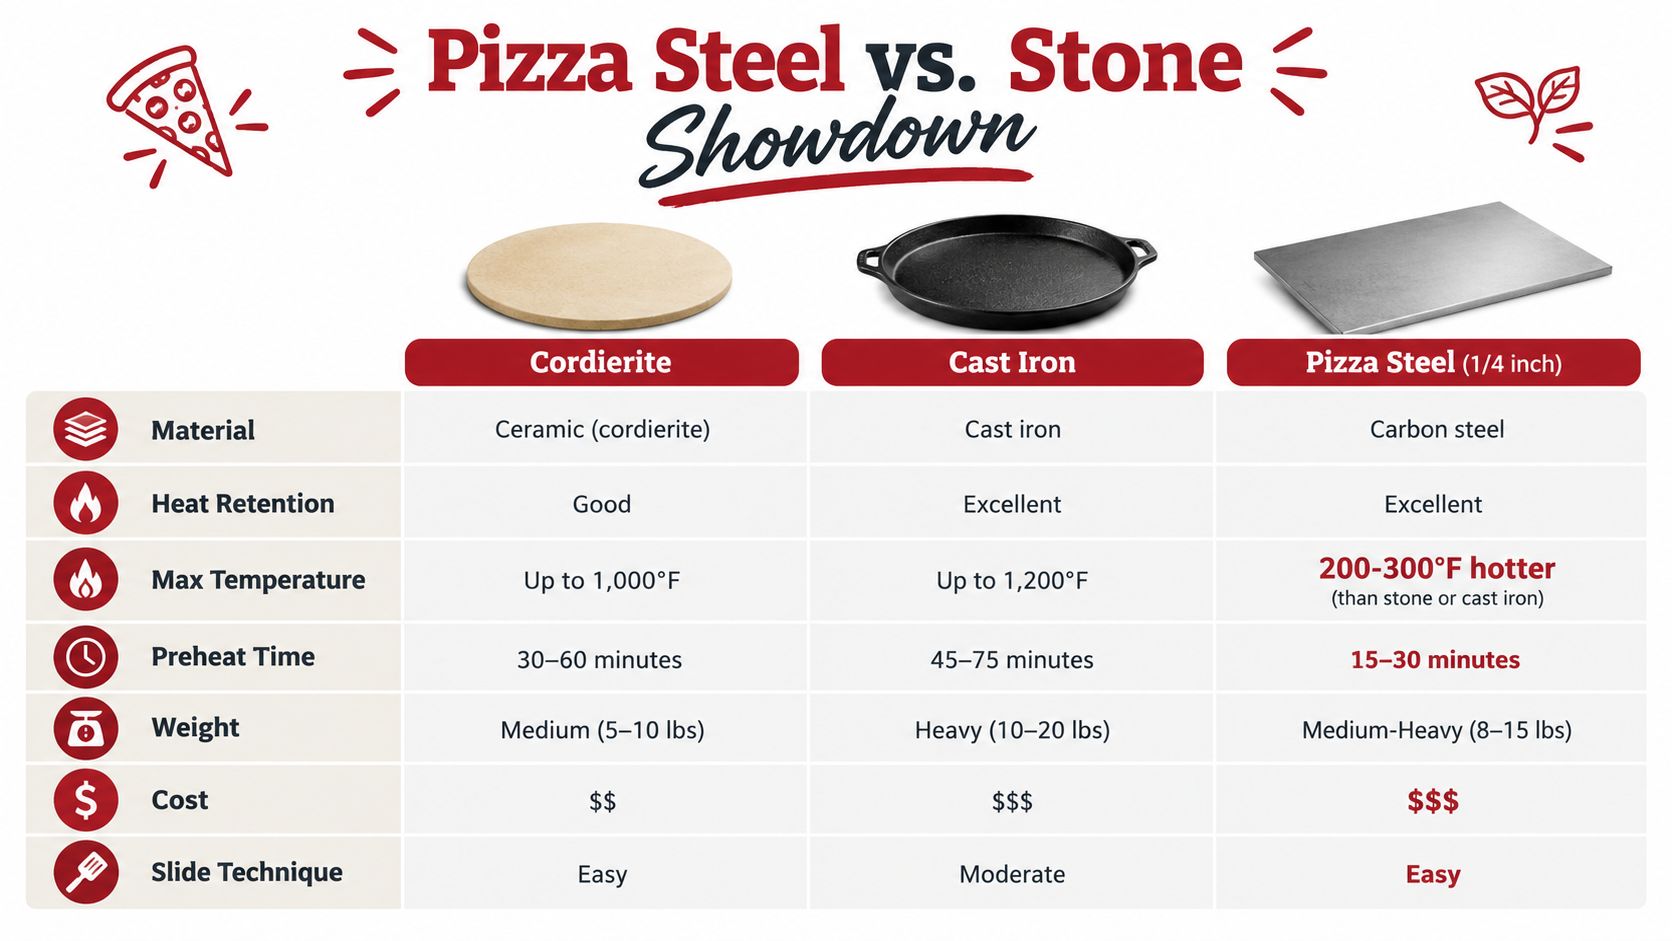
Pizza steel is the aggressive alternative to stone. A 1/4-inch steel plate can run 200°F to 300°F hotter than many home-oven stones, according to the comparison guidance supplied for this article, and that extra surface heat can produce a more thoroughly browned, drier bottom. Steel doesn't need oiling for pizza baking, either. It needs dry cleaning and protection from rust.
Cordierite is lighter and more forgiving for everyday handling. It absorbs moisture and gives dough a crisp base when fully heated. Ceramic can offer a smooth baking surface, but it needs careful temperature changes. Cast iron delivers strong heat retention and accepts seasoning, though it's heavy and requires maintenance.
Steel's trade-offs are obvious once you lift one. A thick plate is difficult to move, needs a sturdy peel, and can be awkward in an oven with limited clearance. It also demands dry storage and careful handling around moisture. For fast browning in a home oven, it's compelling. For a lighter, simpler setup on an oven rack or BBQ, cordierite remains easier to live with.
Use this pizza steel seasoning guide for metal-specific care, but don't turn “seasoning” into a requirement for every baking surface.
The five rules I'd keep
- Skip seasoning on cordierite and ceramic. Use them dry and let normal baking change the color naturally.
- Condition only bare cast iron. Apply an almost invisible oil film and remove every visible pool.
- Never soak or soap a porous stone or steel. Dry scraping and brushing are safer maintenance habits.
- Preheat for at least 45 minutes. Give the surface enough time to store the heat your crust needs.
- Prioritize technique over coating. Moisture control, a free-moving peel, and a fast launch beat oily internet rituals.
Hans Grill offers cordierite pizza stones, a Pizza Steel PRO, and related pizza tools for oven and BBQ setups, so you can choose a dry-use stone or a metal surface according to your baking style. Visit Hans Grill to compare the options, then retire the oil bottle unless you're deliberately seasoning bare cast iron.


